

Under the Red Top
making the best of life & wood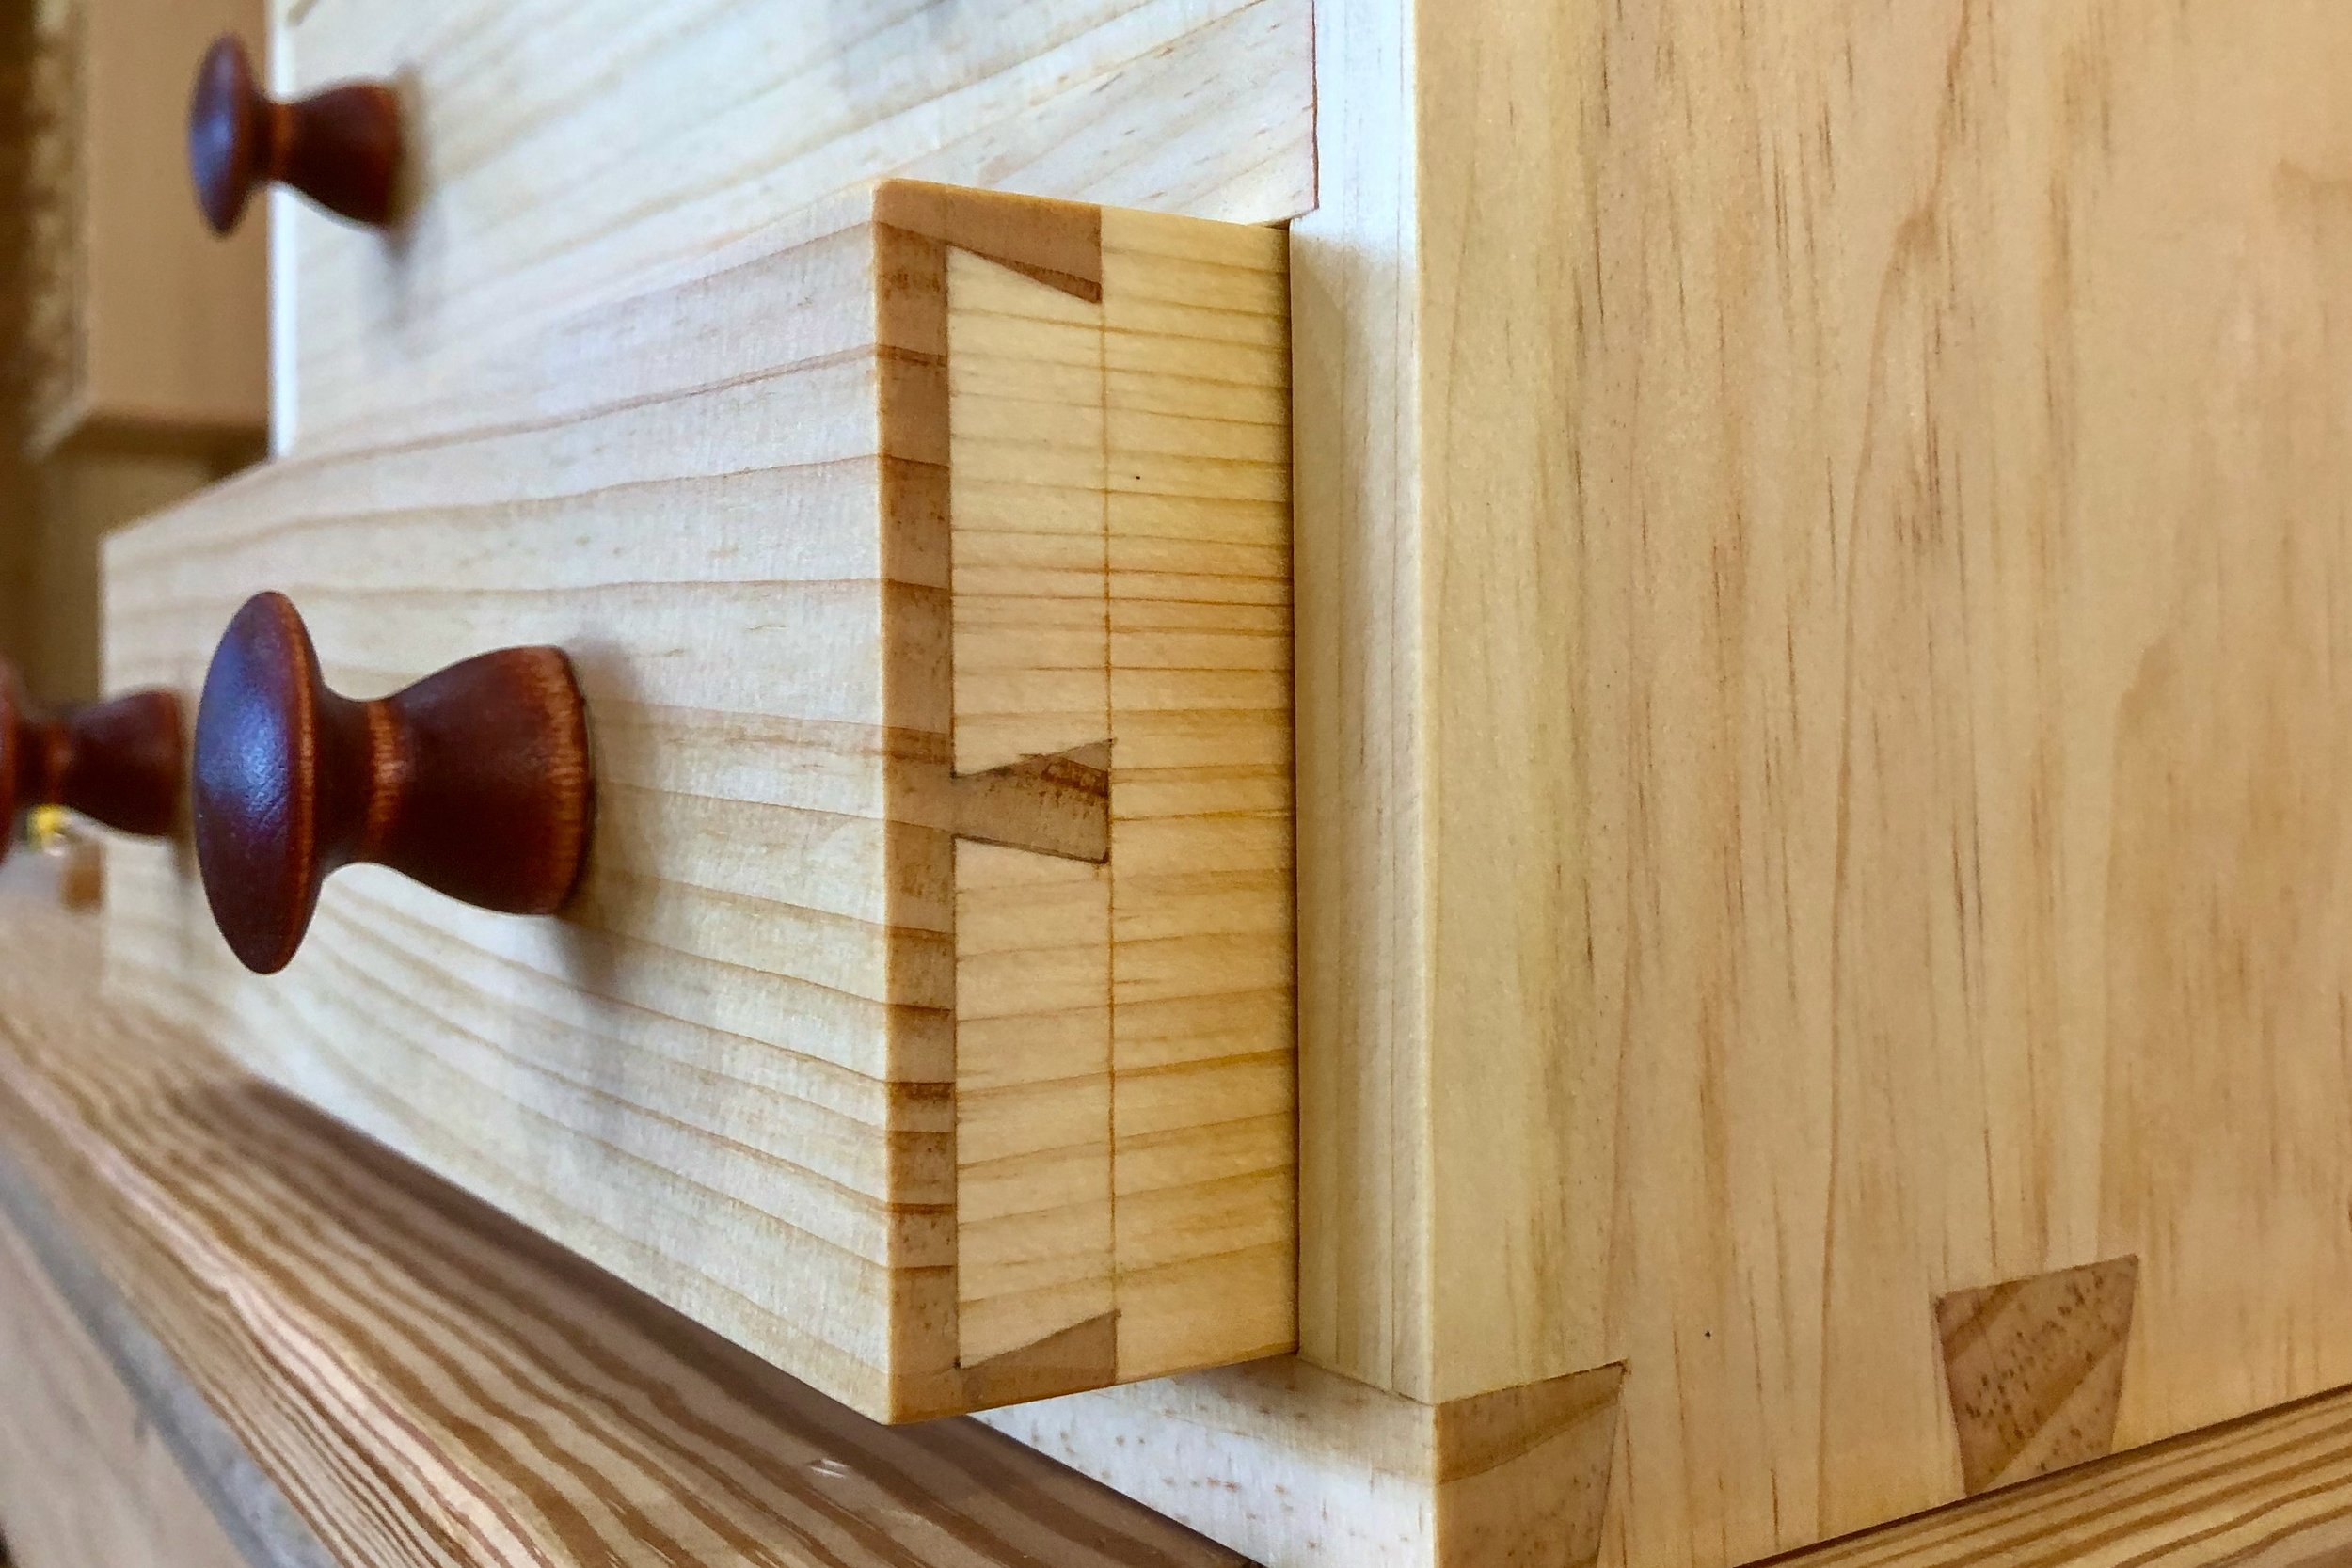


Twin Tabourets

I know … I had to look it up, too. Tabouret is one of those French words with several meanings (and spellings) that you have to coax from context. It describes my new Project, and since I had no intention of making a: 1. low one person stool; 2. embroidery frame; or 3. drum; it had to be 4. small, usually portable stand. That’s the one! - two, actually. My little sister, Lisa, had recently made a polite request for a couple of “small, usually portable stands” to be used in her home office and, of course, I was happy to oblige. In truth, I only happened upon the high falutin “tabouret” term when searching for table design ideas, but if you grew up with the lovely Lisa Renee Goulet you would agree that her tables require le raffinement. Lisa also stipulated that the tabourets be distinct from each other. Maybe the fact that she had to grow up with identical twin brothers (me & Mike) accounts for her aversion to symmetry? Anyway, fraternal twin tabourets it would be.
Design
The winning designs were found in a book of furniture plans* compiled from The Craftsman magazine founded in 1901 by Gustav Stickley, a leader of the Arts and Crafts movement in America. I had had my eye on several of the Stickley pieces in this book (clocks, desks) and was happy to now have the occasion to take action. One article, originally from the April 1905 issue, described plans for “two tabourets almost identical in construction” - bingo! The article also mentions that these would “be a useful addition to any room for the purpose of holding a jardiniere”. (Ever notice how sterile our vernacular has become, some five generations removed from the great influx of European immigrants?) Anyway, I looked it up and “jardiniere” is another French word that describes either: 1. an ornamental pot for plants; or 2. a garnish of mixed vegetables.** So this should give Lisa plenty of options. In fact, her twin tabourets were intended to support specific objects in the office and so a bit of customization was warranted. The request for a small table to support a fountain could be made almost exactly to the “Round Tabouret” plan, whereas a second table of sufficient height to support a lamp behind an upholstered chair would require stretching the dimensions of the “Square Tabouret” plan by 7 inches. Also, the original plan called for a square top, but since this was to be positioned in a corner of the room, a triangular, three-legged design was proposed. Some quick sketches were made but these were no better than my doodles from the original article.
* G. Stickley Making Authentic Craftsman Furniture: Instructions and Plans for 62 Projects Dover, 2018.
** The comedian Steve Martin famously remarked that “Those French have a different word for everything.” Recently I’ve concluded they have words for some things which they reuse on all the rest.

Materials
Since I had been making furniture for a year under the Red Top and for three years, part-time, in my former workshop I had quite an accumulation of plank end-cuts (aka leftovers) from all of the usual hardwood species . I was also the keeper of some antique wood passed down two generations from my grandfather Otto. Surely, some combination of materials from this collection could be used to make these small items. What I was searching for was a theme to connect the two siblings. Since the legs of the two would be made in the same manner, I chose the same wood for both: redwood, obtained from some very old, 2 x 4 in. planks salvaged by Otto during the demolition of something, based on the substantial fractures sustained along their 12 foot lengths. Anyway, it looked like the legs could be excised from between the cracks and these would give each piece a nice, dark foundation. The table tops are what distinguish the pair and I needed the wood to impart personalities here. For the smaller, round top I chose a striking piece of hard maple, leftover (I hope) from an upcoming desk Project. The brown grain flowing wildly through the cream colored summer wood is a pattern only Nature could conceive. The triangular top would be made of cherry, my favorite wood to work with and one whose color should pair nicely with the redwood below. Its grain is strong but not flashy. This piece’s flair comes from performing its function on only 3 legs (show off!).
Dimensioning
You know what we say in the workshop, “no grain, no pain”. Okay, what we mean to say is that “grain is a pain”. Okay, okay, nobody’s been heard actually saying those words, but I’ll bet they’ve been muttered out of earshot. Grain, the alternating layers of spring and summer growth, is what makes wood such a special building material, imparting strength as well as beauty. When things go well during a tree’s development the grain flows straight and parallel. This is most evident in the mature lower trunk. Higher up, where branching, the search for sunlight and wind effects take their toll, the grain becomes much more interesting. Wood derived from this area is where the action is at! How much action the woodworker wants to experience is up to the decisions made at the lumberyard when they select the species and, within species, the specimen board they chose to work with. Forewarned is fair-warned.
Now, power tools with sharp blades generally laugh at all wood grain. They slice through it without much notice of the divots left behind, descriptively referred to as “tear-out”. And, with some strategy to dictate the proper direction of feed into the tool, most wood can be dimensioned on a jointer, thickness planer or router with minimal tear-out damage. However, the manual version of these machines, hand planes in all of their varied designs, cannot be mastered until one appreciates and anticipates the effect of tool orientation with respect to grain. This is easy to understand in theory, but takes experience to truly know how to execute without flaw - take it from someone who does not yet truly know.
I diverted toward thoughts on grain as the wood chosen for the round tabouret top, hard maple, represents one of the most challenging materials to dimension smoothly. Tough fibers, densely packed and weaving in all directions are what distinguish this wood. To achieve the 15 inch diameter of the top, 3 boards (all derived from the same plank) needed to be edge-glued together. Use of my handy biscuit joiner works well in these applications and, while modern wood glues are reported to fasten boards on edge with no need for further “doweling”, I prefer to use biscuits when constructing table tops or any surface intended to support a load. Prior to assembly I attempted to align the grain in these three boards to facilitate subsequent hand-planning. The intention is to have the grain running “up” and through the surface of the board ahead of the plane blade to eliminate the heartbreak gouges of “tear-out”. However, the issue with this piece of maple is that the grain undulated and was variously up, down and sideways throughout the 16 x 16 in. surface. My cautious attempts to even-out the glued seams with a #4 smoothing hand plane worked well in spots but created pits and rough patches whenever the grain took a dive. It basically made things worse. So bad that I decided the best course for correction was to get out the router plane jig and zip-off the top 1/16 in. of the surface. This worked well and produced a slightly ridged terrain (think: newly mowed lawn) that could be smoothed readily with an orbital sander - much better than its precursor (think: pot-holed asphalt). Better craftsmen could have done the job with a hand plane and I aspire to be that craftsman, one day. The glued top was left in a polygon shape as the flat, square edges would facilitate subsequent manipulations. It would be liberated as a circle in the final cut.
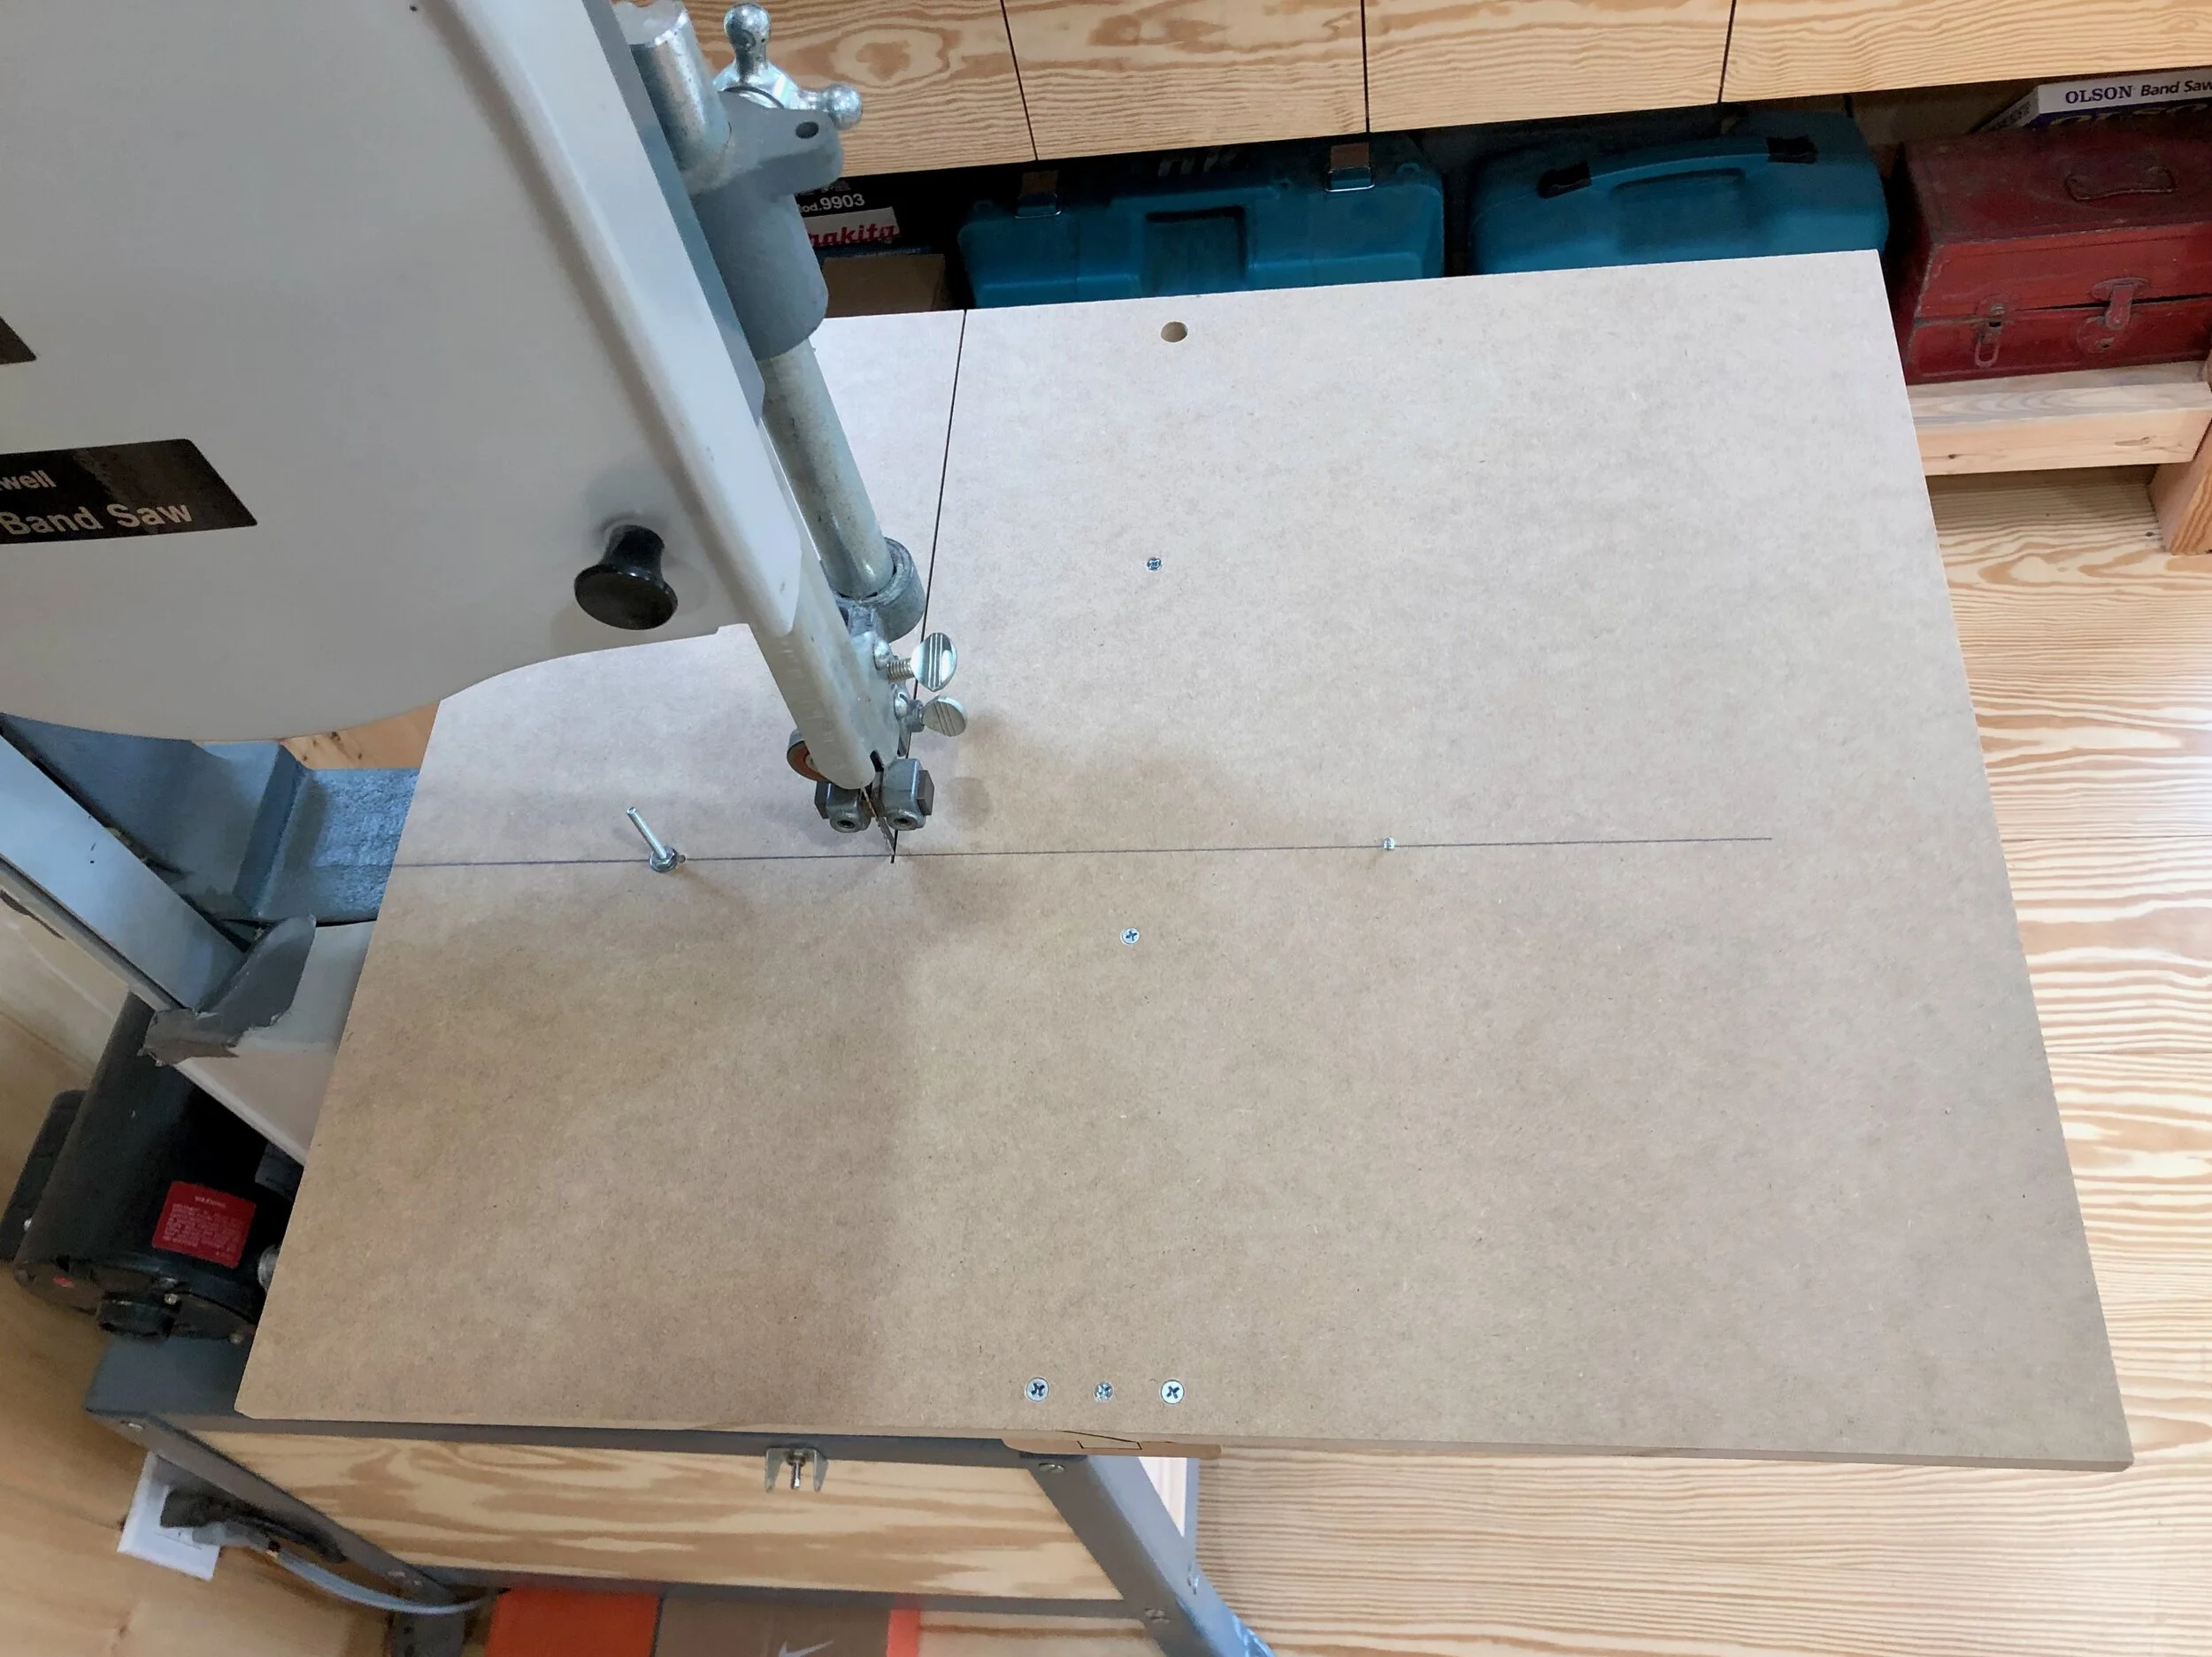
By comparison, the cherry wood used for the triangular top appeared courteous and well-mannered. Three boards were also required to achieve the 12 in. altitude dimension. I needed every bit of depth from these 5/4 boards which had already been thickness planned and didn’t dare risk another session with the router plane jig, so once these were glued, a preliminary surfacing to even-out the joints was done with the orbital sander. At this point the triangular top was cut to the final dimensions. I used my track saw to create the two long sides and then chopped off the vertices with the miter saw to leave 2 inch “nubs” at the corners.

Cutting the sides of the triangular cherry top using a track saw.
The next step was to create mortices (rectangular holes) in the underside of these tops to receive the tenoned legs. The original plans called for “through tenons” where the leg piece would protrude all the way to the upper surface of the table. This is a stronger construction method than the use of “blind” tenons, which stop part-way into the table top, and one that I would have chosen to use if the tables parts were all made of the same wood species. However, since the table tops and legs were intentionally made from different materials, I thought it best to let each element “represent” without interference from the other. It’s a design decision with minimal impact on structural integrity.
The order of operations when making this joint is to decide on the tenon dimension, cut the mortice openings accordingly, and then fashion the tenons to fit exactly within the opening. While the legs for each table differed in thickness, I decided that a 1/2 in. square tenon that was also 1/2 in. in length would do the job for both. The position for the mortices were marked on the underside of each table and then cut using a mortiser. This handy power tool is simply a direct-drive drill press designed to hold a square, hollow chisel in which resides a coarse drill bit. It allows one to accurately cut square holes in the same manner as a drill press is used to bore round ones. As a power tool the mortiser replaces the chisel & mallet. The bottoms of the tops were morticed without incident and the interiors cleaned-out smooth with a chisel. Now on to the legs.

Morticed cherry top
As mentioned, by some mysterious trauma the antique redwood 2x4’s had suffered oblique fractures along their length and so the first step in preparing the legs was to remove the cracked sections using my miter saw. This left 5 segments of varying lengths, sufficient to produce all of the leg and cross brace pieces (stretchers) from the same stock. The segments were in turn, jointed “flat” on the 4 in. surface and thickness planned to remove the rough, discolored wood along the opposite face. This produced boards with parallel sides, which were jointed again on one of the 2 in. sides. Stock prepared in this manner can be easily turned into square leg pieces by sequential passes through the table saw using the rip fence set up one leg’s width from the blade. Rip, rotate 90 degrees, rip again.


While a 1/2 in. mortising bit was used on the tabletops, upon clean-out the dimension becomes a bit wider than that. The corresponding tenons will be cut using a dado blade stack on the table saw using my new cross-cut sled to register the piece and ensure consistency within and between legs. In the event, the dado stack was built up to a blade width of 1/2 in. and raised to a height “x” above the cross-cut sled such that (2x + 1/2) = width of leg in inches. A stop was clamped to the back of the sled at the edge of the saw blade opening and this allowed the top of each leg to be tucked against the stop block and cut in 4 sequential passes: 4x(cut, rotate 90). Of course, I made a test piece first to confirm dimensions of the final tenon for each leg type. I tried to make them just a bit thick and then sanded them to get a snug fit into the mortices. Worked well.


Next, mortices would need to be cut into the legs to receive the through tenons of the stretchers. The set-up is the same as for half-tenons only a “sacrificial” board would be placed underneath the leg to receive the mortice bit as it bore through. This saves the bench from getting cut but does not completely eliminate tear-out from the exit hole in the leg, thus it is important that the “show face” of the leg be positioned to receive the mortice bit at the start of the cut (i.e., facing up). This operation went well, applying a 1/4 inch bit incrementally for a series of cuts to achieve either a 1 1/2 or 1 3/4 in. mortice “slot”, depending on the table leg. Afterwards, the openings were smoothed using a chisel.
The stretchers were prepared from leftover redwood: jointed; resawn; thickness planned to 3/8 and 1/2 inches in depth for the small and large table, respectively; and then ripped to 2 1/2 inches in width. Again, using the dado blade and sled, the tenons were cut on one side of each stretcher to the proper 1/4 in. thickness and a length that was 1/2 in. longer than the leg width. With the tables upside down and legs akimbo (see above), the half-cut stretcher could be laid in place alongside the leg and marked for the second tenon cut. This exact marking is important and will correct for any deviations that may have occurred during the table top morticing step. The second tenons were dadoed to size and all pieces then taken to the bandsaw to create 3/8 in. shoulders.
The pattern and mode of intersection for the stretchers for both tables were taken from the design of the round tabouret (see renderings above). The desired curve was sketched on card stock paper, cut out and used as a template to mark one stretcher for each table. The stretchers pairs were then placed on top of each other, taped together and the pattern cut out on the small bandsaw. Some sanding with a course drum bit mounted on the drill press and a little hand polishing made for a smooth curve which then needed to be notched in the center to allow intersection. The notching was easily done on the bandsaw by first un-taping the boards, flipping one board 180 degrees, and then re-taping them together followed by marking the center. Two incisions, one-half of the width at the centerline (3/4 in., in this case) and one stretcher’s thickness apart were made with the bandsaw. The notch was then chopped out of this with a hand chisel. For the three-legged stretcher assembly, one stretcher was then cut-off 1/2 in. past the intersection point.

Redwood legs and stretchers cut to final dimensions
Finally, it was time to cut the round top. This was a satisfyingly easy step using my home made circle-cutting jig on the small bandsaw. This jig aligns a pivot point with the front edge of the saw blade. A small indentation is made in the board to be cut at the center of the desired circle and the board then plopped on top of a screw protruding at the pivot point, previously inserted one radius length from the blade. With the saw running, the jig is slid into place, “loading” the board and positioning the saw blade at the circle’s edge. The board is then rotated on the pivot above the fixed jig and a perfect circle is sliced.

Last was a treatment of all edges. The bottom edge of the triangular top was chamfered, as were the three legs using the appropriate bit on the router table. The legs for the round table were similarly treated using a round-over bit to smooth the edges. In both cases I opted to not treat the leg edges in the area of the stretcher joint. I wanted there to be some indication of purpose to this region, much like the flare of a knee or elbow joint along an extended limb. It’s subtle but I hope it works. All pieces were then hand sanded down to 220 grit.
Assembly & Finish
The glue-up was a straightforward affair, given the nature of tenon joinery and perhaps some accumulating experience on the assembler’s part. I decided to use gel polyurethane varnish for the finish. Even with a satin gloss it should add life to all the woods and give a durable waterproof protection to the tops, but not blotch the cherry as an oil might. Four days of wipe/dry/repeat and voilà! Les tabourets sont finis!
With Love …

The New Garden

The main character in this blog post is actually a fence, but please read on.
I grew up in the countryside of rural Michigan on the family farm - never fully “immersed”. The crops raised were wheat, corn, navy beans and sugar beets but the job of raising them had been passed on to neighbors leasing our fields before I became old enough to “farm”. However, the family vegetable garden was always there. Over the years it migrated about the yard, expanding to fit the needs of a growing family of six, and providing all of the usual table vegetables with plenty of strawberries, raspberries, green beans, pickles, peas, corn and tomatoes left over for my mother to preserve. That garden grew to its 2-acre crescendo when I and my three siblings came of age. Selling tomatoes, onions, dill and pie pumpkins wholesale to the village farm stand became our summer job during the high school years. Looking back, “doing the garden” was not the drudgery that it seemed at the time and it kept us using our muscles out-of-doors. It also taught us to appreciate gardens, what a good job looked like and, basically, how to “work”. The value of those lessons far exceeded the spending money we earned. But this post is not about that 1970’s garden, nor the two small back yard gardens that were nurtured by my wife and I during our stint at family raising. This one is about the new garden that we are starting at our Harvard home.
The suburban gardening mentioned above was truly a mixed bag experience for us: a few precious vegetables and a lot of varmint control. The foe at our Westfield, New Jersey plot was the gray squirrel. While a chicken wire fence served to keep the rabbits at bay nothing could thwart the determined squirrels from getting to our almost ripe tomatoes - frustrating! Sometimes the squirrels would “dine in” on the vine, but often they preferred “take out”, leaving the half-eaten tomato core for us to find on our picnic table when we returned home from work. I tried trapping the creatures and releasing them in a park 5 miles away (beyond a divided highway) but this “resettlement”, while satisfying, eventually became a Sisyphean chore. In the end we resorted to raising plants that squirrels would ignore: lettuce, pickles and herbs. Our Lexington, MA home bordered a woods and the two raised bed gardens were immediately beset by squirrels, and also chipmunks, rabbits, groundhogs and turkey. Yes, turkey love to peck at pink tomatoes. Fenceless, it eventually flourished as an herb garden. We now share our Harvard yard with all of those critters plus raccoon, deer and bear, but I am determined to go “once more unto the breach”, and this time win!
My foolhardy(?) optimism is based on all of the fences we observe while walking the roads in our neighborhood. Everybody has a garden of some sort and they are all fenced. I figure the fences must be serving some valuable purpose. During the summer of 2020, after completion of the Red Top Workshop, we created our garden comprised of four (4ft x 8ft) raised beds that were terraced to accommodate a sloping backyard. It was a lot of work to pick axe these plots out of the rocky New England “soil” (thanks! again for the help Ben, Andrew, Greta), and we think they turned out nice. The final act, as I saw it, was to surround them with a fence that we would not grow tired of looking at and trust that said fence would also be the barrier needed to grow vegetables in “varmintville”.

Raised bed garden before fencing
Design
Since the garden perimeter is small (12 ft x 16ft) I wanted to keep the overall height proportionately modest. I also wanted to avoid two features found in many backyard garden fences: metal posts and sagging wire. After mulling these requirements all winter, researching in books and comparing the various fence philosophies found online, I arrived at a design. I would use 4x4 pressure-treated (PT) pine posts mounted to the garden frame at the natural vertices and these would support rectangular fence “frames”. The frame members would be fabricated in the workshop from dadoed 2x2 PT pine and they would enclose a sturdy wire mesh made from livestock feedlot fencing, specifically something called “hog panels”. The Pros of this design include: no concrete post footings; no sagging wire; short stature; while the Cons could be: fence openings not narrow enough to prevent invasion; short, 3 foot height could still allow deer to browse overtop. To mitigate the potential deer issue I would plan to put the large tomato plants at the interior of the garden. If the holes of the feed panels proved to be too large I could always back them up with a finer wire mesh and still avoid sag. Of course, squirrels and other climbers can still maraud at will, but that should be the case in all of the neighborhood plots … yet they persist. There are certainly other gotchas awaiting but at least I had a plan supported by a strategy. A simple drawing on graph paper helped me to be sure the proportions and fastening scheme of that plan would work.


The planning to get actual dimensions and dado specs happened in the workshop sketch book while pacing about the garden timbers, tape measure in hand. I show a scan of this book to reveal how many projects are, in fact, made; from crude sketches quickly jotted down as new ideas or solutions are conceived. It’s ugly and sometimes involves the back of an envelope, but it generally works. From there I was able to plan for the lumber and hardware purchases.


Materials
I secured the 8ft long 4x4’s and some 8 and 12ft long 2x4s in time to clamp & dry them for a few days before starting the project. I also got 4 hog panels from a local farm supply store. These unwieldy things are 16 feet long and weigh 32 lbs apiece! Farmers may be the fittest humans on the planet not drawing a 7-figure sport salary, bless ‘em! Add a couple dozen 6 in. lag screws, some 2 in. deck screws, a pair of hinges and a latch, all galvanized, and it turned out to be a $350 investment in materials. Not bad, considering the excitement that is brought about by accumulating a pile of raw material that you know will soon be turned into “something”. Sort of like collecting 64 college basketball teams in early March and knowing that in a few short weeks a champion will somehow emerge. “Hey honey, we should really book that $350 against our entertainment budget this year. What do you think?” (Silence)
Dimensioning
This fence has only three wooden components: posts, frame members and a door. These all serve to support the 4 gauge wire panel fencing. In that sense it is a simple project. It’s really a “production” project given the repetitive nature of turning out 8 posts and over 150 linear feet of fence frame. Making the posts was an easy operation. To provide a 2 in. “knob” above the fence height, each post would need to extend 39 in. above the garden frame. This would be accomplished by cross-cutting the 96 in. long 4x4s in half , yielding a remainder 9 in. portion (96/2 - 39 = 9) at the bottom for fastening to the sides of the garden frame timbers. The plan was to avoid pouring concrete footings and rely on the stability of the timber-framed garden bed to support the posts. To provide two perpendicular surfaces of contact with the timbers the posts were notched to create a 2 in. x 9 in. rabbet on the bandsaw. The 2 in. portion of the post that laps over the top of the garden timbers would also provide an attachment surface for the fence frame. After all the posts were prepared they were clamped snugly together so they could continue drying without “losing their figure”.
The dimensions of the frame members were likewise chosen to be easily obtained by halving a raw material, this time by ripping down the 8 or 12 ft. length of 2x4s on the tablesaw. I don’t especially enjoy using my furniture-making tools for cutting wet, PT wood, but I thought purchasing a contractor’s tablesaw for the occasional backyard project would be extravagant. (Didn’t even bother to ask.) I would just use old/inexpensive blades and clean them off afterwards. The sawdust thing is a bigger issue. Contact with the chemicals used to treat lumber should be avoided but these are not readily rubbed off on hands, clothes or tools as they are pretty tightly associated with the wood fibers. However, that means it is even more important to avoid ingestion of those fibers as sawdust. In practice, PT lumber is usually dimensioned by cross-cutting the planks to length with a circular saw, out-of-doors, and then fastening them to the Project. Thus, there is not a big concern with dust exposure in that setting. My plan was to rip PT material to non-standard widths and then dado slots into these pieces. Both of these operations would be done indoors and both create substantial amounts of sawdust. The vacuum system in my workshop does a good job collecting dust as it comes off the tool, but further measures: frequent floor sweeping; air filtration; and, most importantly, donning an N-95 dust mask were taken. Probably a good idea to give the whole shop a thorough dusting afterwards, too.
Anyway, cutting the damp 2x4s went smoothly using a thin, 24-tooth ripping blade on the tablesaw. It was fascinating to observe the pent-up grain tension in some of these southern yellow pine planks. Sliced along their length the wood in many of these straight 2x4s bowed or crook’d substantially upon being “released” as 2x2s - bother! The next step was to cut a 1/2 in. deep groove (dado) down the center that would be wide enough to accommodate the width of the wire panel fence (5/16 in.). To keep the groove in the center of the frame and of uniform depth, the bent-up 2x2s would have to be brought back into line, at least momentarily, during that 4 inch stretch when they pass through the dado saw blade. This was accomplished by creating a “channel” composed of a rip fence on the right, a feather board on the left, the steel table of the saw below, and a stout piece of wood clamped above the blade. In truth, 3 out of these 4 directions (E,S,W) are constrained in the same manner when making most cuts on the tablesaw. It is the presence of the “bullying” fence north of the blade that was crucial to getting accurate dados in these boards. Once the framing stock was milled it was cut to the proper lengths on the miter saw.

Constraining the wood on all 4 sides was critical to making accurate dados in the warped frame wood. Completed groove shown on the piece at left.
Design and construction of the door was put off until after the fence was erected. I wanted to see how the wire panels “behaved” once slotted into their grooves to determine how much of the door should be allocated to wire versus wood. (I’ll describe it’s construction here, though.) I found the wire panel to be suitably stiff when braced upright by the frame, so it would be used in place of wood for the door “panels”. My concern with the 40 in. wide door was avoiding warp and so I decided to make it “substantial”, using 2x6 PT boards for the frame. With an extra, center stile this 37x40 in. door consumed almost all of two 8 ft. planks. After cutting to length I dadoed 3/4 inch deep grooves along the interior sides of the stiles that would secure both the wire panels and the tenons made at the ends of the top and bottom rails. This is referred to as a “square-stuck” frame and is easy to make. My only modification was to skip the dado on the horizontal (rail) portions where the wire panel rests. My fear was that the resulting 3/4 in. deep “gutter” on the bottom rail would hold rain water and somehow hasten the door’s destruction. I opted instead to drill holes to incorporate the vertical wires of the panel. This made for a remarkably sturdy structure once the wire panels were tapped into place. The door, which resembled those chunky, Big Little books that we read as children, was fitted with spring-loaded “screen door” hinges prior to hanging as the last step of assembly.


Assembly
Assembly for this Project would be done at the job site, itself. (Love that phrase: job site.) To begin, the posts were seated at strategic points about the perimeter, squared against the garden frame, made “plumb” with the help of a carpenter’s level and then secured to the garden timbers using a pair of 6 in. lag screws. In actuality, the four front posts were installed first and then the two, 4 ft. front fence frames were constructed, just to be sure things were going to work-out as planned.


On YouTube, I saw similar frames made on the floor of a garage, then carried to the yard and shimmied into place between two posts. While that would work for this application, since the panels sit on the garden wall it was easier to construct the fence panels in situ. This also provided the opportunity to straighten the frame pieces in the process. I first laid down the bottom member, cut to fit exactly between two posts. For some this was preceded by screwing down a “training” 2x4 board to the garden timber alongside the position of the frame and then clamping them together so as to make the crooked frame member straight for fastening to the timber with 2 in. screws. The two side members, all cut to a uniform length of 33 and 5/8 in., were then mounted perpendicular to the bottom frame by screwing into the posts. These “troublemakers” also required some straightening-out, accomplished by clamping each to a 4 ft carpenters level mounted alongside. This method creates a “U” shaped partial frame into which the hog panels could be slotted into. The panels needed to first be trimmed to size with bolt cutters beforehand. Lots of measuring, snipping and then trimming to get the fit right, but I was impressed at how well-made and “square” these panels were. Good product! The capping frame member, selected from among the straightest of the dadoed 2x2 stock, could then be cut to length, placed on top and secured with screws at each end.


The job went well, methodically fencing the space between posts, one panel at a time. Except … the “12 foot” section at the back of the garden turned out to be precisely 12ft., 2 and 1/8 inches between posts. You guessed it, 2 and 1/8 inches longer than the 12 ft 2x4s that I had already ripped and dadoed. That cumbersome process had involved opening the door of the Workshop behind the tablesaw to accommodate the hind end as it was being milled - no desire to replay that scene with even longer stock. Plan B was to purchase, prep and interdigitate one additional 4x4 fence post in order to use the 12 foot frame pieces, now cut in half. Plan B worked well and breaking up that long run of panel probably made for a sturdier fence, in the end.

Fenced garden before door installation
Door installation and trimming went just like the cabinet-scale work to which I am more accustomed. The screen door hinges re-seat the door with a satisfying ‘clank’ upon release. It’s a farming sound, actually.

View from the deck (note turkey skulking at right)
Wonder Wood

“I’ve got a great idea!”
“What?”
“Let’s soak some boards in preservative chemicals. We can use high pressure and really saturate the stuff. Yeah!”
“And then we can let it dry out on the shelves of the Box Store and see what happens?”
“Oh, right …”
Something tells me this simple exchange has yet to occur. Don’t get me wrong, I think preserving wood by pressure treatment (PT) has its place in the world. I just wished somebody would have figured out how to dry the stuff afterwards so that it could be easily worked without experiencing debilitating warp. As it is, the lumber is usually received at the store and then sold to the public sopping wet. And unless you can take your purchase home and immediately build a project that is heavily fastened you’ve just bought yourself a stable’s worth of light green bucking broncos. It might have been better to pick among the dried up loners at the back of the pile, hoping to find a couple tame ones, but whenever I am able to think ahead I buy my stallions waterlogged and true. I then “break” them in the garage by clamping together, interspersed with stickers (thin wooden spacers), for a month of drying. I believe this achieves some good, but it’s the thinking ahead part that usually fails me.
Ever wonder about that wood? While garage-drying the wonder wood for a recent project I spent a few hours online trying to demystify the whole PT lumber thing. The Treatment refers to application of preservative chemicals under high Pressure. During this process the wood is first subjected to vacuum to eliminate air trapped within its pores followed by flooding with an aqueous solution of preservative chemicals. This is then pressurized up to 160 psi to fully saturate the cell structures within the wood. After draining, the now green-tinted planks undergo a period on the “drip pad” to (ahem!) dry off before shipment.
It turns out that not all light green PT lumber is the same, and one should read the tag stapled to the end of every board to understand the product before purchase. This informative label both describes the “type” of treatment administered and prescribes the board’s most suitable use. In fact there are 12 different “use categories” (UC) recognized for treated lumber and these are listed on the AWPA (American Wood Protection Association) website. Each category is assigned a 2 digit alphanumeric code which indicates the intended use and, thereby, defines which of the 15 different(!) chemicals or chemical mixtures are to be employed in the PT process. My project required both 4x4s and 2x4s which I acquired in the commonly available, less than perfect #2 grade. Their product tags are shown below.


Typically 4x4s rest upon, or are partially buried in, the ground and so this material is listed as UC4A, Ground Contact General Use. UC4A lumber can be preserved by any of 8 different chemical mixtures; all containing copper of some sort. The label on my posts indicate that the preservative MCA-C (micronized copper azole, type C) was used at a concentration sufficient to produce a minimum average retention, once the process is completed, of 0.15 pounds per cubic foot (pcf). MCA-C is a preservative composed of two chemicals: micronized copper particles which impregnate the wood with microscopic copper nuggets that slowly dissolve (over decades) to act as a general toxin, or “biocide”, retarding wood decomposition caused by algae, fungi and insects; and tebuconazole, an antifungal from the “azole” class that eliminates those species that can tolerate copper. The azole antifungals act by inhibiting an enzyme unique to fungi that results in disrupted cell membranes and death. As in all PT lumber there may be a trace of colorant added, too.
In contrast, the similarly green colored 2x4s I purchased are listed as UC3B, Above Ground Exposed Use. To enable this use they have been treated with EL2 (DCOI-Imidacloprid-stabilizer) at 0.019 pcf. Okay … what is that?, you ask. EL2 is a cocktail of 3 chemicals. The inactive stabilizer component is probably there to inhibit chemical decomposition or to retard leaching of the two “active ingredients”. DCOI, an acronym for 4,5-Dichloro-2-N-Octyl-4-Isothiazolin-3-One, is an approved chemical to kill fungi, purported to be otherwise environmentally benign and broken down rapidly if/when it leaches from the wood into water or soil. Imidacloprid, a generic name for the insecticide N-{1-[(6-Chloro-3-pyridyl)methyl]-4,5-dihydroimidazol-2-yl}nitramide, acts to mess up the nervous system of wood boring insects (termites, beetles, ants) by binding to a key receptor on nerve cells and preventing acetylcholine from transmitting pulses between neurons. Wait a minute, you say, “me and my pets also rely on acetylcholine to do the same thing!” Correct, but since imidacloprid was invented (in 1985 by a Japanese agrochemical company) to bind to the insect form of the receptor much more tightly than to the mammalian version, it can be applied as a pesticide in concentrations far below anything that would affect us (or Fido). In fact, imidacloprid under its various trade names became the most widely used insecticide in the world by 1999. Its chemical structure (below) resembles that of human therapeutics only with a couple of extra nitrogen atoms thrown in at oxidation states generally frowned upon by the FDA. Good enough for lower eukaryotes, though! Imidacloprid is off-patent now and, for extermination purposes, has been replaced by more effective/selective pesticides. It has recently been put forward as a contributor, albeit indirectly, to colony collapse disorder (CCD) which has devastated the honeybee population in recent times, and much research is ongoing to tease apart this complicated story. But traces of imidacloprid, as a component of EL2, and locked into the fibers of 2x4s is thought to be “safe to all”. Still, it makes you wonder how many times that phrase has been confidently used and then retracted over the years. For example, Chromated Copper Arsenate (CCA), the first highly effective, non-creosote wood preservative and in use since the 1970s, was only removed from the residential application market in 2003, acknowledging that the need to preserve wooden decks is subordinate to a desire to limit highly toxic chromium and arsenic from the environment. What took so long?


So that’s a bit of the story behind PT lumber. I call it “wonder wood” because it is remarkable that by putting preservatives into the wood, as opposed to onto the wood (e.g., paint) one can use this versatile, renewable material for the construction of maintenance free structures. And by vastly extending the lifespan of patios, telephone poles, fence posts, and bridges it contributes to human safety and reduces the amount of timber that would otherwise be cut to replenish rotted structures. There are pros and cons to this product to be sure but, with knowledge, one can work responsibly and safely with PT lumber. Certainly, knowing what clings to the sawdust generated when cutting this material should prompt the use of gloves and a dust mask. I sometimes treat myself to a shower afterwards, too.
Thanks for sticking with the chemistry on this one. It’s good to learn the backstory of the items we use, and I hope to have provided a bit of knowledge enabling the backyard carpenters among us to proceed in an informed manner. That was the intention of this blog. Well, … that and to shine a light on the whole wonder wood warping scandal.

Whoa! horsey.
The Spirits Cabinet

Koreans like to drink soju. Why? … good question. Literally translated, soju means “burned liquor”. And while that could describe its aftertaste, it probably refers to its production as a distillation product of fermented starch. Since the 13th century that starch had been rice but the production of soju from rice was banned for 35 years in the late 20th century (1965 - 1999) to address a food shortage associated with the post-war population boom. (Did I mention that Koreans drink a lot of soju?). During this period sweet potatoes, wheat, barley and tapioca were used as rice replacements and some mix of these remain as ingredients, today.
Just as many liquors have a specific country association (you know the ones: vodka; rum; sake; tequila) soju is Korea’s beverage. The most famous brand of soju, Jinro, is also the most popular liquor in the world, selling nearly 90 million cases annually. And yet, in the West, among any three spirits (say, wine/sake/soju) it is clearly “the other guy”*. Nevertheless, in Korea soju is a very popular social beverage with a respected etiquette associated with who pours, and etc. It is actually a mild tasting drink, almost always swigged “straight” and with an unstated intention that goes something like: Look, YOU want to get hammered, and I want to get hammered, so let’s get on with it. Over convivial talk and delicious banchan (side dishes) the small drinking cups are repeatedly filled and then slammed in single gulps, the goal being to get the “burned liquor” out of that cup and into your stomach with as few sensory inputs as possible. It works, too! I participated in this ritual one evening (and dreadful morning) while in Korea to celebrate my sister-in-law’s wedding. I’m good for now.

Under the influence of soju. (Cheju City, South Korea - March 1990)
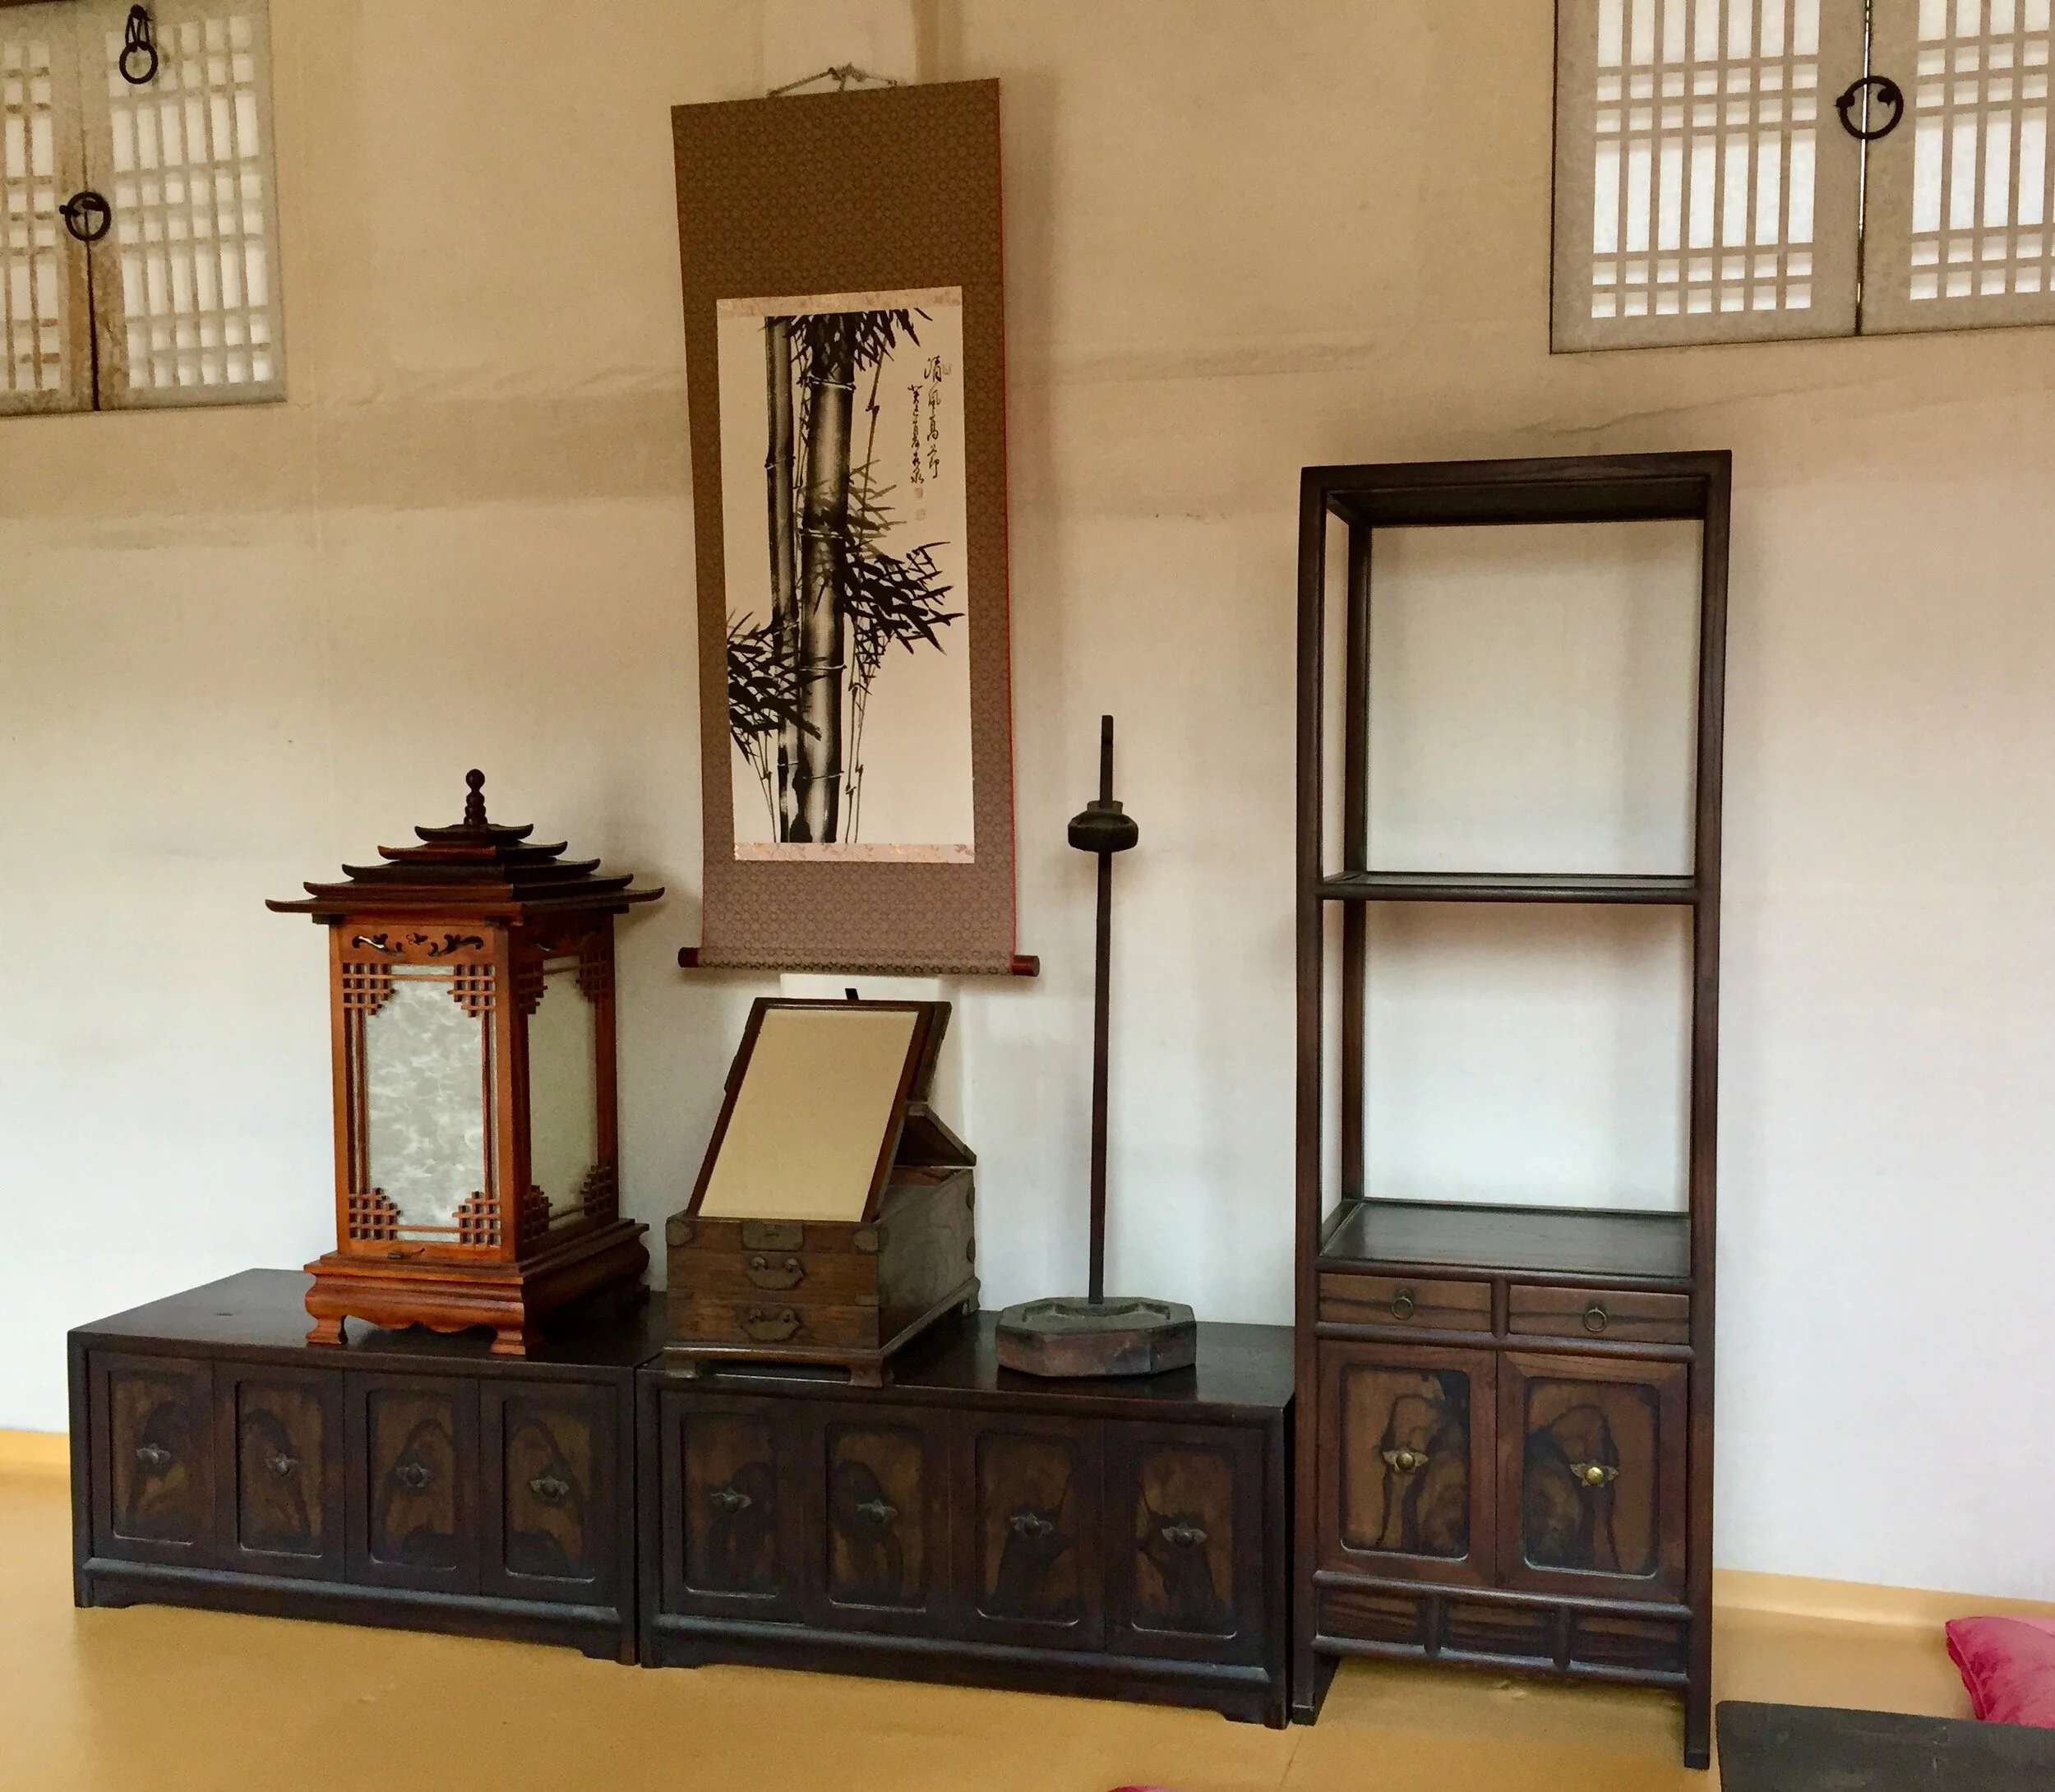
Let’s get on to business … This blog entry is about my latest project, a spirits cabinet based on the traditional Korean kitchen cabinet design. I was very excited to begin this project, both because it was my first commissioned piece from a non-relative, and because I want to keep exploring how traditional East Asian furniture can find their purpose in today’s homes. As an aside, I find it interesting how traditional kitchen furnishings from Korea, Japan and China differ in form while serving the same household function. From my own observations, the traditional Korean kitchen cupboard is the most modest in size, possessing doored compartments and, often, open shelving. In contrast, classic Japanese versions are more substantial in mass and incorporate both doors, drawers and smaller compartments. Chinese examples vary in size but tend to be tall cabinets, with later pieces featuring intricately carved doors to ventilate compartments used for storing fruits and vegetables. All are fine designs that would have utility in today’s home, but the Korean version seems most suited for the special purpose of liquor storage. The dimensions provided by the customer also fit within their canonical form and so it was agreed to proceed along this front.
Design
Once it was decided to go Korean, the remaining design decisions related to door style (sliding or hinged) and whether the lower compartment should have doors or exist as an open shelf. As a kitchen item the versatility of open shelves is compelling, and I had already made a prototype of this form, but for a more refined furnishing it was decided to enclose this space with (hinged) doors. The piece is made of framed panels, inspired by a venerable example from the early 1800’s that I found in the premier reference book on this subject, Traditional Korean Furniture*. Many Korean pieces use the panel construction method and this, along with their appreciation of wood grain, leads to some spectacular looking wood pairings. Perhaps most prized is the use of persimmon wood as panels. Persimmon’s dramatic orange and black grain pattern within a subtle, pear or paulownia wood frame is a signature look for fine Korean cabinets. These would be used in the living space and not in the kitchen, but that also fits for the purpose of the cabinet under construction. I was able to appreciate a few examples up close at the Namsangol Hanok Village during my last visit to Seoul, and was inspired to do my best using the Western Hemisphere woods at my disposal. For our cabinet it was decided that the contrasting colors of a black walnut frame with cherry panels would provide the desired look. Exploiting the grain patterns in book-matched cherry panels would serve as the homage to persimmon.
* Wright, E.R., Pai, M.S. Traditional Korean Furniture, Kodansha: Tokyo, 2000.

The hardware on Korean furniture is generally made of brass or iron, adding a golden or black metallic feature, respectively. Rarely will you find silver-colored metals or wood used as handles on traditional pieces. Today, there is much more brass hardware produced in traditional East Asian designs than iron, however, iron was typical for kitchen cabinets and black colored hardware was preferred by the customer, providing me an opportunity to scour the internet and add to my “source list”. (Borrowing from the Materials section) I was able to locate a classic, round door hinge in matte black finish from a Korean vendor on eBay. The matching colored knobs were found stateside from a high quality cabinet hardware store.
So, with the basics of style, dimensions and materials settled it was time to draw up more detailed plans. I find it useful to do this in two stages. The first is a rough plan that both serves as a visual for the customer, defining “what will be made”, and also facilitates a comprehensive accounting of parts and their dimensions, important for generating a so-called “cut list”. The cut list, sometimes referred to as a “mill bill”, serves as the shopping list to be used at the lumber yard. It purposely exaggerates the size of each part to allow for milling waste (end scraps and sawdust) during the dimensioning step. The second set of plans are more detailed and describe both the exact measurement for every part and the location of all joint features, in this case dados, tenons, mortices and rabbets. While it is good to have a numeric (in inches) associated with each part/feature, in the workshop you will generally fix the dimension of one component as being the result of a cut, say the actual width of a dado slot, and then mill the associated parts, in this case the cherry panels, to best fit within that slot opening regardless of exact numerical measurement. The same goes with the other elements. In the end, the mortice opening defines the tenon size; door cavity (minus clearances) defines the door size, etc.


Materials
The woods for this project are black walnut, cherry, ash (interior rails) and birch plywood (shelves and backboard). These are common materials and easily sourced in New England. Since my objective was to highlight the cherry panels, the best cherry lumber supply would determine which yard to visit. I needed to find suitably wide boards (~8 inches), that measured one inch in thickness (what is known as 4/4 or “four quarter” at the lumber yard) and in plentiful enough supply that I would have a selection to choose from. The goal would be to find a choice specimen that fit those dimensions and was of sufficient length (~10 ft) so that all of the 12 panels could be cut from the same board to ensure harmony of color and grain. I also needed a ~7 ft length of thicker, 5/4 cherry to use as the table top. Now, boards in these sizes are not difficult to find, it was the potential for variety that sent me to my favorite lumber yard an hour’s drive north into snowy New Hampshire. Upon arrival, I found the walnut, ash and plywood without difficulty but the cherry stock was unexpectedly sparse! Some other wood species were also low or SOLD OUT. Apparently the COVID-19 pandemic had served to both heighten demand while reducing the production of popular building and craft materials and my cherry boards were swept-up in this calamity. Of the three 5/4 boards that were both wide and long enough for the top I was able to settle on a nice, knot-friendly specimen containing only a bit of sapwood on one edge. The key 4/4, panel-generating board was selected from among eight or so picked-over planks. These all had their own hard luck stories evident beneath rough exteriors but I was pleased to select the, albeit sapwood laden, pick o’ the litter which exhibited a rather fetching grain pattern. Of all the natural defects present in furniture lumber I find sapwood (the lighter-colored, “live” portion of a tree lying just beneath the bark and surrounding the “dead” heartwood) to be the most endearing. I actually try to include a glimpse of sapwood in every item I make and this piece would let me continue that streak. Happy to escape from New Hampshire pestilence-free and with all lumber in-hand it felt like a victory.

Korean Spirits cabinet (raw materials)
Dimensioning
After allowing the wood a couple weeks to acclimate to conditions in the workshop it was time to get serious about making something. I first marked the wood in crayon to show where each of the pieces would be extracted and was gratified to find that the project would completely consume the cherry boards and with a bit of walnut in excess. The 4/4 cherry board would only need to be bisected by resawing and then planed & cut square to the panel dimensions. The heftier 5/4 board would be planed to the desired thickness, cut into two 36 inch lengths, ripped (cut lengthwise) to 6 inches in width and then glued together to make the tabletop. Not a lot of operational risk with the cherry pieces. However the walnut, once cut to lengths, would required all manner of manipulations to create grooves, slots and notches (aka dados, mortices and rabbets). These operations provide many chances to make a mistake so some extra stock is warranted. But, in the end, I’m happy to report that these operations all went swimmingly, including the miter cuts to make the framing for the doors and top. Andrew’s home made picture frame jig did the trick on the table saw for all but the two longest pieces. These were even one inch(!) too long for the guide on my miter saw bench, but a MacGyver-like table extension was cobbled together to (as always) save the day.


Assembly & Finishing
Once all of the 53 individual wooden parts had been cut to dimension, it was time to see if the plan worked by way of a pre-assembly operation known as the “dry-fit”. Two things are accomplished in this exercise: ensuring that all the pieces fit together as intended; and rehearsing the order in which the pieces will be joined and glued during final assembly. Since all of the cherry panels will “float”, unglued in the final piece the dry-fit was all about the walnut, ash and plywood parts. It took a couple of attempts to learn the best order of assembly but the dry-fit was successful and this “first draft” assembly revealed the few spots where either the joints were too tight or where gaps existed in mated boards. These trouble spots were noted with tape and easily remedied with a chisel upon disassembly. This rehearsal also confirmed that I was deficient in clamps … yes, get more tools!

I mentioned that the panels would not be glued to the frame - this is an important, invisible design element. Left un-glued and tucked snugly in their dados they will be free to expand and shrink as humidity conditions change without risk of cracking or warping the cabinet. Assembly will require a neater-than-usual glue application to avoid squeeze-out from clamped joints that could unintentionally fix the panels in place. Floating panels also require that the final finish be applied to the panels prior to assembly so that if/when they shrink over time they will not expose outlines of unfinished cherry. Varnishing beforehand also ensures that the finish, itself, will not unintentionally cement the panels to the frame. It’s actually easier to finish wood in the horizontal position so there was no inconvenience, just a few additional days added to the schedule. I used gel polyurethane varnish to finish the cherry boards, and I am now hooked on this product. The gel wipes on (and off) with a cloth rag and dries sufficiently during this process to eliminate the possibility of catching dust during the subsequent final drying periods - no additional sanding required. The gel material also contains far less volatile organic solvent than traditional surface coating materials (oil varnish, shellac) making things easier on the furniture maker as well as the planet. It’s not for every application, but it does seem like “the future” and I’m sold! Three coats in three days and it was then time to mate the cherry with the walnut.
As the walnut stock used for the carcass appeared to be lighter in color than the material used to make the door frames I decided to stain all of the pieces with a walnut colored (gel) stain. This would darken the wood a bit but the intention was to lessen the color variations between and within boards. After all, the walnut’s purpose is to frame the cherry, not compete with its statement. All pieces were sanded to 220 grit but it was anticipated that after the door frames and carcass were put together some additional sanding would be required to smooth the joint seams and so, with the exception of some stain applied along the interior edges, the bulk of the walnut would be stained and varnished after assembly.
While waiting for the new bar clamps to arrive I set about making the four doors and table top. These were put together in the same manner that picture frames are constructed, only in this case the picture (cherry panel) is inserted prior to glue-up of the miter-jointed walnut frame. The frame pieces were held in place during assembly by a strap clamp which worked perfectly. With only one such clamp I could glue a frame in the morning and then, after it had dried, another frame overnight. The 4 doors and table top were thus completed in a three day span. Once the shiny new clamps were in I enlisted the help of my eldest son, Ben, to assist in the carcass glue-up. This was a challenging assembly operation with tenon “vectors” pointing in all three directions, 4 large plywood boards and 8 floating panels. Including the “dress rehearsal” where Ben and I discussed and refined our strategy this operation went on for almost 3 hours (with a couple “what in the … ?” moments) but it all came out fine in the end. Whew! I imagine that these will become more routine over time and that would be welcome.


In addition to the final sanding and finishing steps mentioned above, the last major operation was the hardware installation to affix the doors and top to the cabinet. These are the only places where screws are employed. The hinges used are the “surface-mounted” type found on Asian furniture as opposed to the “butt” variety used for most furnishings in the West. Fine Western cabinets will generally have the butt hinge plates hidden within mortices chiseled into the edge of the door and frame, exposing only the hinge pin. In contrast, Asian furniture makers opt to display the hinge on the outside. These hinge plates are often decoratively shaped, allowing this utilitarian element to also add charisma to the piece. The round hinges used on this cabinet will do their duty in the charm department, the only trick is mounting them “square” without any straight edges to reference. I relied on accurately marking the coordinates of the central screw openings. With each door lying flat on the workbench, I mounted their hinges at the central point and then squared the pin to the edge of the door before drilling the remaining holes to get it right. Mounting the doors within the cabinet opening was a matter of evening-out the clearances between the doors and the frame. Working solo, this is usually an awkward process but I used painter’s tape this time to help hold the hinges in place and it worked easier than ever before. You can learn something new every day, if you try. One thing I learned on past adventures is to use steel screws when first mounting hinges into a frame. The metal alloy used in the typical decorative hinge screw will surely fail and twist apart while screwing into hardwood for the first time. Don’t try it - take my word. The top would be affixed by screws mounted into 4 corner blocks, which also serve as extra bracing for the cabinet frame.

Fitting the doors with steel screws prior to disassembly, final finish and reassembly.
Once the hardware was removed the walnut was stained and then treated to 3 applications of the gel poly. All good! The doors still appear a bit darker than their frame but not alarmingly so. They remind me of how old, hand-animated cartoon figures often had discolored arms/legs, betraying the fact that they were moving parts requiring extra labors during production - it all fits. Upon reassembly the piece could, at long last, reveal its finished character. I think the essence of the Korean kitchen cabinet has been achieved, with an unintended whiff of Mid-Century Modern. That could be a mix of furniture styles worthy of further exploration, but for now this Korean spirits cabinet will be enjoyed, straight up.
Geonbae! (Korean toast: “dry cup”)

Fore!

Did you ever consider that in many ways woodworking is like the game of golf? Here’s what I mean. While executing a woodworking operation (a shot), there will inevitably be some degree of flaw present in the result that one can both attempt to compensate for during the remaining operations (shots) prior to finishing an item (hole), as well as try to execute even better during the course of the next project (round). Continual correction en route to perfection - it’s what keeps you coming back, right?
To further the analogy, furniture making, like golf, proceeds through a sequence of four discrete activities or “steps” and it can be useful to think about these steps individually for the sake of analysis and improvement. Playing golf involves: 1. the drive from the tee; 2. the iron shot(s) from the fairway; 3. the short pitch shot required to access the green; and finally 4. the putting stroke that gets the ball to the bottom of the cup. In making furniture, the steps might be listed as: 1. design; 2. material selection; 3. cutting to dimension; 4. assembly & finishing. These last two could be separated to make 5 steps, but I often find myself applying some of the finish prior to final assembly and the rest afterwards; and besides, five is not a homonym of fore!. The familiar skills associated with woodworking are mostly applied during the third, dimensioning step, but I submit that excellence in all phases are required for producing an heirloom-quality piece. Personally, I enjoy every step along the way but I also find myself ready to move along in the sequence at about the time each one is completed. I’d like to expand my thoughts on the “four steps” of furniture making and maybe use these as an organizational rubric for future Project blogs. If I may have the honors …
Design
All furniture pieces, good and bad, start here. I believe good designs must address both the visible and invisible properties of furniture. Visible properties include not only the proper proportions for the piece (chair, table, cupboard, etc) but also the style, of which certain pre-existing categories exist (Shaker, Craftsman, East Asian, etc), the type of joinery used (mortice-and-tenon, dovetail, etc), any decorative motifs (raised panels, cabriole legs, carvings, etc), material, (oak, maple, cherry, etc), finish (oil, varnish, shellac, etc), and other features. But unless you are actually thinking about making furniture, these visible design elements will probably meld together into the overall “look” of the piece under consideration. This implies that, to the average consumer, the invisible properties are completely unknown; but to the maker they are both real and vital. What I describe as the invisible properties include the accommodation of motion (aligning wood grain, or fastening components such that the inevitable shrinking and swelling of wood will not damage the piece), production strategy (reducing the number of variables to help eliminate error during the dimensioning step, e.g., all dados will be made 3/8 inch deep) and construct-ability (considering, stepwise, how the pieces will ultimately be put together when planning the specific joints). This last property is important, for not all designs can be assembled using earth-bound physics. There’s a lot here, but I am learning that design is an exercise that gets easier (better?) as more hands-on woodworking experience is acquired. Put another way, the best way to improve your swing is with practice.
Materials (wood, but also hardware and upholstery)
In the end, much of material selection will come down to the personal preference of either the maker (what you like to work with) or the customer (the ultimate beholder of beauty). Selection is a subjective endeavor, however, some norms have developed over time that inform on the proper wood species to be used for certain items (chairs, tabletops, etc) and these should be followed to ensure success. Once the decisions of type have been made (i.e., lets’ make this dresser out of white oak and use brass handles) the rest comes down to smart shopping. The best place to shop for wood is at a lumber yard that stocks a variety of hard and soft woods and also caters to the individual woodworker, as opposed to the construction manager. These places are all around and once you find a couple that fit your needs you will enjoy the selection experience more than you might expect. While shopping one needs to first confirm that the desired species is available in the proper dimension (width, thickness, length) and then pay attention to two other things: 1. the way a board has been sawn from the log (plain sawn, quarter sawn, or rift sawn) as these cuts orient the wood grain differently and will affect the integrity of furniture parts; and 2. the presence of defects. Now, ALL wood contains defects, and that’s what gives it the character we adore. But some planks are better than others and you should know what to look for when in the yard. I have read* that there are two categories of wood defects: natural and artificial. I find this notion to be useful when making compromises during selection. Natural defects such as knots, splits along the grain (called shakes), the presence of lighter-colored sapwood, and burls are simply the result of a tree’s life spent “in the wild”. Often, naturally defective wood is sorted out during the lumber grading process and most woodworking retailers stock only the better grades. Thus, what you are actually selecting for are the natural defects that you can abide in otherwise good quality material. There is some artistry in this step so be prepared to apply your imagination. Artificial defects are derived from the way in which other organisms, notably humans, insects and fungi, have modified the wood once it has been harvested. Lumber needs to be seasoned (dried) before it can be used for woodworking and, as this process shrinks the wood, it can introduce a host of artificial defects which will be further exacerbated by improper drying or storage methods. The primary artificial defects to look for are splits at the end of boards (called checks) and warp. End checks can be chopped off and discarded if the rest of the plank meets your needs, however, as described previously, warping is impossible to “undo” and so you need to be certain you can extract straight and true material from the rough stock that you purchase. Insects can affect wood both pre- and post-harvest, leaving holes in their wake and occasionally inoculating the inner wood with fungus spores. Aside from the few desirable fungal stain patterns found in so-called “ambrosia maple” and “spalted” hardwoods, all other wood revealing insect or fungal presence should be avoided. You can let your guard down on this if shopping at a lumber yard, but stay alert when in your neighbor’s barn or on Craigslist. That’s enough about defects. Just be judicious as you inspect your wood and be sure to purchase a little more than need so that you can confidently complete a project even if you have mis-judged the amount required, or you make a cutting mistake and have to take a mulligan.
* Joyce, E.; Peters, A. Encyclopedia of Furniture Making; Sterling: New York, 1987.
Cutting to dimension
Just like playing the fairway in golf (and let’s also include the adjacent rough, woods, water and sand traps), dimensioning wood is the most varied and eventful step in woodworking. It is the subject of countless books, articles and YouTube videos, and so there is little I can add to that canon with this blog. I’ll just say that whether working wood by hand or with the assistance of machines you will need a small collection of essential tools in order to actually make things. These are akin to the driver, 7 iron, wedge and putter of the golf game. The starter set you acquire is a personal choice, but you will somehow need the ability to make big boards smaller, create true surfaces & square edges, and cut holes in your wood. Remember, over time you can add to your starter set and you will not be limited to 14 “clubs” in your workshop (spousal permission assumed). In a power tool shop I would choose a table saw, jointer, drill press and router, but there are other combos that work. Once you start you will soon find yourself adding the enjoyment of a dust collector, miter saw, band saw, thickness planer, mortiser, lathe, orbital sander, track saw, bench grinder, bluetooth speakers, (and more) to go along with those hand tools you’ve always had your eye on; like a back saw, hand plane, chisel set, etc. See how much fun this step can be? It should be mentioned here that this is “serious fun” and attention to all aspects of shop safety as you accumulate your tools and instruction manuals is paramount. Like all woodworkers (golfers), I love the activities in this step and find the endless opportunity to try new things while improving on my existing game to be downright seductive.
Assembly & Finishing
As mentioned earlier, these steps need not be combined but I find it liberating to erase the distinction and consider what could/should be finished prior to assembly compared with the finishing activities that must come at the end. Traditionally, these are sequential steps like the “up and down” shots used to finish a golf hole. While the skills and tools for assembly and finishing are distinct: assembly uses glue and clamps; finishing requires organics and patience; let’s just say “anything goes” from here on out. We are all assemblers, in that many of the things we purchase still require assembly to be useful. And we have become accustomed to following diagramed step-by-step instructions. Assembling home made furniture is similar - only absent the foolproof instructions, employing >100 lb/square inch clamping force and, since glue is involved, without the prospect of a do-over. This creates an excitement during the assembly step that in my imagination matches the exhilaration felt by test pilots. Anyway, assembling furniture is a fun and rewarding experience! Finally, I have found that becoming an accomplished finisher can be achieved in two easy steps: purchase a copy of Bob Flexner’s book, Understanding Wood Finishing, and then read it. Seriously, this book demystifies and simplifies the practice of preserving wood such that anyone can apply Bob’s teachings to create a fine finish. Loads of other instructional materials exist, and these are useful, but they are also likely redundant to the content of this single, enlightening book. And then with a final wax rubdown you are ready for the Nineteenth hole.
Thank you for following my reflections on the endlessly fascinating sport of woodworking. Play again next week?

This Owl House
See what I did there? I freely admit that, like many of my generation, I adore the PBS program This Old House. I’ve watched that show for over 30 years and it’s been airing for much longer than that. To me it is the most compelling “reality TV” show out there. No rivalries or competitions, just real people showing how they “do what they do” in a constructive and supportive setting. I won’t go on about this show other than to submit that, in addition to helpful home improvement instruction, it serves as a tremendous source of inspiration for us non-professionals. It provides encouragement that we can do this stuff too, and has prompted many of us to better understand our homes and take a stake in their upkeep. It is a treasure, actually.
Now, the house that concerns me, today, is for a resident that I hope to attract to my neighborhood, the barred owl. I am deeply interested in wildlife conservation, and have a soft spot for raptors, but I have never spent much time thinking about owls. I see owls flying near our home in Harvard, MA and have heard a Great Horned Owl saying “something” (repeatedly) at all hours of the early morning. So, prompted by a local TV news story where, in the adjacent town of Bolton, a homeowner was confronted one morning by a barred owl siting in his fireplace, I decided to set down my furniture work and build an owl house. Apparently, owl nesting season is happening now, and the real estate market is hot!
After some book & online research I found that many owls will nest in man made houses, which are pretty much unadorned, big wooden boxes. The box dimensions help select for your “owl of choice”, and barred owls are among the biggest such nesters in North America. This house would be roughly 2 ft. tall, 14 in. square with a 7 inch opening. The remaining structural features to consider are the roof and hole “style”, some means of access to facilitate cleaning, and the tree-mounting mechanism. With a rough idea of design I procured the wood : 22 linear feet(!) of 7 in. x 7/8 in. shiplapped pine panelling; a left-over cedar board from an Adirondack chair project of Andrew’s; and a plywood scrap. I planned to make the roof out of rot-resistant cedar and the floor out of 3/4 in. plywood, while acknowledging the longevity risk of using cheaper pine for the rest of the structure. Add some screws and hinges and it comes to about $25.00 in materials.
For the build, each face of the elongated cube had to be glued together from either 2 or 3 component boards. The ship lap edge made this an easy task, using waterproof wood glue with an extra bead of Gorilla Glue® to ensure integrity in “the wild”. The roof pitch was cut on both sides using my track saw, and the arch of the entry hole cut on a bandsaw using a shop-made, circle-cutting jig. A couple dados along the side walls allowed the floor to slip in nicely. I recessed the floor board 3/4 in. from the bottom edge of the sides to prevent water seepage and added a coat of paraffin wax to the interior walls and ceiling as a means to foil hornets. I learned these tips during the “research” phase, and hereby extend my thanks! to those who pay their lessons forward for others. I also learned that barred owls do nothing to build a nest. So to keep the eggs from rolling around and to provide some insulation for the hatchlings it is advised to add a few inches of wood chips to the bottom. It would also be prudent to have an easy way to clean out old feathers, detritus and squirrel-borne junk. Given that this chore would be executed on a ladder 15 feet above the forest floor I felt that hinging the roof to open (prescribed in many plans) would make it too awkward to then reach back down 2 feet to clean the bottom so I opted to cut-out a 7 x 7 in. hatch on one of the sides into which I inserted a small door. That should work better. Finally, the house was assembled using stainless steel screws, and the countersink holes filled with cedar plugs.
Overall, I like the look and sturdiness of the piece. And whoo wouldn’t? (See what I did there?)
Now, to mount this beast ...

The Stationery Chest

Korean Stationery Chest (chang mungap), mid-1800s
It was during my last visit to Korea in 2016-17 that I fell in love with its traditional furniture. Prior to that, I can only say it was like. Over the years my wife and I had purchased a couple of antique Chinese pieces and had some other Asian reproductions in the house, but these were just nice looking items that fit with their surroundings. It was not until this in-country exposure, after having been sensitized by my new hobby of furniture-making, that I could actually see the craft in Korean design and construction and become infatuated. It hit me minutes after landing in Seoul as my family and I traipsed down an airport hallway along which there was a display of Korean chests. Were it not for prior infection with the woodworking bug it’s certain I would have passed this display in the weary, head down manner of my fellow 747 travelers. Instead I was energized - and still am.
The mission of the trip was to celebrate Christmas and New Years Day with my son, Andrew, who had just graduated from college and was spending a year teaching English in the city of Inchon, a 50 min train ride from Seoul. We had other family to visit in Korea and some interesting excursions planned that now included hunting for more furniture. It was a fabulous vacation! I’ll likely include this trip in future blog entries but, needing to get on with the title story, I will leave you with a scene from one memorable day poking around an antique shopping section of Seoul with my boys. I encourage a visit of your own!

Furniture hunting amongst other relics (Seoul, Korea, 2016)
While in Seoul I picked-up a neat little book called Making Traditional Wooden Furniture that explains (in Korean) the process of furniture-making, from wood choice to the use of traditional tools and techniques. It concludes with four instructional projects of increasing complexity: jewelry box; desk; bookcase; and stationery chest. The book is nicely illustrated such that, with the helpful translation of a phrase or two (thanks honey), one can pretty well understand what they’re getting at. Now, I try not to follow pre-existing plans in my work but all four of these items are worthy of construction following the methods described so as to experience wood joinery the “Korean way.” That was my goal when selecting the stationery chest as a project. And since it represents my first serious foray into mitered dovetail and swallowtail joints, not to mention proper drawers, it would be a prototype piece for our living room - NFS.
The piece itself is very simple in design, making the attention to wood choice and overall proportions critical. In their day, these chests were generally made using paulownia wood (odong namu, Kr). Paulownia is a fast growing, deciduous softwood tree prevalent in Korea and Japan that is remarkably sturdy, given it is only slightly more dense than balsa. It was commonly used to make smaller furnishings intended to be lifted and moved around often, and also, due to its reputed insect repellant properties, book storage chests. Paulownia is farmed as lumber stock in the Southern USA and I will certainly use it one day, but for this project I chose another light-colored wood, soft maple. I have a few 50+ year-old planks of soft maple handed down from my grandfather Otto that I had been saving for a meaningful project and this would be it. The proportions would turn out to be dealer’s choice. The aforementioned “plans” are actually a list of techniques and their sequence of use to make and assemble the joints (plus diagrams). They advise the builder to choose “width:depth” dimensions of between 4:1 and 6:1 … vague, but convenient. Since I intended to place the chest beneath a certain window in my living room, I chose 15 in. for the height, 9 in. for depth and 56 in. for width (6.2:1). It’s a long window.
Before I could tap into the plans I first needed to prepare my lumber. Since the wood had been stored in several barns over the years it carried a coat of surface grit that I wanted to remove before it could chip or dull my tool blades. A rub down with the belt sander did the trick (outdoors, of course). Removing the oxidized surface also gave me a first glimpse of the material which appeared to be a desirable variant of maple called curly, exhibiting rows of rippled grain that can be quite beautiful when finished properly. You have probably seen this type of wood used for the sides (aka ribs) of violins. Back to our wood … there are four different ways that lumber can warp after being cut into planks. During the seasoning process wood can remain stable or else it can cup, bow, crook or twist - depending on the affected dimension. In aeronautic terms I guess these would correspond to roll, pitch, yaw and death spiral. Anyway, the most insidious warp, and the most difficult to correct, is the twist. Otto’s maple was twisted. It should be noted that correcting warped wood is not like orthodontics. There is no amount of pressure-over-time that will straighten a bend in seasoned lumber. Instead a woodworker acts more like a butcher, imagining in three-dimensions where the choice cuts reside and then trimming away the surrounding, inedible parts. Seasoned, myself, by having corrected a twisted old barn plank for an earlier project, I reached for my trusty shop-made router plane sled. This useful sled allows a router to cut, in a level manner, over an underlying surface (e.g., the twisted plank) thereby creating a level top face. While reproducing the result of having used a hand plane, the operation is more akin to lawn mowing. It takes a while but it works well. Having achieved a flat top there are several ways to proceed. One could flip it over and have a go at the backside but nobody enjoys router planing that much. It would also be a straight-forward task to clamp the flat side to your workbench and flatten the other surface using a hand plane, but I chose to subject the plank to my thickness planer (flat side down) and after a few passes created a remarkably uniform board to begin cutting up.

“Mowing” the maple in a router plane sled
At some point in a project I like to add up the number of individual board pieces to be dimensioned and jot that down. This helps me keep track of things in the shop and allows me to account for all of the parts as they are fashioned. This simple chest is comprised of 37 parts: 13 maple; 24 poplar wood - the poplar components making up the drawer interiors. Cutting them all as intended and then putting them together in the right order is called “woodworking”. (Got the bug, yet?)
From here on, the story will focus on the chest’s frame, or “carcass”. The carcass is made of 9 maple pieces, and of these only 3 will attract attention of the casual admirer: the top and two sides. Some of the remaining frame members reveal a 1 in. thick edge while others, a back rail and backboard, can only be seen from behind. (The backboard was not present in the original “plan” but I added it during design for extra stability and as a means of keeping dust out of the drawers.) Anyway, better do those 3 pieces properly.
As it turns out, the 3 primary components plus the backboard could all be obtained from that one, formerly twisted 2+ in. x 10 in. x 8 ft. maple board. After the aforementioned thickness planing to obtain clean and flat surfaces, the plank was cut into two, more easily handled sections roughly approximating the table top (60 in.) and the sides (17 + 17 = 34 in.) and then jointed on one edge to create adjacent and perfectly “square” reference sides. These two were then sliced through the narrow dimension on the bandsaw in an operation called “re-sawing”. Re-sawing is a very useful method to convert thick wood pieces into thinner boards, but it requires a powerful bandsaw to do the job well. My 2 HP Grizzly with 17 inch wheels was made for this type of job and it performed well. In the end I obtained the top and side boards (planed to 1 in. thickness) plus a backboard (planed to 1/4 in.) and 34 inches of excess, thin curly maple stock for future clock-making use. Subsequent cuts created the remaining parts from additional, straight(!) boards, removed semi-circles from the leg boards and brought all pieces to their final dimension. Let’s get on to those Korean joints.
The top will be affixed to the sides through the very strong and versatile “dovetail” joint. This joint connects two distinctly fashioned boards (a so-called “pin” board and “tail” board) and is named for that portion that resembles a bird’s tail. There are jigs available that allow dovetails to be precisely constructed using power tools but I feel this ancient joint is best made by hand. Over the centuries a number of ‘religions’ have arisen concerning the hand-cutting of dovetails that differ primarily by which board (pin vs tail) is cut first. Woodworkers tend to remain devoted to their sect, as it takes a fair amount of practice to become skilled (and even more to convert). I had no such skills when I began this project. Some research, a few practice pieces and guidance from my skilled son, Andrew, got me off the mat but there is considerable room for improvement. It’s a matter of perfecting one’s handsaw and chisel techniques and then applying these without fault during a series of cuts. The pay-off is a very strong joint that becomes an attractive feature of the finished product. The particular variant of dovetail joint in this piece contains a mitered element (i.e., cut at 45 degrees to match another 45 degree piece). Mitered dovetails are not the favored beginner’s joint as they involve extra, and delicate, cuts on both the tail and pin boards, but these joints have the potential to look great and I enjoyed the challenge. I’ll skip the blow-by-blow description and grade my effort a B- overall. I did encounter one unanticipated challenge in cutting the dovetails on a 56 inch board: height. I solved this by building a 7 in. “booster” step that allowed me to saw the pins in the top piece at a more comfortable elevation. I also needed to make a platform bracket to substitute as the bench top for properly marking the lofted piece prior to cutting. These diversionary projects will no doubt come in handy over time.

Shop-made booster step and platform bracket allow for cutting dovetails in the normal manner on tall boards
The final joint required for assembly is referred to as a “swallowtail” joint and is named for that portion that resembles a bird’s tail … hey, wait a minute!? (Turns out the woodworking nomenclature is almost as confusing as organic chemistry’s. But that’s the topic of a future blog.) It appears that what Koreans depict as a “dovetail joint” they describe as a “fist joint” (I can see it). Their native joint, which has no real counterpart in the West, they call a “swallowtail”, and who am I to argue. In truth, this “swallowtail” is simply a mortise and tenon joint that is further registered in alignment by a decorative point at the junction of the two boards - that apparently resembles a bird’s tail, kinda. The main point is that there are 10 swallowtails contained in this carcass, and I got pretty good at cutting them toward the end.
The final step in construction is the “glue up” where for the first time all the pieces are fixed in their final resting place. While not the final step in production, as there are still planing, sanding and oiling steps remaining, the “glue up” is akin to Graduation Day. It signifies an arrival, of sorts, often accompanied by a few unrehearsed stumbles during the ceremony. This turned out to be a tricky assembly for, given the tightness of the dovetail joints, I opted to omit the customary “dry-fit” rehearsal. This would be a “one-and-done” operation that, with some spousal assistance and 6 ft. long pipe clamps, worked out pretty well. I have the cosmetic steps mentioned earlier to complete, and also those 4 drawers. However, I am taking a break on this piece to attend to the desires of paying customers and to study drawer construction some more. Pretty happy to leave it here for now. To be continued …

The partially-completed Stationary Chest
The New Sled

“I could use another tool.” - Common expression
Some tools you buy and others are better to make yourself. Such is the case with most so-called ‘jigs’. Sandor Nagyszalanczy (now that’s a woodworker’s name!) in his classic book Workshop Jigs and Fixtures describes jigs as devices which “orient and control the motion of the tool or the workpiece”. That’s all. But that’s a lot when you are trying to safely and accurately use sharp steel to change the dimensions of wood. There are commercially available jigs for almost all woodworking operations, but my bet is that the majority of jigs in any workshop are of the homemade variety. I have maybe a dozen jigs that I use on my table saw, band saws and router. They help me make picture frames, table legs and perform all manner of cuts with both reproducibility and precision. Nearly all of these were made in my shop after some consultation of the woodworking literature and YouTube channels loaded with good examples. These plans help but, just like any good recipe, I doubt they are ever followed exactly. Instead, they serve as a time-tested version for the innovator to further refine based their own tastes and appetite. That is certainly the case with the cross-cut sled, perhaps the most popular jig of them all.
I have two sleds (sometimes called ‘carriages’) for my table saw. One is an open design that runs on the right side of the saw blade and is used for cutting larger, panel-type pieces at 90 degrees. It was the very first jig I made and provides good service for this special task. The workhorse sled is the more conventional, double runner variety that spans both sides of the saw blade and is used to make accurate cuts across the grain of a wooden workpiece, hence the name. These jigs go WAY back. Not only is there a canonical design for the cross-cut sled, there is also a standard sequence of steps to be followed during construction. The inspired woodworker needs only to familiarize him or herself with these conventions and then apply them to the construction of their own custom job.

reproduced from: Ingenious Jigs & Shop Accessories; Taunton: Newtown, 1999.
That’s what I did in 2017 when I made my model #1. It was a beauty and, at the time, a source of personal pride for the features it possessed. I made the sled base out of a material called MDF (medium-density fiberboard), which is an engineered material made of wood fibers, bound under pressure with added wax and resin. This versatile material is available in several dimensions and, as there is no directional grain, there are no internal pressures to warp the product over time. While a bit weaker than natural wood, its main drawback for this application is its considerable weight. Anyway, I chose 1/2 inch thick MDF and glued a 1/8 inch plywood overlay to the surface to make the platform. To the right of the saw kerf opening, where the dado blades will stack to create new “blades” of variable thickness, I left a 3 inch space in the overlay into which I could insert 1/8 inch hardboard (aka HDF) plates of various widths to provide a close edge (so-called ‘zero-clearance’) to that side of the kerf depending on whether I was using a single blade or dado stack. Zero-clearance between the blade and the sled surface provides a cleaner cut by reducing tear-out as the blade sweeps past the bottom edge of the wood. The front brace and rear fence of the sled were made of doubled 3/4 in. plywood to ensure straightness and strength. Unfortunately, given the overall size, this also served to ensure heft. To avoid accidentally dropping the thing on my foot, I attached a handle to the front brace which made it easier to heave the sled on and off of the table saw. Unexpectedly, the handle also provided for a safer way to use the jig. It turns out that many cuts could now be made by clamping the workpiece to the rear fence and then walking around the saw and using this handle to pull the sled into the blade. This maneuver puts your body, face and hands behind the spinning blade and surely adds a measure of safety to an operation, admittedly de-risked by using a sled in the first place. I admired this adaptation but recognized that it came at the expense of mass. Unfortunately, once I started furniture-making on a daily basis I began to eye my obese sled with displeasure. “You know you could stand to lose a few pounds” I would mutter with every mount & dismount from the saw. Eventually I took matters into my own hands and performed the needed surgery. It was a modified gastric bypass procedure, wherein one saves the entrails (runners and T-track) and discards the body.
For model #2 the runners were trimmed further to a manageable 15 inches in length and then transplanted on to a sleeker, plywood body. The front and back pieces were made of dry, straight-grained 2x4 pine that I had been saving for a special purpose such as this. (Typically, plywood or poplar (hardwood) are used here and I hope my lighter option does not dent and deform over time.) To improve upon the zero-clearance feature I glued a 1/8 inch layer of HDF to the left of the blade. On the right side, I used another piece of HDF that was allowed to slide freely beneath rabbeted grooves on the front/back pieces in order to tuck-up to whatever blade was in use. I put a screw bolt along the front to secure the sliding board into position, but this was probably not required as the fit was quite snug. I also inserted the T-track, salvaged from model #1, along the backside of the fence and mounted a wooden stop block to assist with cutting reproducibly identical furniture parts. Sweet! However, none of these features matter unless you have made the back fence of the sled absolutely perpendicular to the saw blade. This is the critical attribute of the cross-cut sled. If not fashioned properly in this one dimension, the jig is useless. There are a number of methods used to make, check, and adjust the backside of sleds during construction. I like the one developed by William Ng. This guy not only learned his high school geometry, but he remembered it beyond graduation! Using Ng’s method I convinced myself that my sled was off by no more than 0.2/1000 of an inch over a cut of 11 inches. That’ll do for #2.
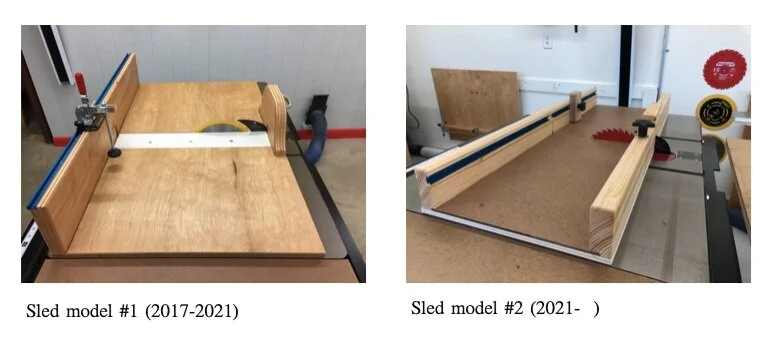
Pretty happy overall. I have a big piece of furniture and a clock in the works, now. Hope I’m still pleased when these are finished.
Ready for My Close Up

Who’da thunk it would take this much technical gear to make one of my furniture Projects look presentable? … kidding, JUST KIDDING! But seriously, while cellphone pics in a well-lit foyer might have been good enough for my prototype pieces, to suitably represent Projects for sale I would need to up my game. Here’s why …
The human eye & brain are remarkable organs. Working together to process incoming light they can detect all nuances of color, texture, shape and chatoyance (there’s that word again). Beyond accurate observation, they can give the perception of depth and even evoke emotions. Powerful. Often the trick is to give them something to look at that does not limit their potential - especially when the palette is an electronically generated 2D image (wink).
Now, I don’t know much about photography as a craft, but I do reckon that a well-lit, true-color representation of my Projects would be a good way to market them from a website. With that as the goal, and consciously stopping short of the magazine-quality renderings seen on real portfolio sites, I set out to see what I could do. There is a lot to read on this subject from pioneers who settled the ebay and Etsy frontiers, but I chose not to study those accounts in any detail. I thought there might be something to gain by figuring things out myself - plus consulting with my friend, Alex, who knows. And besides, I have two Art Directors (sons) “on staff” who draw the pictures for my site and never let me get too far adrift. I just needed some new tools. To that end, I purchased a white 10x12 ft muslin backdrop with stand and a couple of soft box lights to add to my Canon SLR camera, LED light and tripods ($180 in extra gear). The bigger challenge was real estate. Once these things accumulate you need to set them all up - and with enough space to focus a 55mm lens. That meant commandeering the living room. Now, I had ordered my equipment during the 2020 Holiday shopping & shipping season so when it finally arrived in early January I was anxious to try it all out and post a Project for sale. Damn the backdrop ironing, full steam ahead!

All went well on the maiden voyage. Experimenting with the lighting was actually fun, as digital photography provides instantaneous hypothesis testing, and the Sumo boys were reasonably patient with all of the futzing. It took the better part of a morning to get my half dozen poses shot and the rigging dismantled. The pics looked good on the camera, but when posted to the website I found the fabric folds were too distracting to tolerate. I asked an Art Director to kindly “get rid of those” and he did something on his computer to make that happen. Looks okay, I’d say. I do miss the under-piece shadows, though, as I feel they impart a beneficial realism. They’ll be back next time after I iron the mainsail.
Well that’s my tale and remember, … I was JUST KIDDING!
The Sumo table

Sumo bout between Shiranui Dakuemon (Kumamoto Pref.) and Koyanagi Jokichi (Chiba Pref.), by Kunisada (c. 1840)
Here’s the story of a simple table Project that became something more.
Up to this point, all of my Asian table Projects had been based on a Korean desk design, so, for diversity’s sake, I decided that my next table was going to be Japanese-inspired. Traditional Korean desks have rectilinear leg boards, whereas, many Edo period (1600-1868) Japanese writing desks display attractive, curved edges. That was the inspiration. In design, I could extend the height to accommodate a shelf and this would then become a coffee table Project. Cutting the curves would also let me use my father’s old Rockwell 14 inch bandsaw, recently transplanted into the workshop. This sturdy machine dates to the 1980s and, now fitted with a 1/4 inch band for shaped cuts, its use will allow me to keep my 17 inch Grizzly version dedicated to a bigger blade for re-sawing and other hefty tasks.
Aside from the finished dimensions, the only remaining design decisions would be the actual leg pattern and the wood. Mulberry is a hardwood that was used in Japan for desks and was prized for its beautiful grain that would darken over time. Today, mulberry lumber is difficult to source, but African mahogany is not and it would be the alternative used. The leg pattern is what defines this piece. The challenge, as I saw it, was to incorporate flowing curves that would still look appropriate for a piece that would be twice the height of the few original reference drawings at my disposal.

Edo period writing desks, from: Koizumi K. Traditional Japanese Furniture, A Definitive Guide, K. Koizumi, Kodansha International: Tokyo, 1986.
Three other alterations would be made: the addition of a shelf; the consequent removal of the two “navel” openings; and omission of the bottom, tatami-zuri (Jp.) board. The tatami-zuri element, affixed beneath leg pieces, are commonly found in East Asian furniture where they served to protect the floor coverings from wear by otherwise narrower, weight-bearing contact points. They are, in fact, vestiges of much earlier East Asian furniture, where their presence was vital for carcass stability and to protect the legs from damp stone floors. I have incorporated tatami-zuri into some of my cabinets, but their use today on hardwood can be problematic, often serving only to highlight the humps in our floors. Without this feature, then, it would make sense to define individual “feet” into the sides. Introduction of a shelf might also necessitate enlarging the mid-section “waist” so that, in use, stored magazines or books would not protrude out of the sides and ruin the profile. (Did I mention that my Projects are inspired by Asian aesthetics and are not replicates?) To decide on the final form I sketched chimeras comprised of varied anatomical parts, and then mixed-and-matched from there to select a harmonious set of curves defining the shoulder, waist and foot. In the end, it would be 18 inches in height and quite a departure from the original inspiration, but (to me) still Japanese in form.
The rest of the Project consisted of prepping the lumber, cutting to final length and shape, mortising, chiseling, fitting, glueing, sanding and finishing. In sum, all of the woodworking enjoyment spared from this narrative. However, something notable happened as the leg pieces were taking shape that transformed the meaning of this piece. In practice, the curved edge of each leg board is sawed as two halves that have been previously stacked and taped together. This allows the profile to be cut on both sides of a leg simultaneously so that when glued together a perfectly symmetrical shape will result. (Imagine trimming a pattern along the edge of a book and then opening it to reveal a butterfly.) The half-profile outline of this piece resembled a noble urn, but when cut and paired together, my shoulder/waist/foot patterns formed the likeness of an actual person - a stout, muscular Sumo! To my eye there was no other way to see it. Further, as I began sanding and finishing the legs (a very intimate experience for woodworkers where they closely inspect the texture, grain and colors of the wood) I found that each leg/wrestler had their own personality. One wrestler appeared wholesome and friendly with the characteristic tuxedo striping of quarter sawn mahogany. The other wrestler was dark with patches of wildly figured grain that revealed a troubled upbringing. This revelation created a new obligation. If I were to mount these two combatants 28 inches apart - for the rest of their lives - I must also provide a wrestling ring (dohyō) and somehow capture the essence of their perpetual bout. The shelf and table top might serve this purpose and, fortuitously, I had yet to procure the wood for these features that now had something to represent. At the lumber yard I looked for wide boards that would furnish a complete shelf and only require a single glued seam down the middle to make the top. I picked through the pile of a dozen such boards until I uncovered the most quarrelsome looking plank of the lot. It’s grain pattern was dark and turbulent - gnarled, gouged, perfect! In the end, these same qualities would make it a challenge to smooth and finish, but this also seemed fitting.
The conjoined top of the completed Project now looms above the wooden dohyō. It grapples in opposed chatoyance, and the bout continues.

Making a Mark

In Korea it’s called a dojang, in Japan a hanko and in China a yìnjiàn - among aliases. They are the inked hand stamps (chops) used for millennia to sign the name of the bearer when required. In the West they are spotted most often as the red markings along the edge of East Asian printed art. Once used in place of signatures, they are today sometimes required in addition to the hand written version on important documents. Their use and history is complex but the items, themselves, are becoming endangered as electronic signatures supplant inked paper for official record keeping. They are beautiful, though. I got mine in 2016 for ₩15,000 ($14.00) from a street vendor outside of the Bamboo Forest in Damyang, South Korea. Yes, they have become tourist souvenirs, and perhaps that will be their ultimate niche. I watched mine being fabricated from an exotic hardwood by a modern artisan and his computer controlled engraver. This runs afoul of the traditional methods for handcrafting a personal dojang/hanko/yìnjiàn from jade or other high quality material which can also make these items precious and pricey. That doesn’t bother me. I like mine just the same. It is a component of the Workshop logo and I put the chop to every piece of furniture that is made there. I am told it spells “Mark Goulet” but since I cannot read Hangul it could say anything, and in that sense it serves as an abstract personal logo - no different than the “X” used by many illiterates of the past, or the illegible signatures used by many of us literates, today. It’s only function is to represent the bearer and to make a Mark.

My personal logo dojang under construction on the streets of Damyang, South Korea
What Would Woody Say?

I covet old woodworking books - especially the ones you can get for almost free at library book sales. That’s largely how I’ve built my collection. The most prized are the ones that have been used, with as-built dimensions neatly penciled on the pages. But alas, most of mine are found in mint condition. One unused, library sale gem on my shelves is the high school textbook Modern Woodworking by Willis H. Wagner. I have no doubt that it was indeed modern on its publication date (1967) but today we would consider it “mid-century modern”. Still, it covers all aspects of woodworking and serves as a handy source of concentrated wisdom. I bought it as a Xmas stocking stuffer for my younger son, Andrew, who was about to embark on a three month furniture making course at the venerable North Bennet Street School. This experience vaulted his skill level beyond mine and so the text sits in my library now. I have every intention of re-gifting it to him one day … when I’m through with it.
Like all good texts it is copiously illustrated and briskly paced. An endearing feature that surely rolled a few mid-century eyeballs are the “WOODY SAYS:” comments interjected throughout. These are mostly reminders of the hazards to be encountered should one fail to heed WWS.

Priceless!
I am convinced Mr. Wagner knew what he was doing when he scripted Woody’s lines. We all need reminders in life, and sometimes the seemingly self-evident ones are the best. They matter. And they can be picked-up almost anywhere you look. For instance, I enjoy watching The American Woodshop series on PBS. We don’t always use the same methods in our woodworking, but I admire the unquenchable enthusiasm shown by host Scott Phillips as he goes about his work. He has been doing that work on television for 27 seasons! His sing-song admonition whenever he uses the bandsaw: “Save the line; take your time!” is a Woody-ism that I chant whenever I approach my same tool. It helps.
Now, not all Woody-isms’ will please the soul when you hear them: “Mind the gap!” does; “Please make sure your seat backs and tray tables are ...” not so much. The one that tickles me most I first heard from my grandfather Otto, the woodworker. It is a variant of the old carpenter’s adage: “measure twice, cut once”, only instead of a reminder to check your work, its a reminder to check your approach to your work. When puzzling over a surprising result Otto would say: “Mmm!? I cut it off twice and it’s still too short.” That one fit right into my irony-seeking, adolescent brain and remains stuck there today. It often applies itself to situations on my Projects. The workshop, unlike the research laboratory, is a solitary environment lacking the peer review of proposals and the opportunity to bounce new ideas off of colleagues. It requires a self-check discipline to do well (and stay safe). That makes these especially wise and helpful words. They are WWWS!
How It Started

Charles Richter (right), carpenter c. 1910
I should have known it would come to this. Nothing crystallizes better than a life in retrospect.
As it happens … Edward, my father, was first a farmer and then a truck salesman who, additionally, liked to design and construct things. He built his own barn and the family cabin, among other structures. He was also a hobbyist woodworker with a workshop in our basement. That is where I learned to saw and fasten boards. In addition to fine cabinetry he liked to make kitchen things, birdhouses and the occasional furniture piece. Otto, my (maternal) grandfather, had a workshop in his basement too, equipped with all of the power tools available in the 1950s - Craftsman was his brand. That is where I first noticed the beauty in wood. By trade, he variously owned a silver fox farm, drove trucks and the village school bus. On the side he would make furniture and nice wooden items to sell. He was retired by the time I was born, so I only knew my grandfather as a woodworker. I recall that neighbors would bring him their broken furniture pieces and he would produce replica parts for them. Indeed, my childhood rocking chair sports a maple, Otto-made prosthetic arm. His father, Charles, a late nineteenth century immigrant from Germany, was a true carpenter. He built craftsman-style houses in Bay City, Michigan - the town where I was born. A few of his hand tools bearing a stamped “C. Richter” beneath the patina are the treasures of my collection.
This foundation, reveals two generational truths: you don’t have to just do one thing in life; and building with wood is a worthy vocation.
My professional training and career as a scientist would keep me pondering the sub-microscopic world by day - for decades. Off hours, in the macroscopic world, I dabbled in home renovations and refinished antique furniture while mostly raising a family. It was not until my older son graduated from college and I was helping him build a clothing chest … from dimensional pine and plywood … using a circular saw … while squatting on cold basement cement that it dawned on me: I had forgotten to build my workshop. From that moment I was playing catch-up with destiny. With the help of my sons, Ben and Andrew, I built a wall to partition our unfinished basement, added electrical lines and lighting, and ordered a suite of starter woodworking machines - Grizzly Industrial was my brand.
That was 2016. That is how it started.
Seasons Greetings
December 2020
Merry Christmas from the Red Top Workshop!
Keep doing what makes you happy in life - every day.
Have a prosperous 2021.