

Shaker Cabinet ep.1

See if you can spot the lesson in this photo.
Shaker Design: Out of This World, Burks, J. M., Ed., 2008.
In the workshop, horizontal surfaces are precious; as a place to set things they are indispensable. But without super-human discipline these flat spots inevitably become the place to store things, and that’s not the intention. Fortunately, all that is needed to reclaim this setting space is proper storage space. Kitchen designers have found all manner of storage systems to preserve the countertop, but it seems some woodworkers have been slow to see the analogy. That’s about to change under the Red Top with the creation of a hanging Shaker cabinet.
Design
Let’s first remind ourselves of the Shakers (formally, the United Society of Believers in Christ’s Second Appearing), a religious movement that began in England way back in 1747 and later thrived in the United States before dwindling to a current membership of two. Held together by their beliefs, the Shakers were an industrious and inventive lot who formed farming collectives based around communal villages. These Shaker communities were largely self-sufficient, but to obtain non-food necessities goods such as seeds, clothing, chairs and other handcrafts were sold to the “World’s people” (non-Shakers). Their villages multiplied through the early 1800s, providing refuge for people seeking a pastoral life with purpose. Depending on the source, the Shakers are listed as having 4,000-8,000 members at their peak, but ultimately their ways, including strict celibacy, were their undoing. Of the 19 major villages established in the Eastern and Central United States, four were in Massachusetts, including one in the town where I reside (Harvard, est. 1791-1919, max. pop. ~200) and the neighboring town where I purchased the lumber for this Project (Shirley, est. 1793-1909, max. pop. ~100).
In later years, the Shaker’s grew sensitive to being known only for their handicrafts but I believe these articles, especially Shaker furniture, are the reason why we remain familiar with this group, as opposed to the many other utopian movements that sprouted and waned in nineteenth century America while failing to leave behind any artifacts. Today, authentic Shaker chairs, tables, cupboards and clocks are treated as art pieces. “Shaker” is also a recognized style that woodworkers love to copy. The designs are not complicated but, for just that reason, they demand fine workmanship . This will be my first serious attempt at a Shaker piece.
The hanging cabinet of interest is the one featured on the cover of the book Shaker Design: Out of This World (see above). It was built between 1860-1880 for use at the Shaker village in Canterbury, NH. This lovely spot, now a National Historic Site, was a home to the Shakers for two centuries (1792-1992) and is one of the several open air museums dedicated to that group’s heritage. I toured it with my wife in 2022 and found the buildings and grounds to be inspirational.
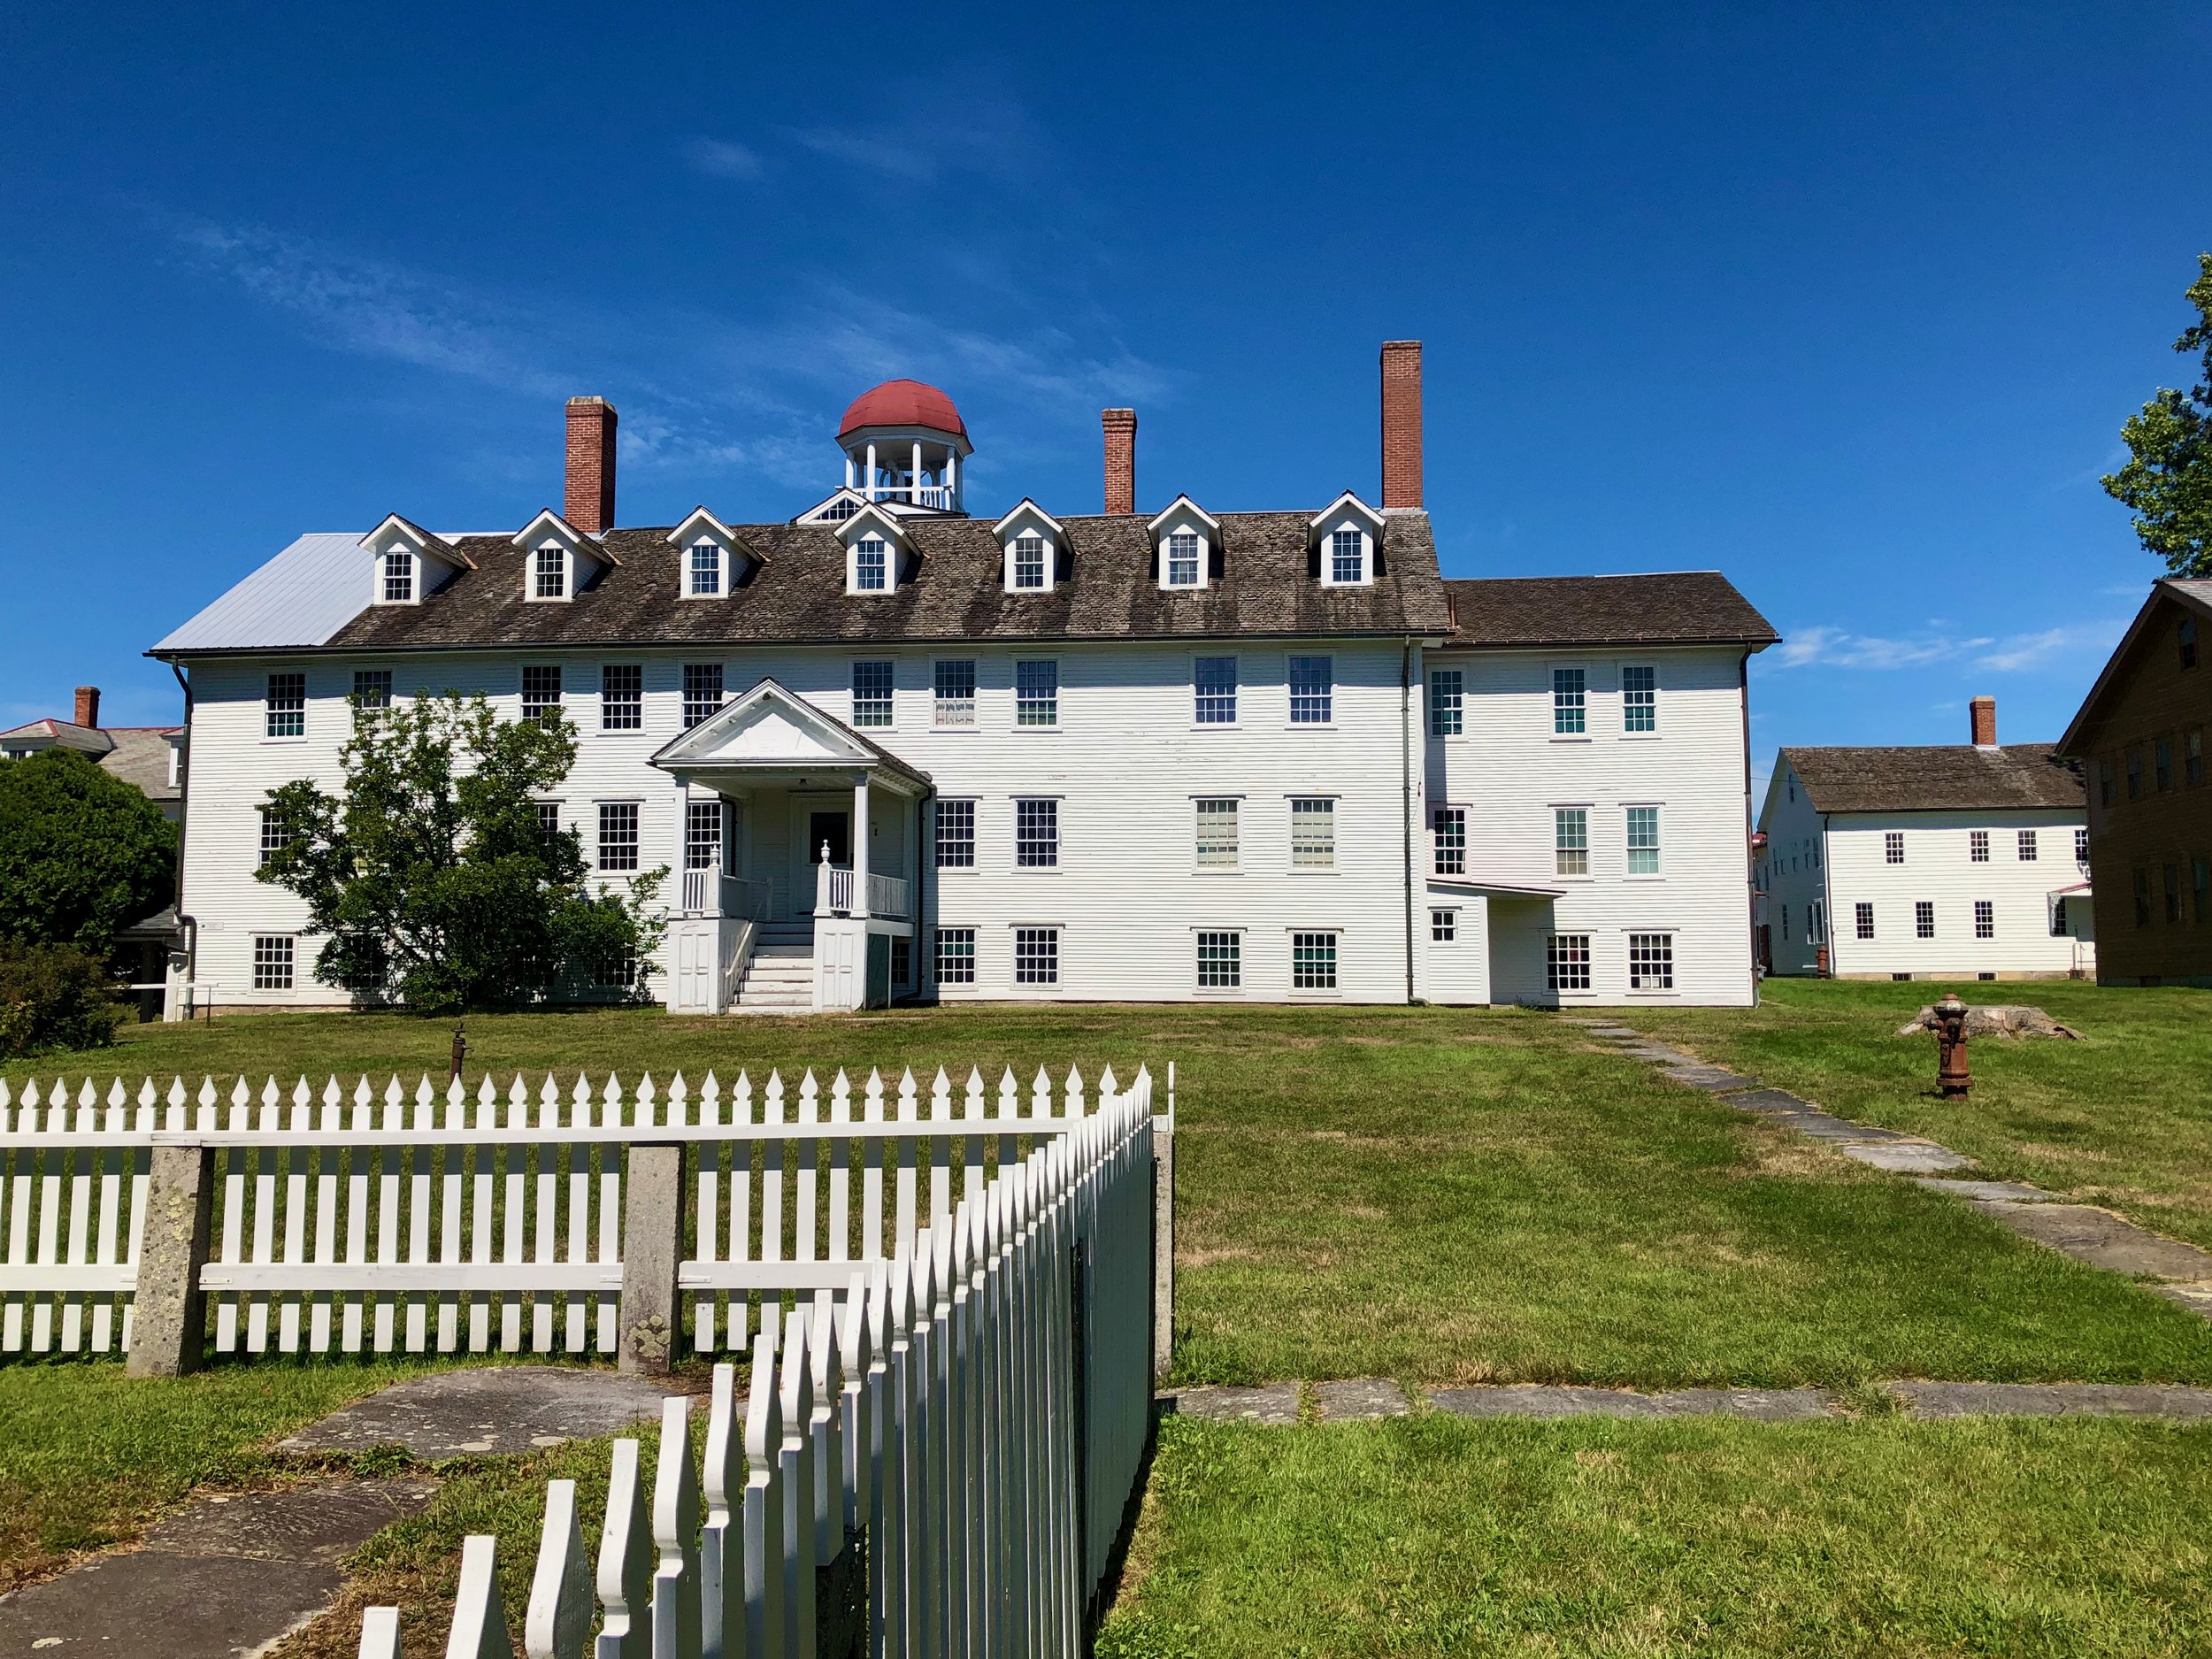
Canterbury Village Dwelling House (1793), Canterbury, NH
While the Canterbury Shakers provided the design, the working plans for this Project come from a recent article* in Fine Woodworking magazine by the noted Shaker furniture maker/scholar, Christian Becksvoort. Colorfully illustrated articles of the modern Fine Woodworking contrast with the B&W, text-heavy version that I recall in my father’s shop. And although today’s version is less meaty, the content serves to both inform and motivate me; it is my favorite of the diminishing number of periodicals received at our house. I intend to follow the plan on p. 39, along with the helpful hints contained in Becksvoort’s article to make this cabinet.
*Fine Woodworking 2023, 305, p. 38-45.
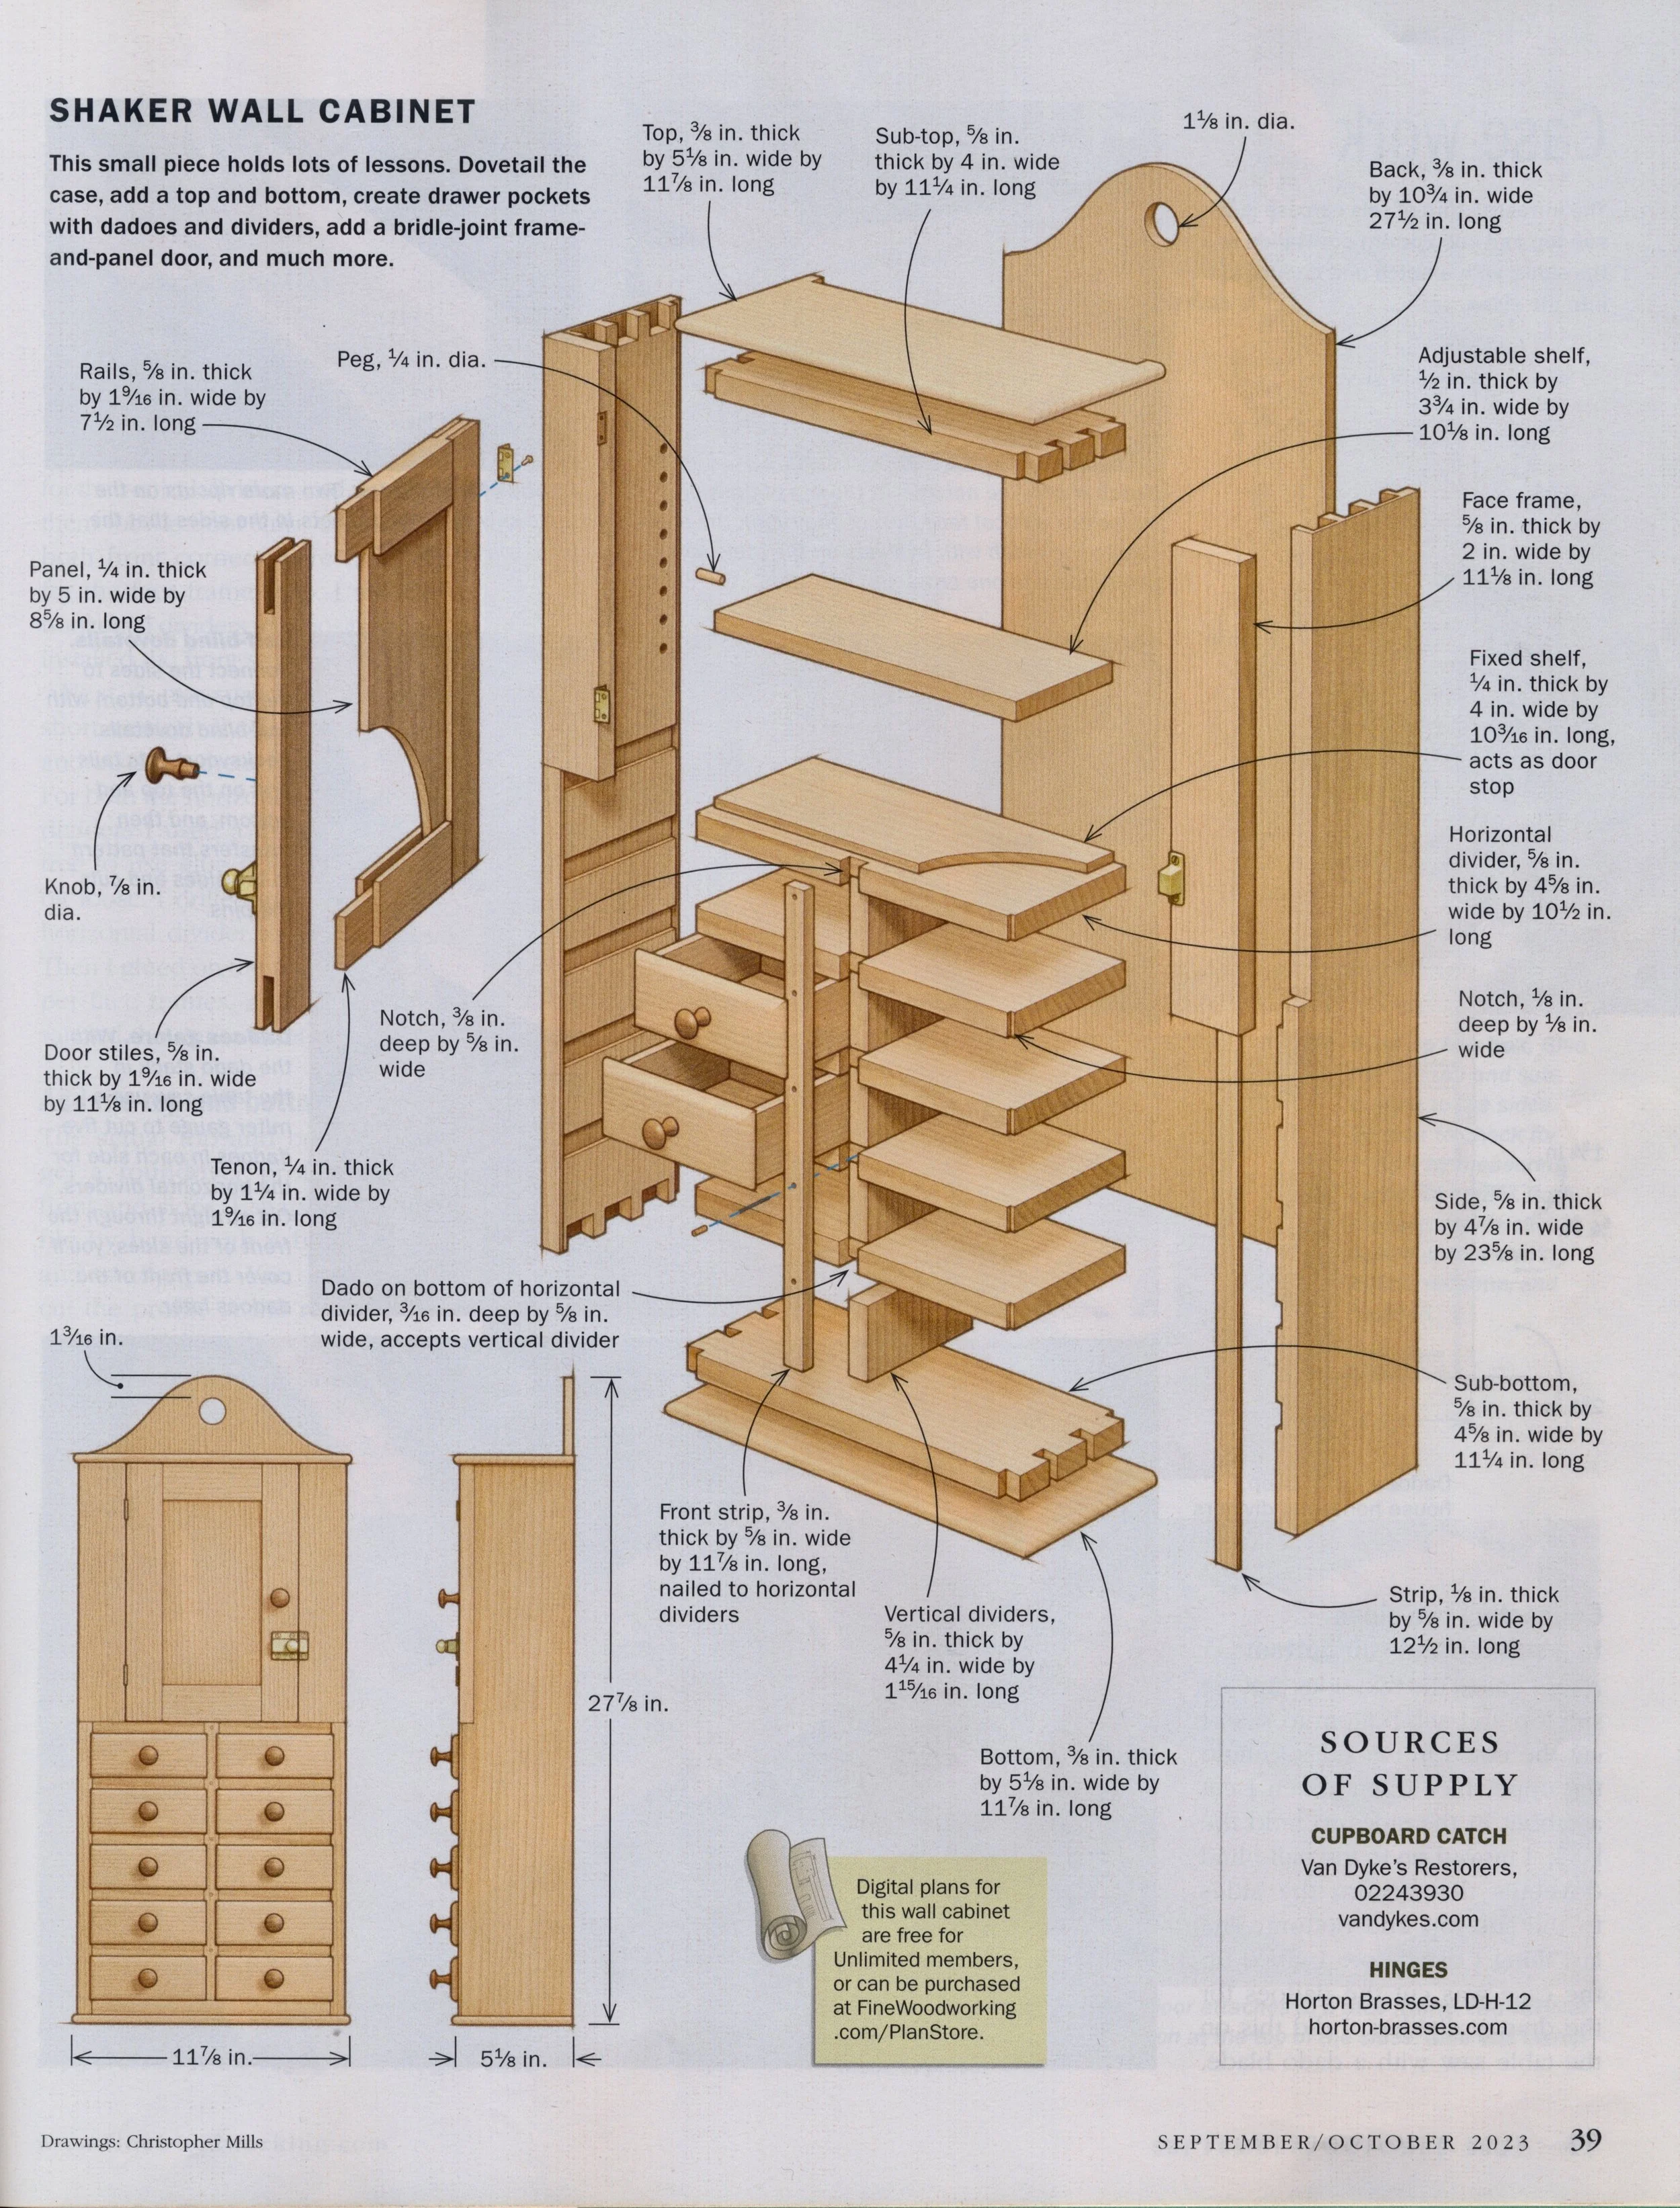
Shaker Hanging Cabinet plan, created by Christian Becksvoort and reproduced from Fine Woodworking
Materials
The original cabinet was made out of pine with cherry knobs and mine will be too. Knot-free, furniture grade pine is a lumber mill (i.e., not a Big-box store) product. I got my red pine boards up the road at Farnsworth Lumber, a small and friendly yard in Shirley, MA. I also have an antique pine board, purchased from a barn salvager, that I can use for the drawer fronts and door panel should that seem the right thing to do when I get there.
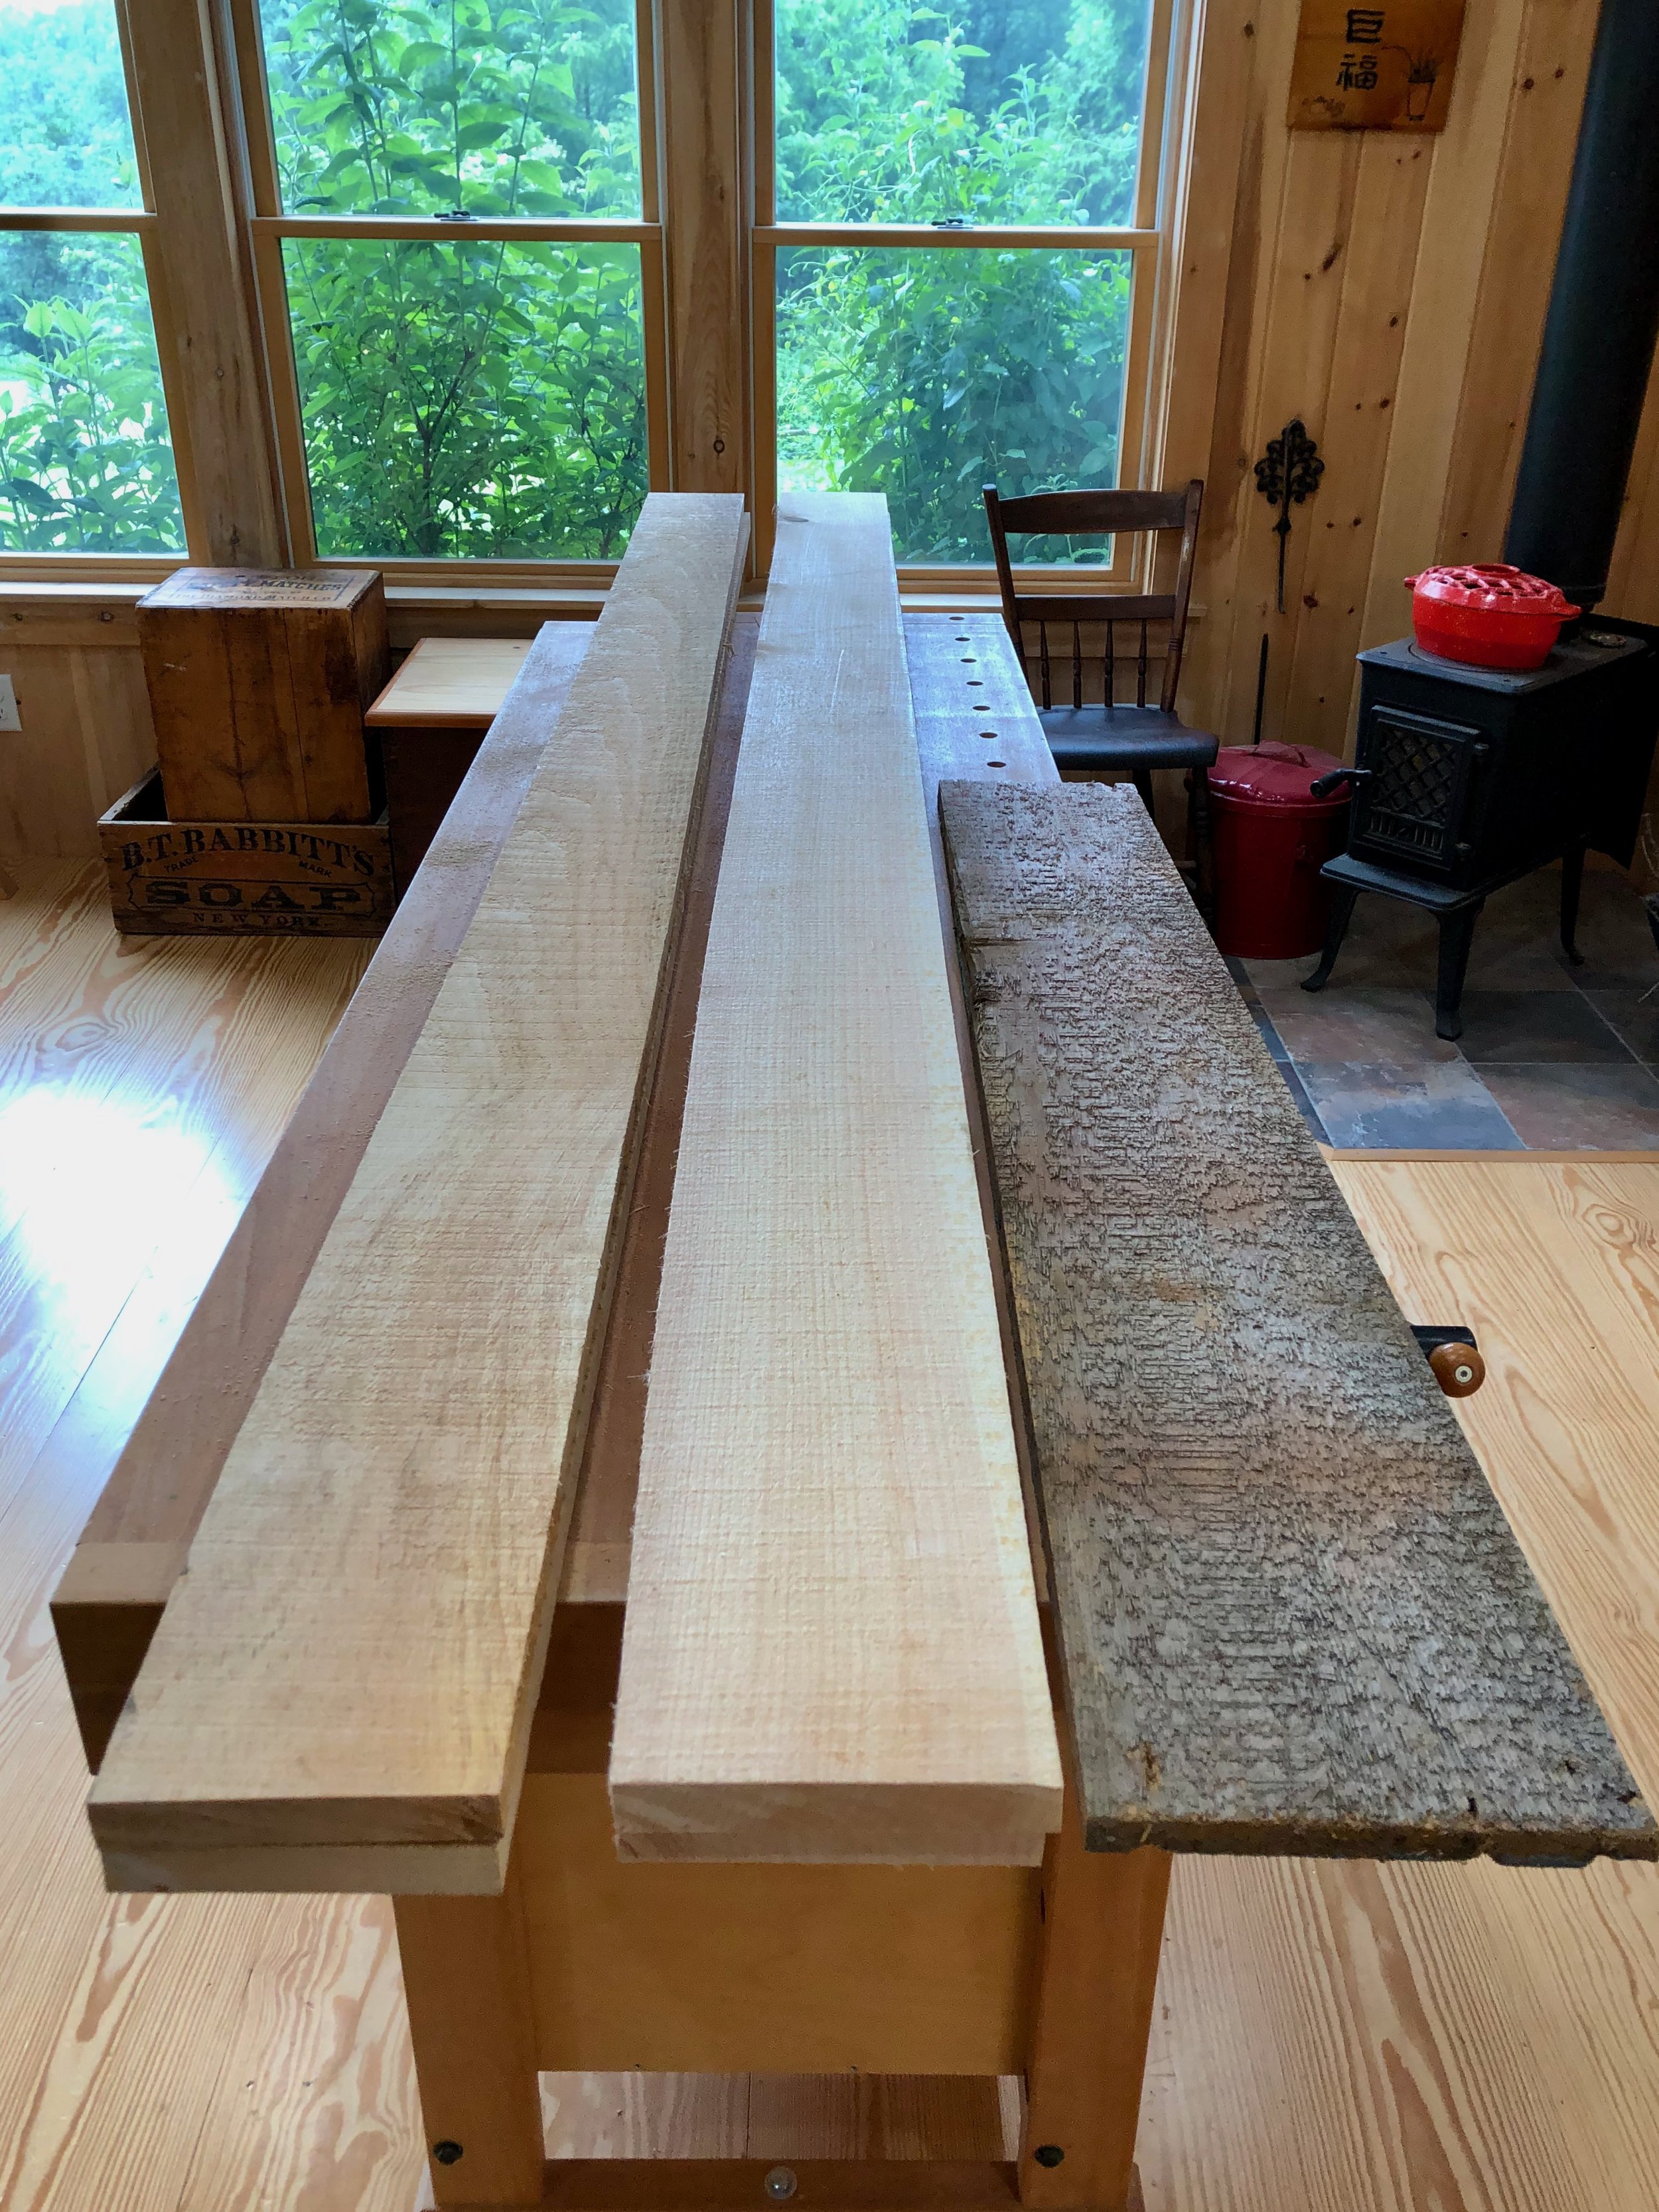
Pine boards, new & old
Dimensioning & Assembly
The work begins by marking out the case components and cutting these to rough widths and lengths. The parts were then jointed flat before thickness planing to 5/8 inch. Several cuts were then made to prepare for the box-making to follow. After recently working with oak, birch, cherry and ash it is startling how soft a pine board is to cut. Red pine (Pinus resinosa) is surely lumber’s Brie de Meaux.

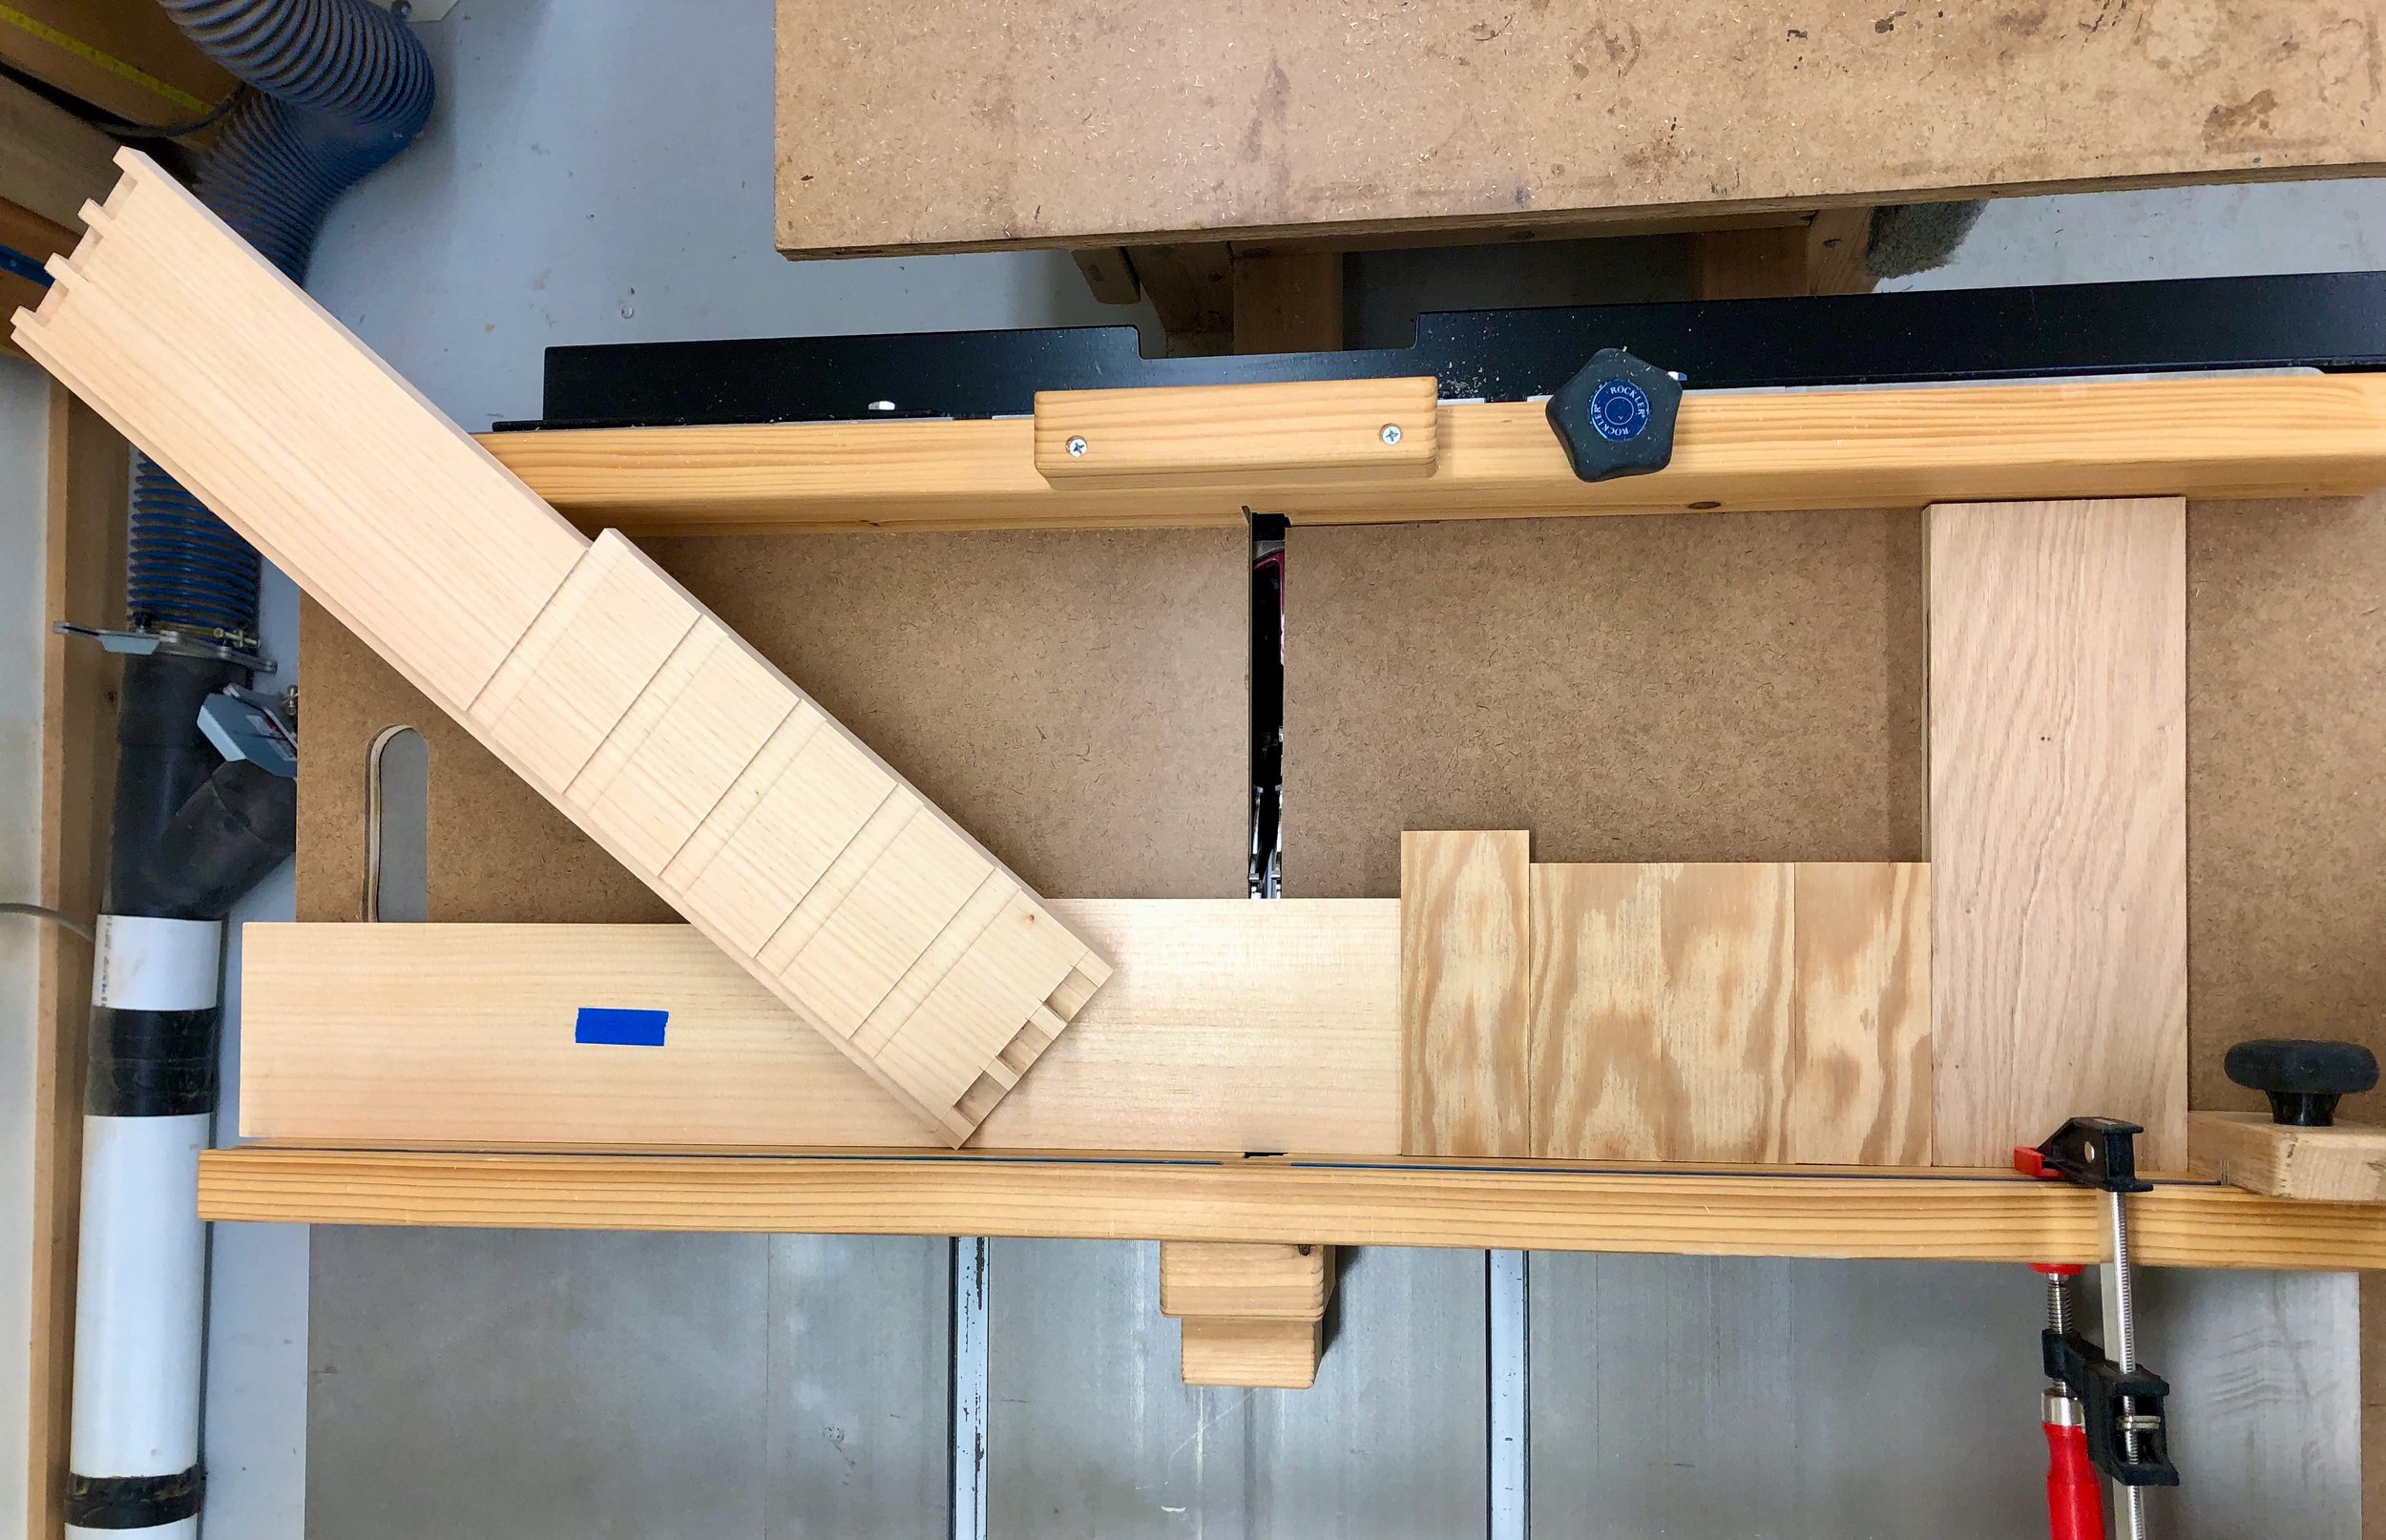
Notching one of the side boards at the table saw after having created a rabbet along the back edge
The seams of the box will be joined using half-blind dovetails, a feature most typical of drawer construction. After re-familiarizing myself with the strategy and techniques surrounding this joint the tail components were marked and cut into the top and bottom boards. To accommodate the face frame of the door compartment, the sides are one-half inch narrower at the top than at the bottom and so two independent sets of dovetail dimensions are required.

First come the tails,
Following the tail cuts, pins were marked-out on both ends of the side boards and then made. These joints were sawn and chiseled by hand, and, while functional, they could be better. Mercifully, they will be covered-up during final assembly.
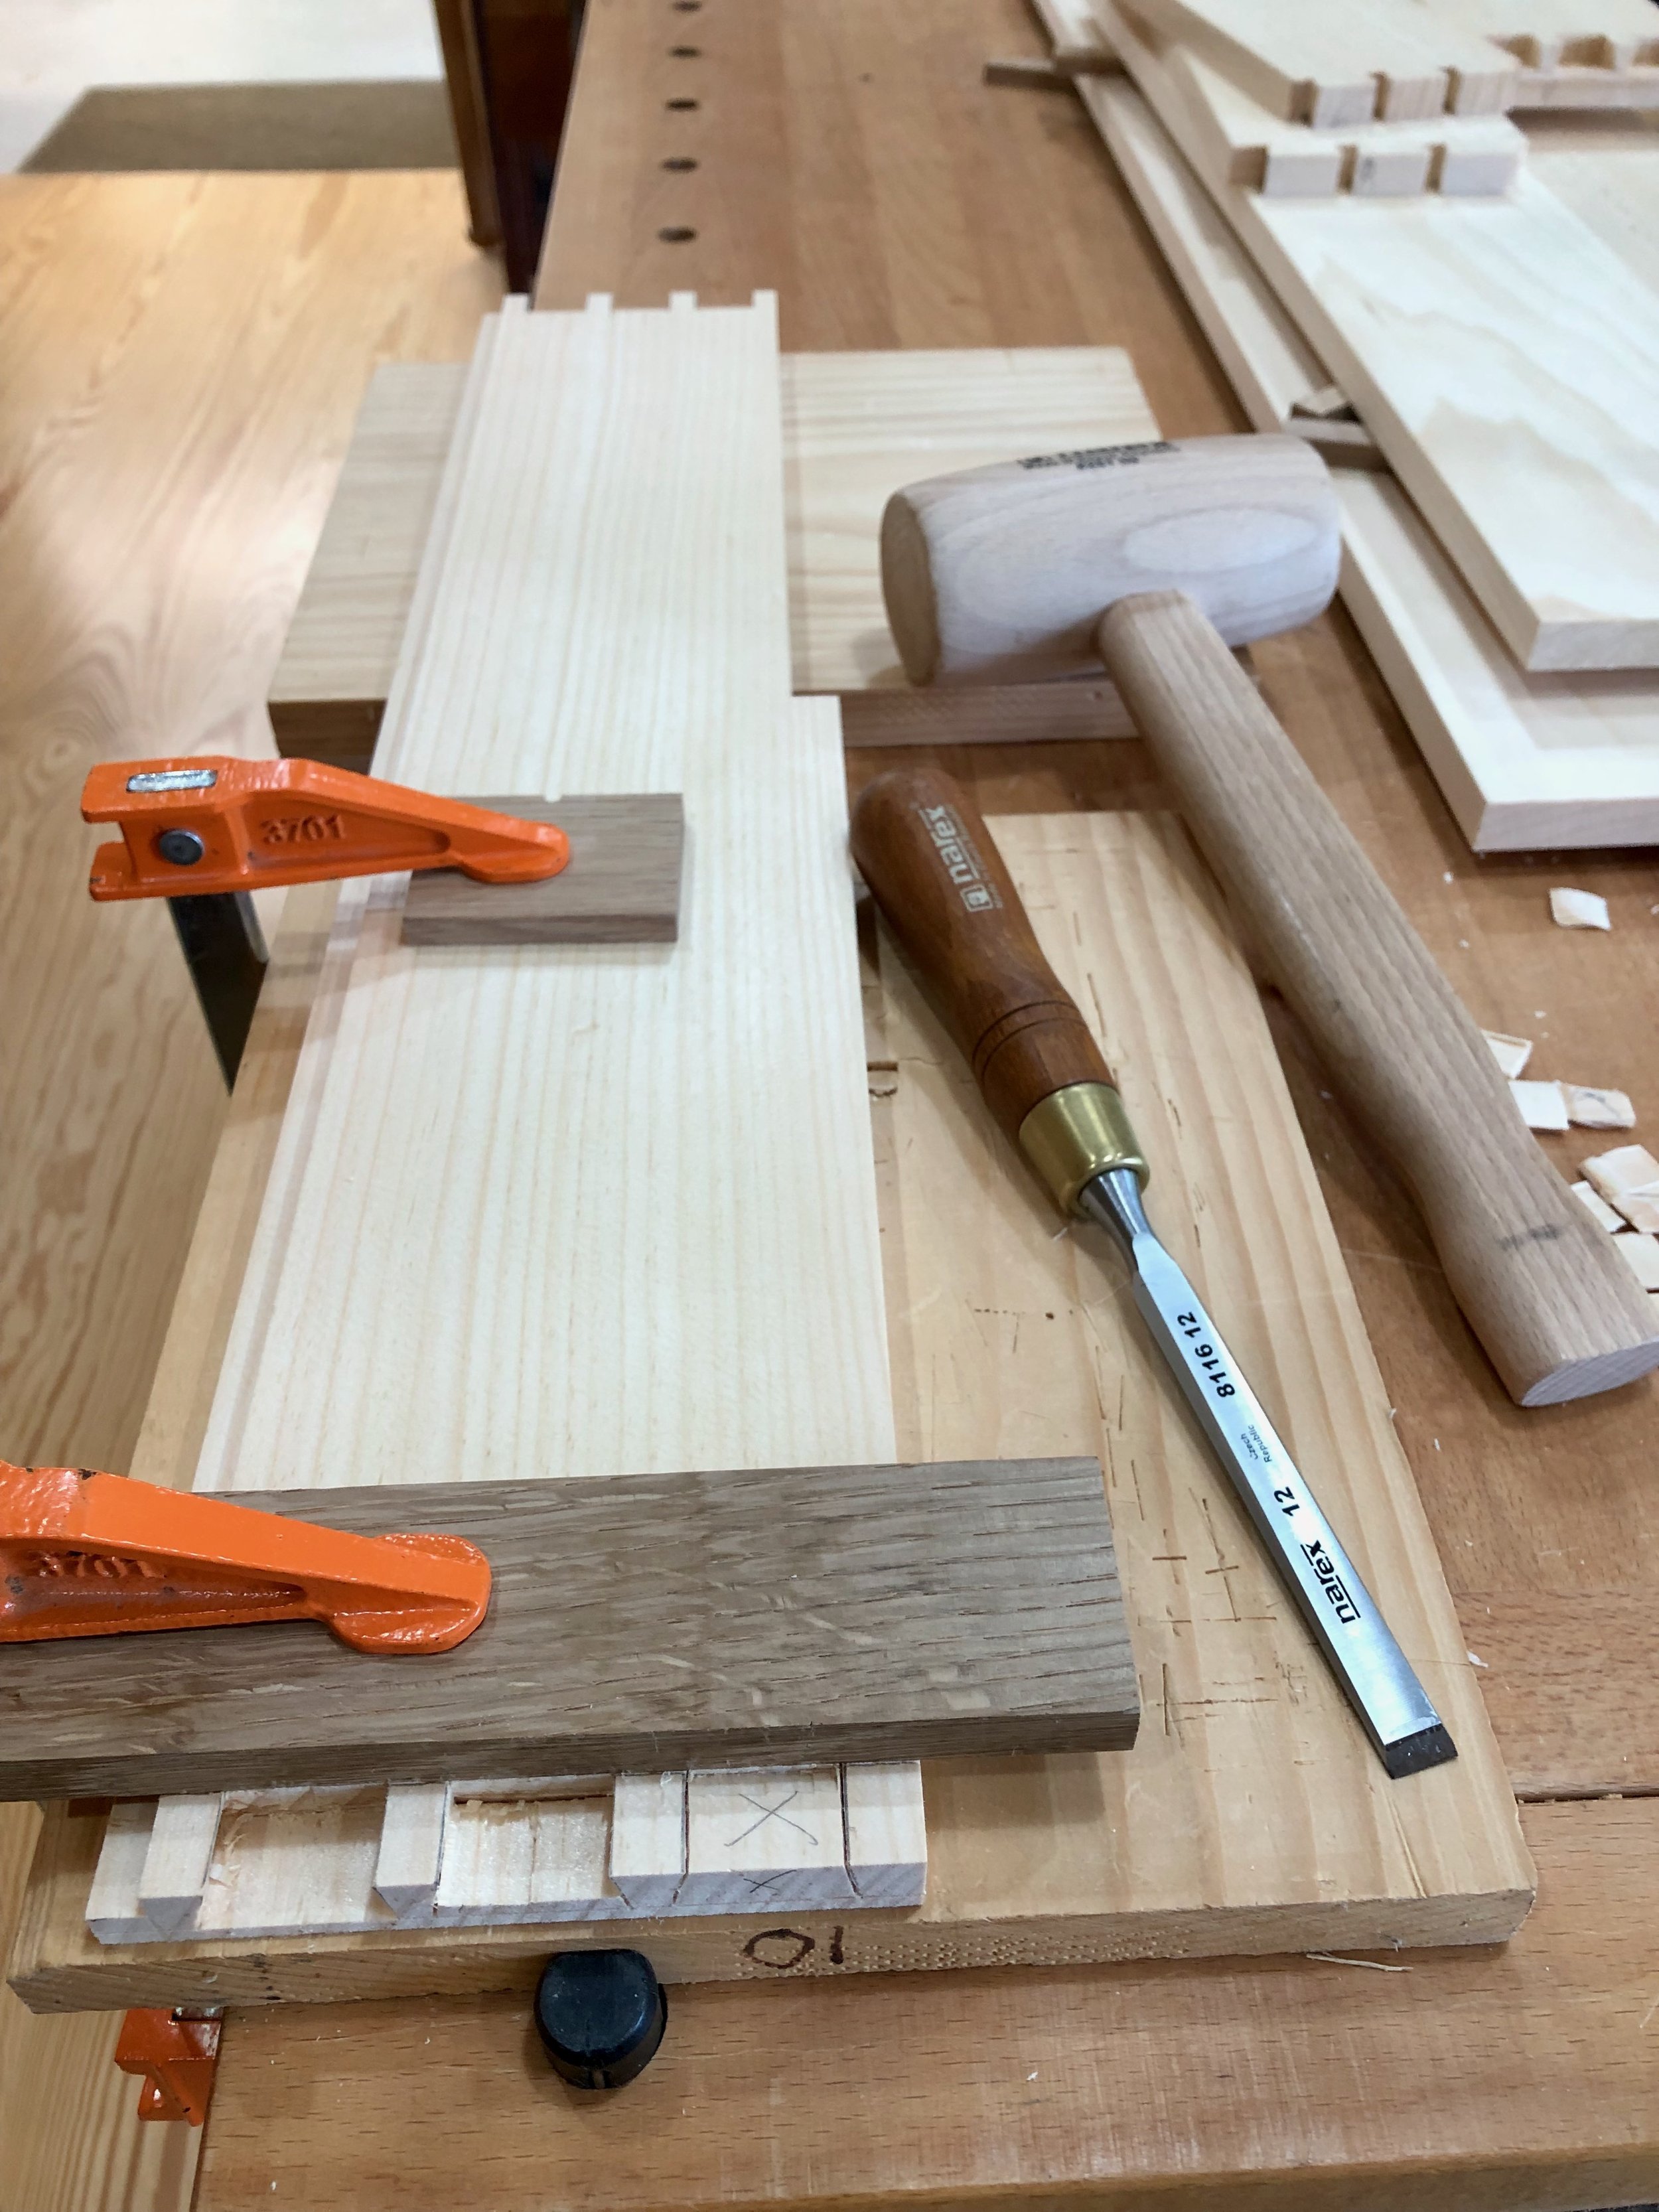
… then the pins.
Before glueing-up the box, 5 shallow grooves to hold the horizontal drawer dividers needed to be fashioned into each side. I used the dado blade at the table saw to make these cuts, employing the cross-cut sled and four plywood spacers to keep things uniform as the cuts proceeded. Worked well. I also drilled a few holes for the shelf brackets at this time.
Spacer boards inserted (right) to register the sequential dado cuts at the table saw, a final board laid on top.
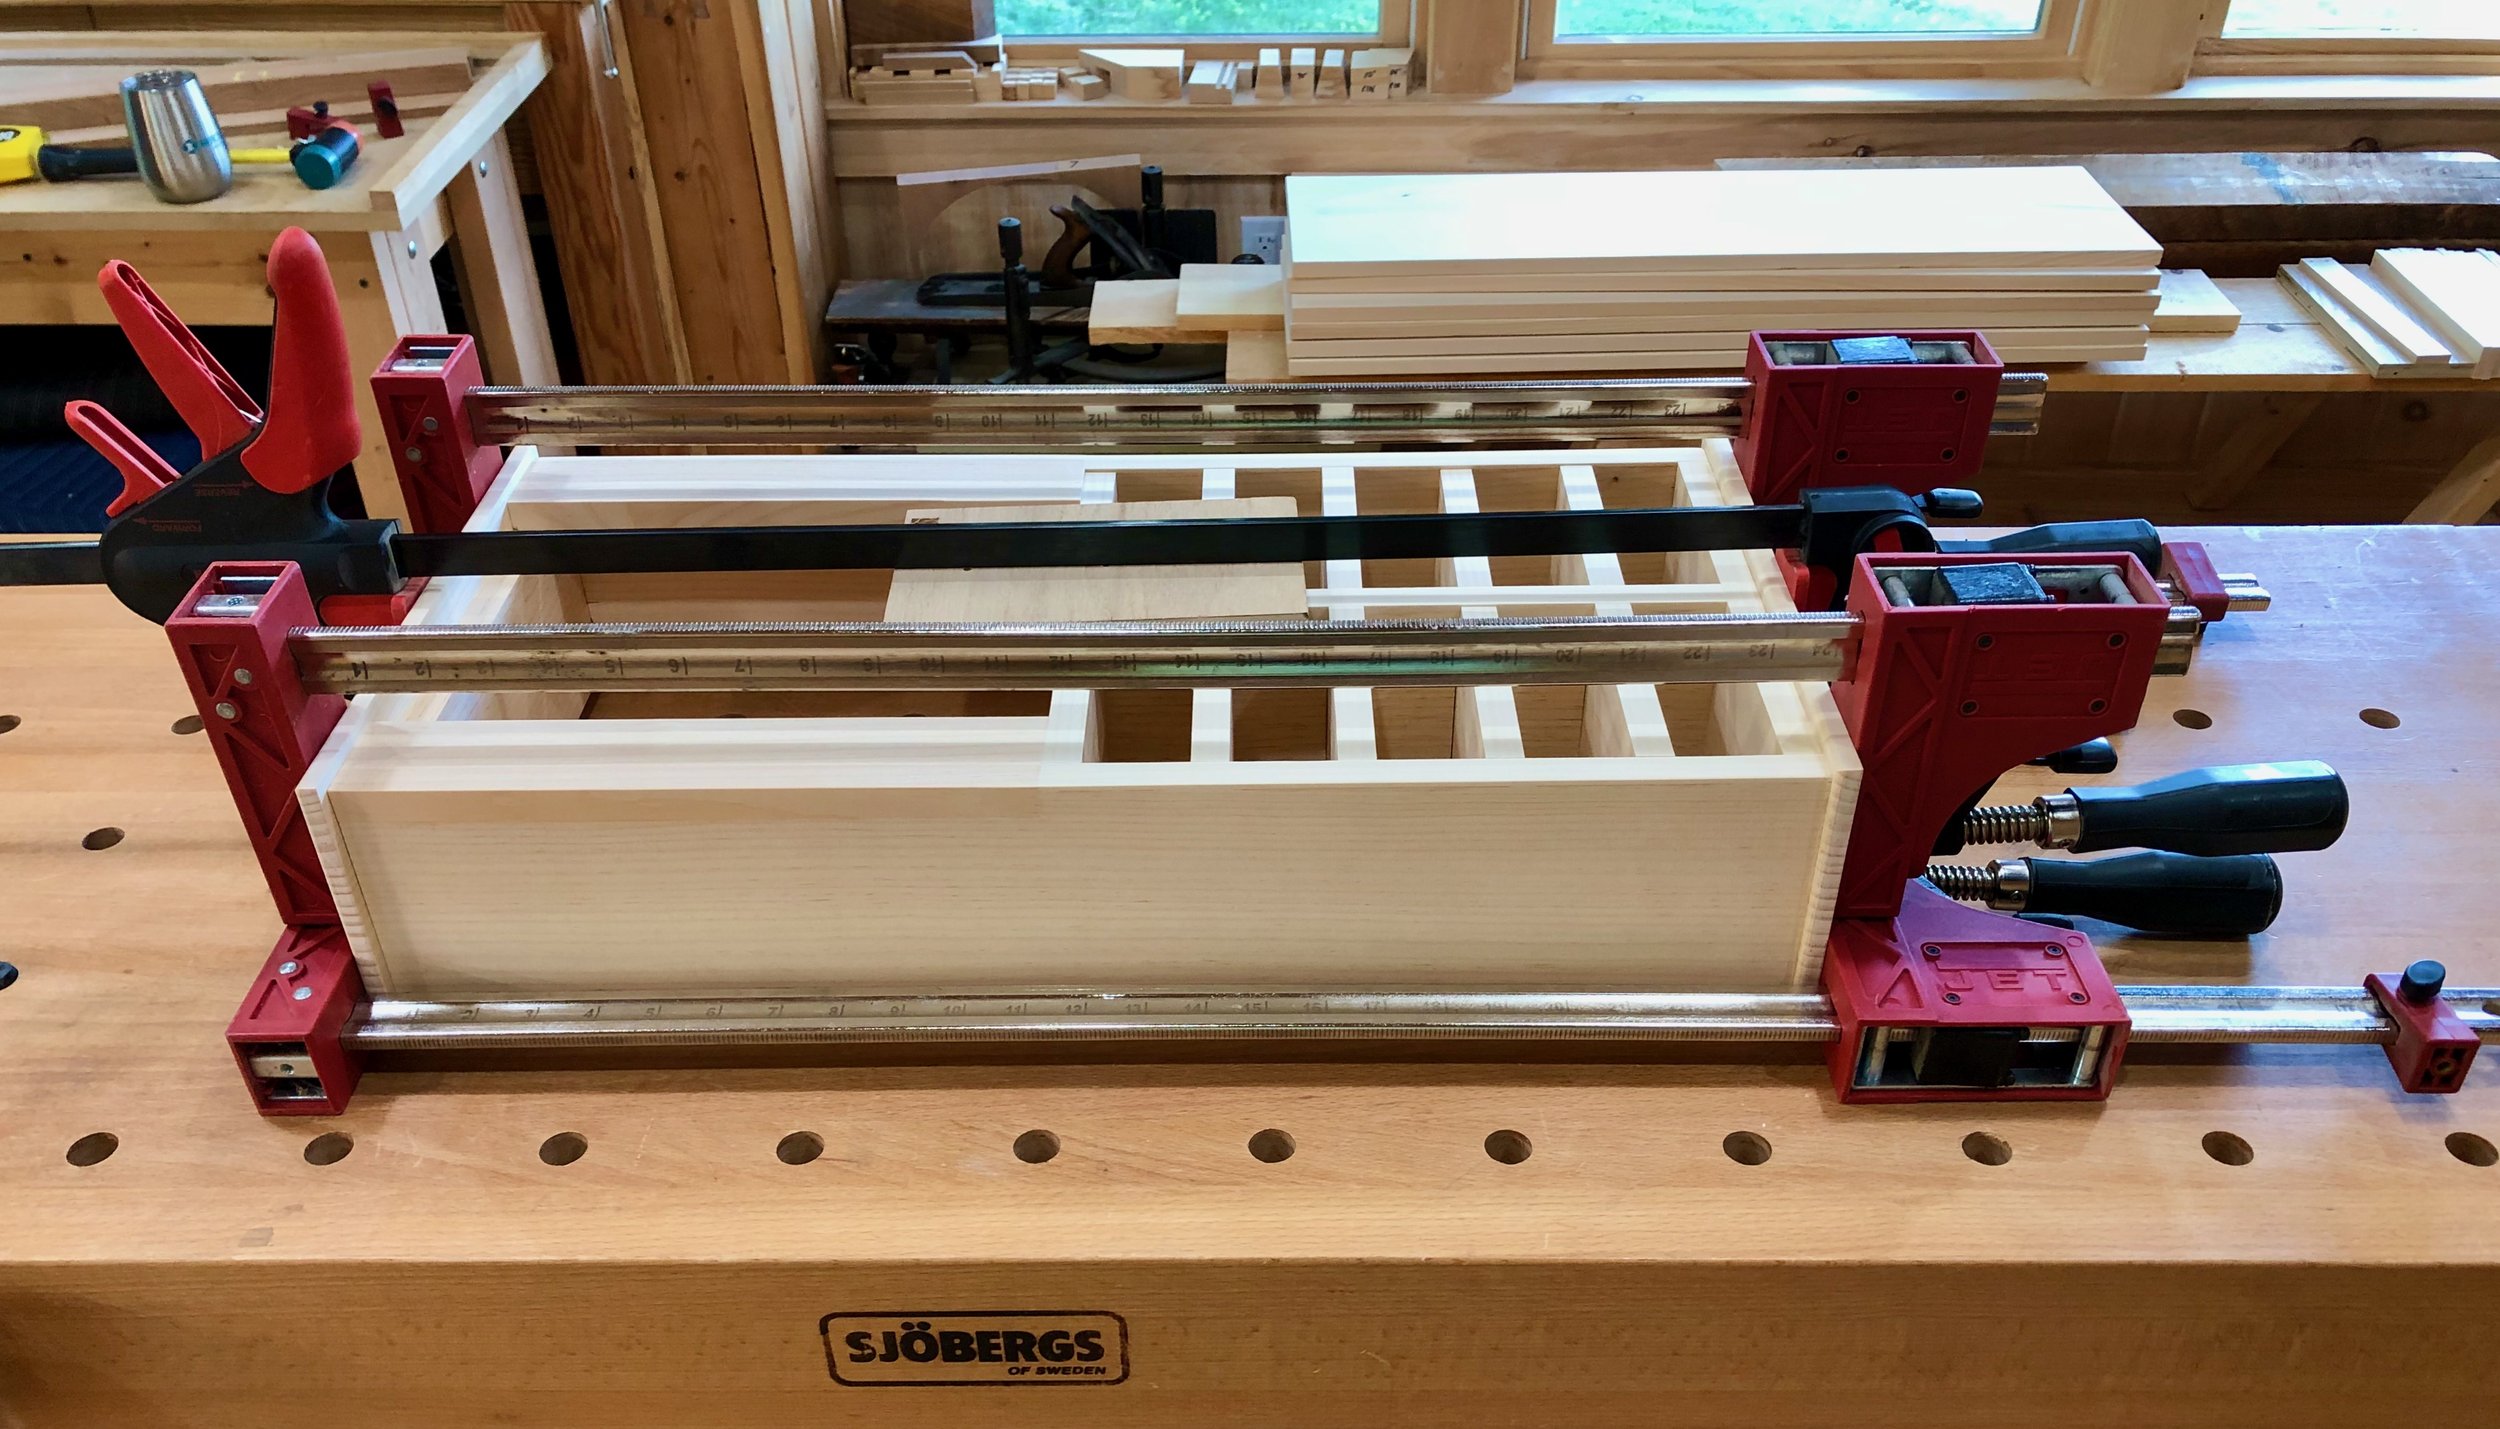
Glue-up of the dovetailed box was easy, as this joint naturally keeps everything nice and square.
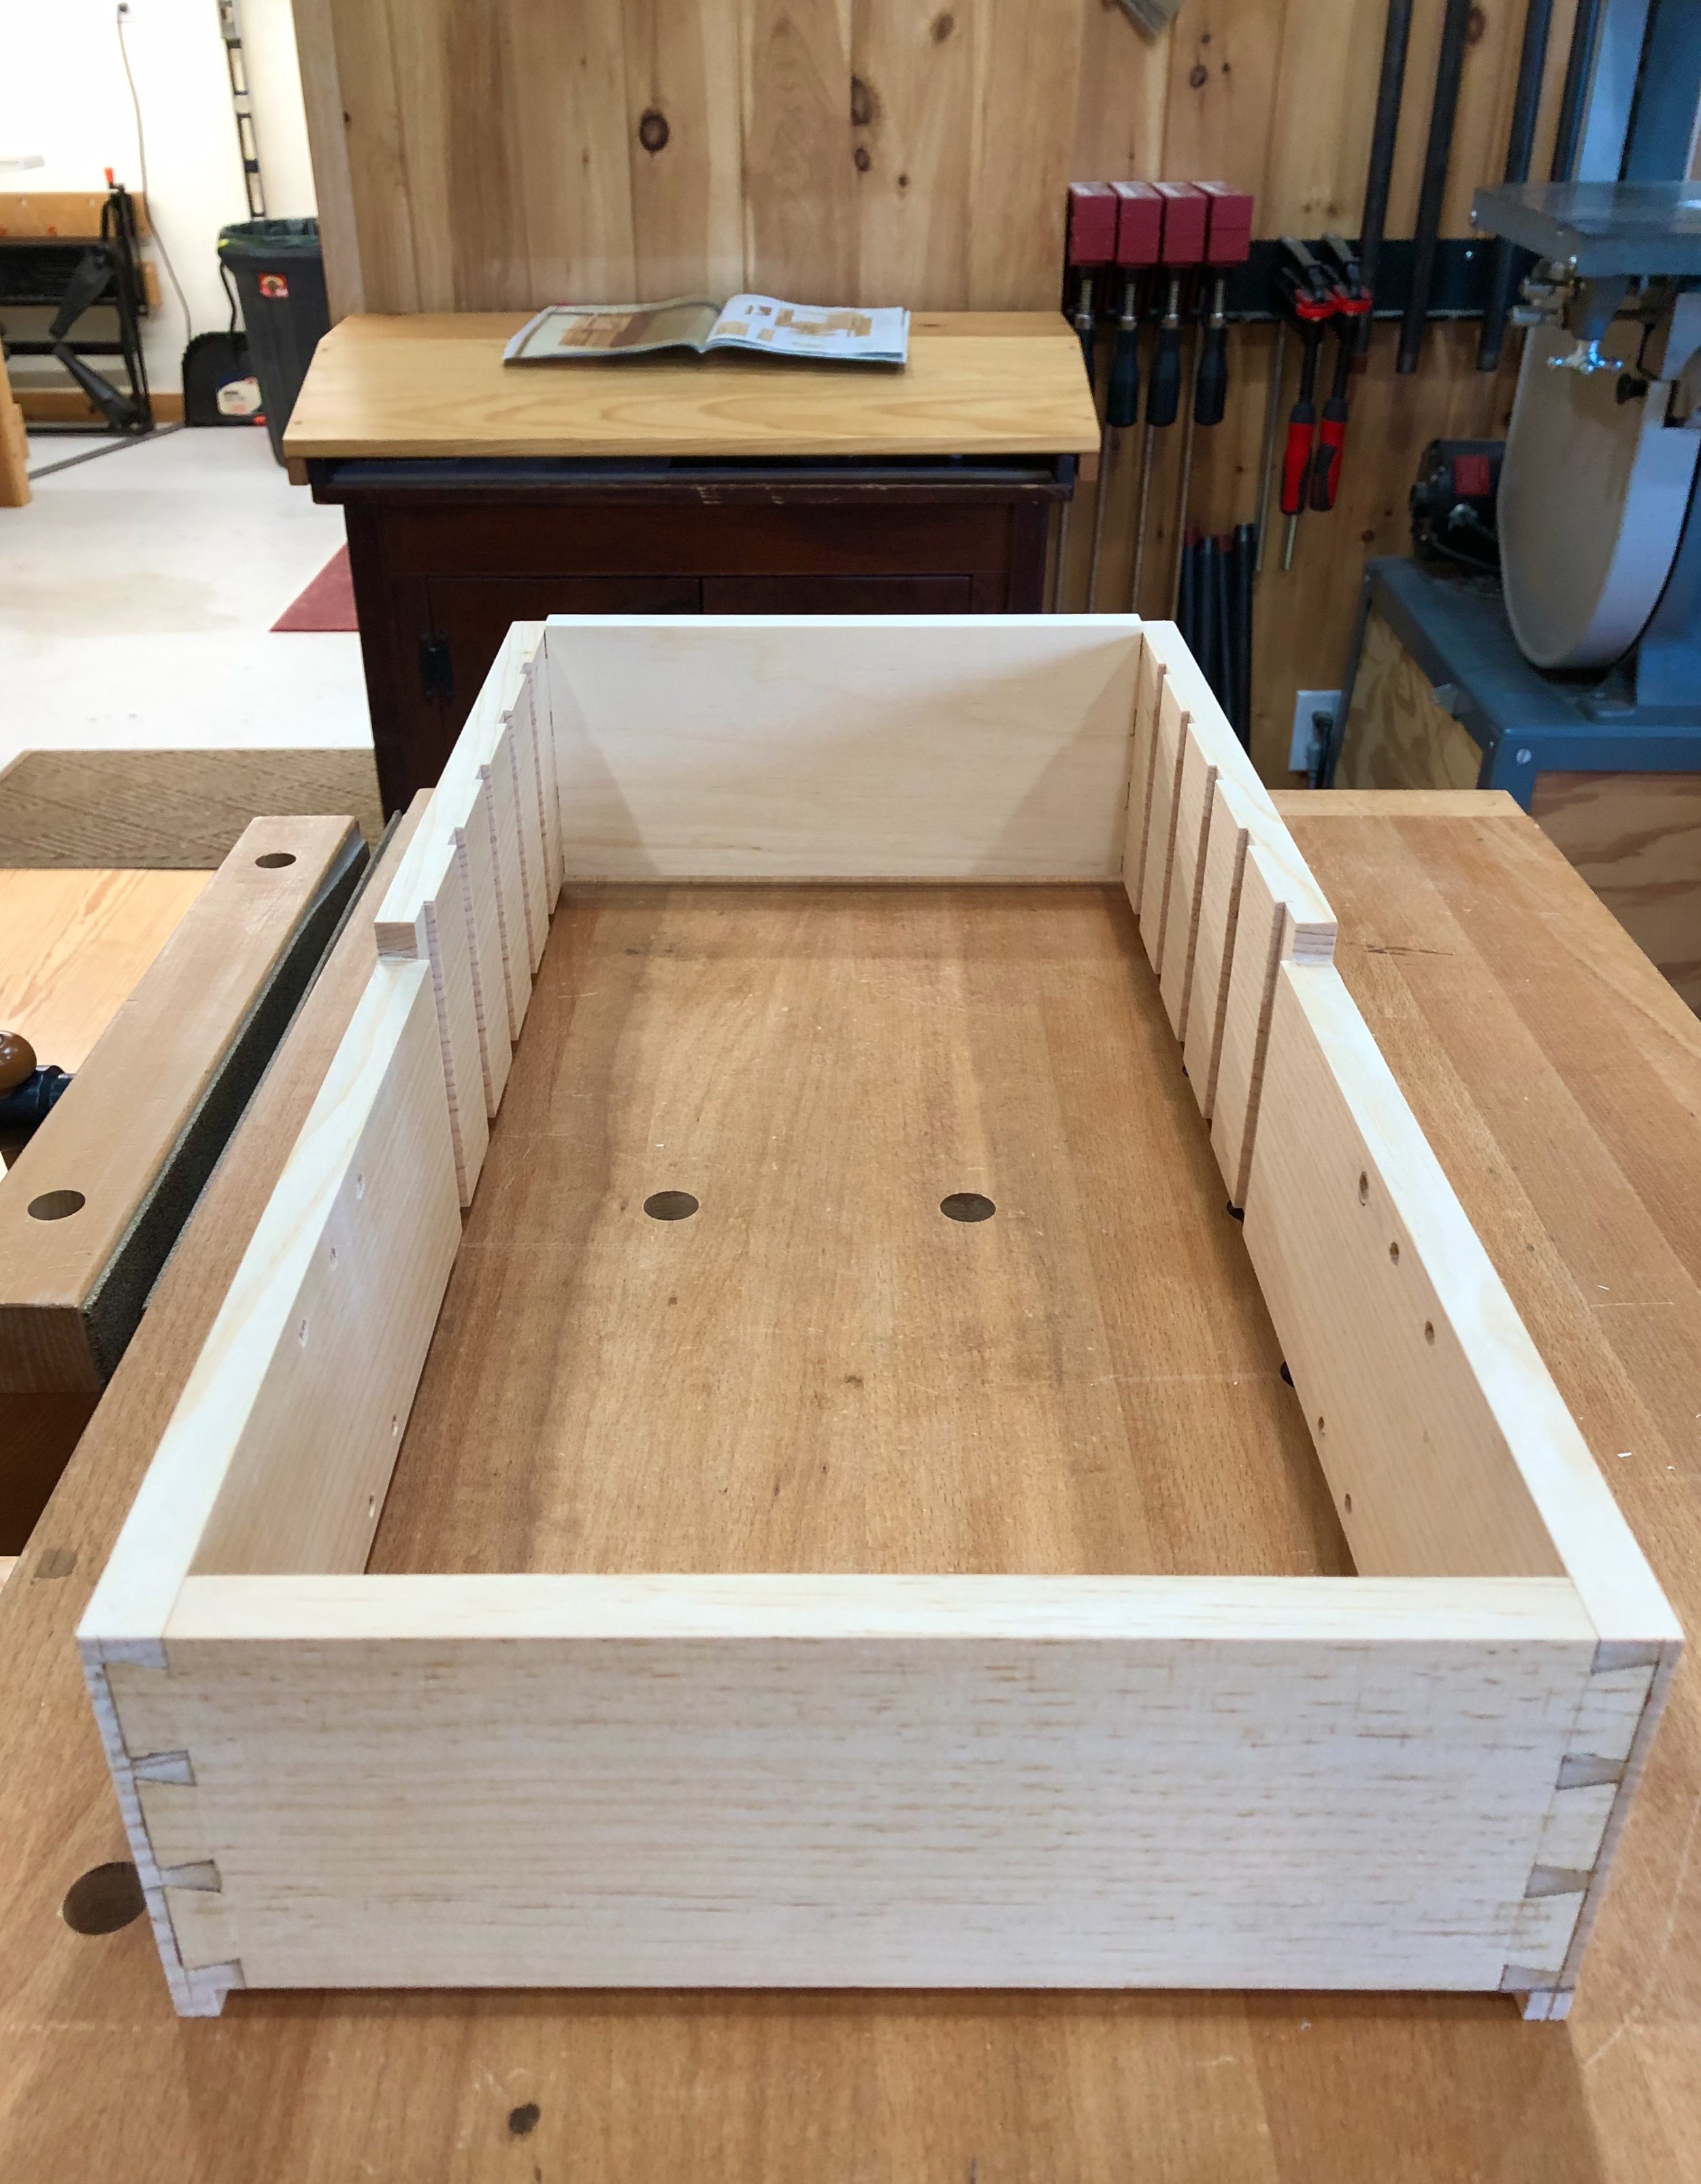
Box assembled
I next prepared the horizontal dividers on which the drawers will ride. These were cut to length, grooved, notched and then cut to final width at the table saw. Before installation, two 1/8 inch thick strips were applied along the front of the case to hide all seams.
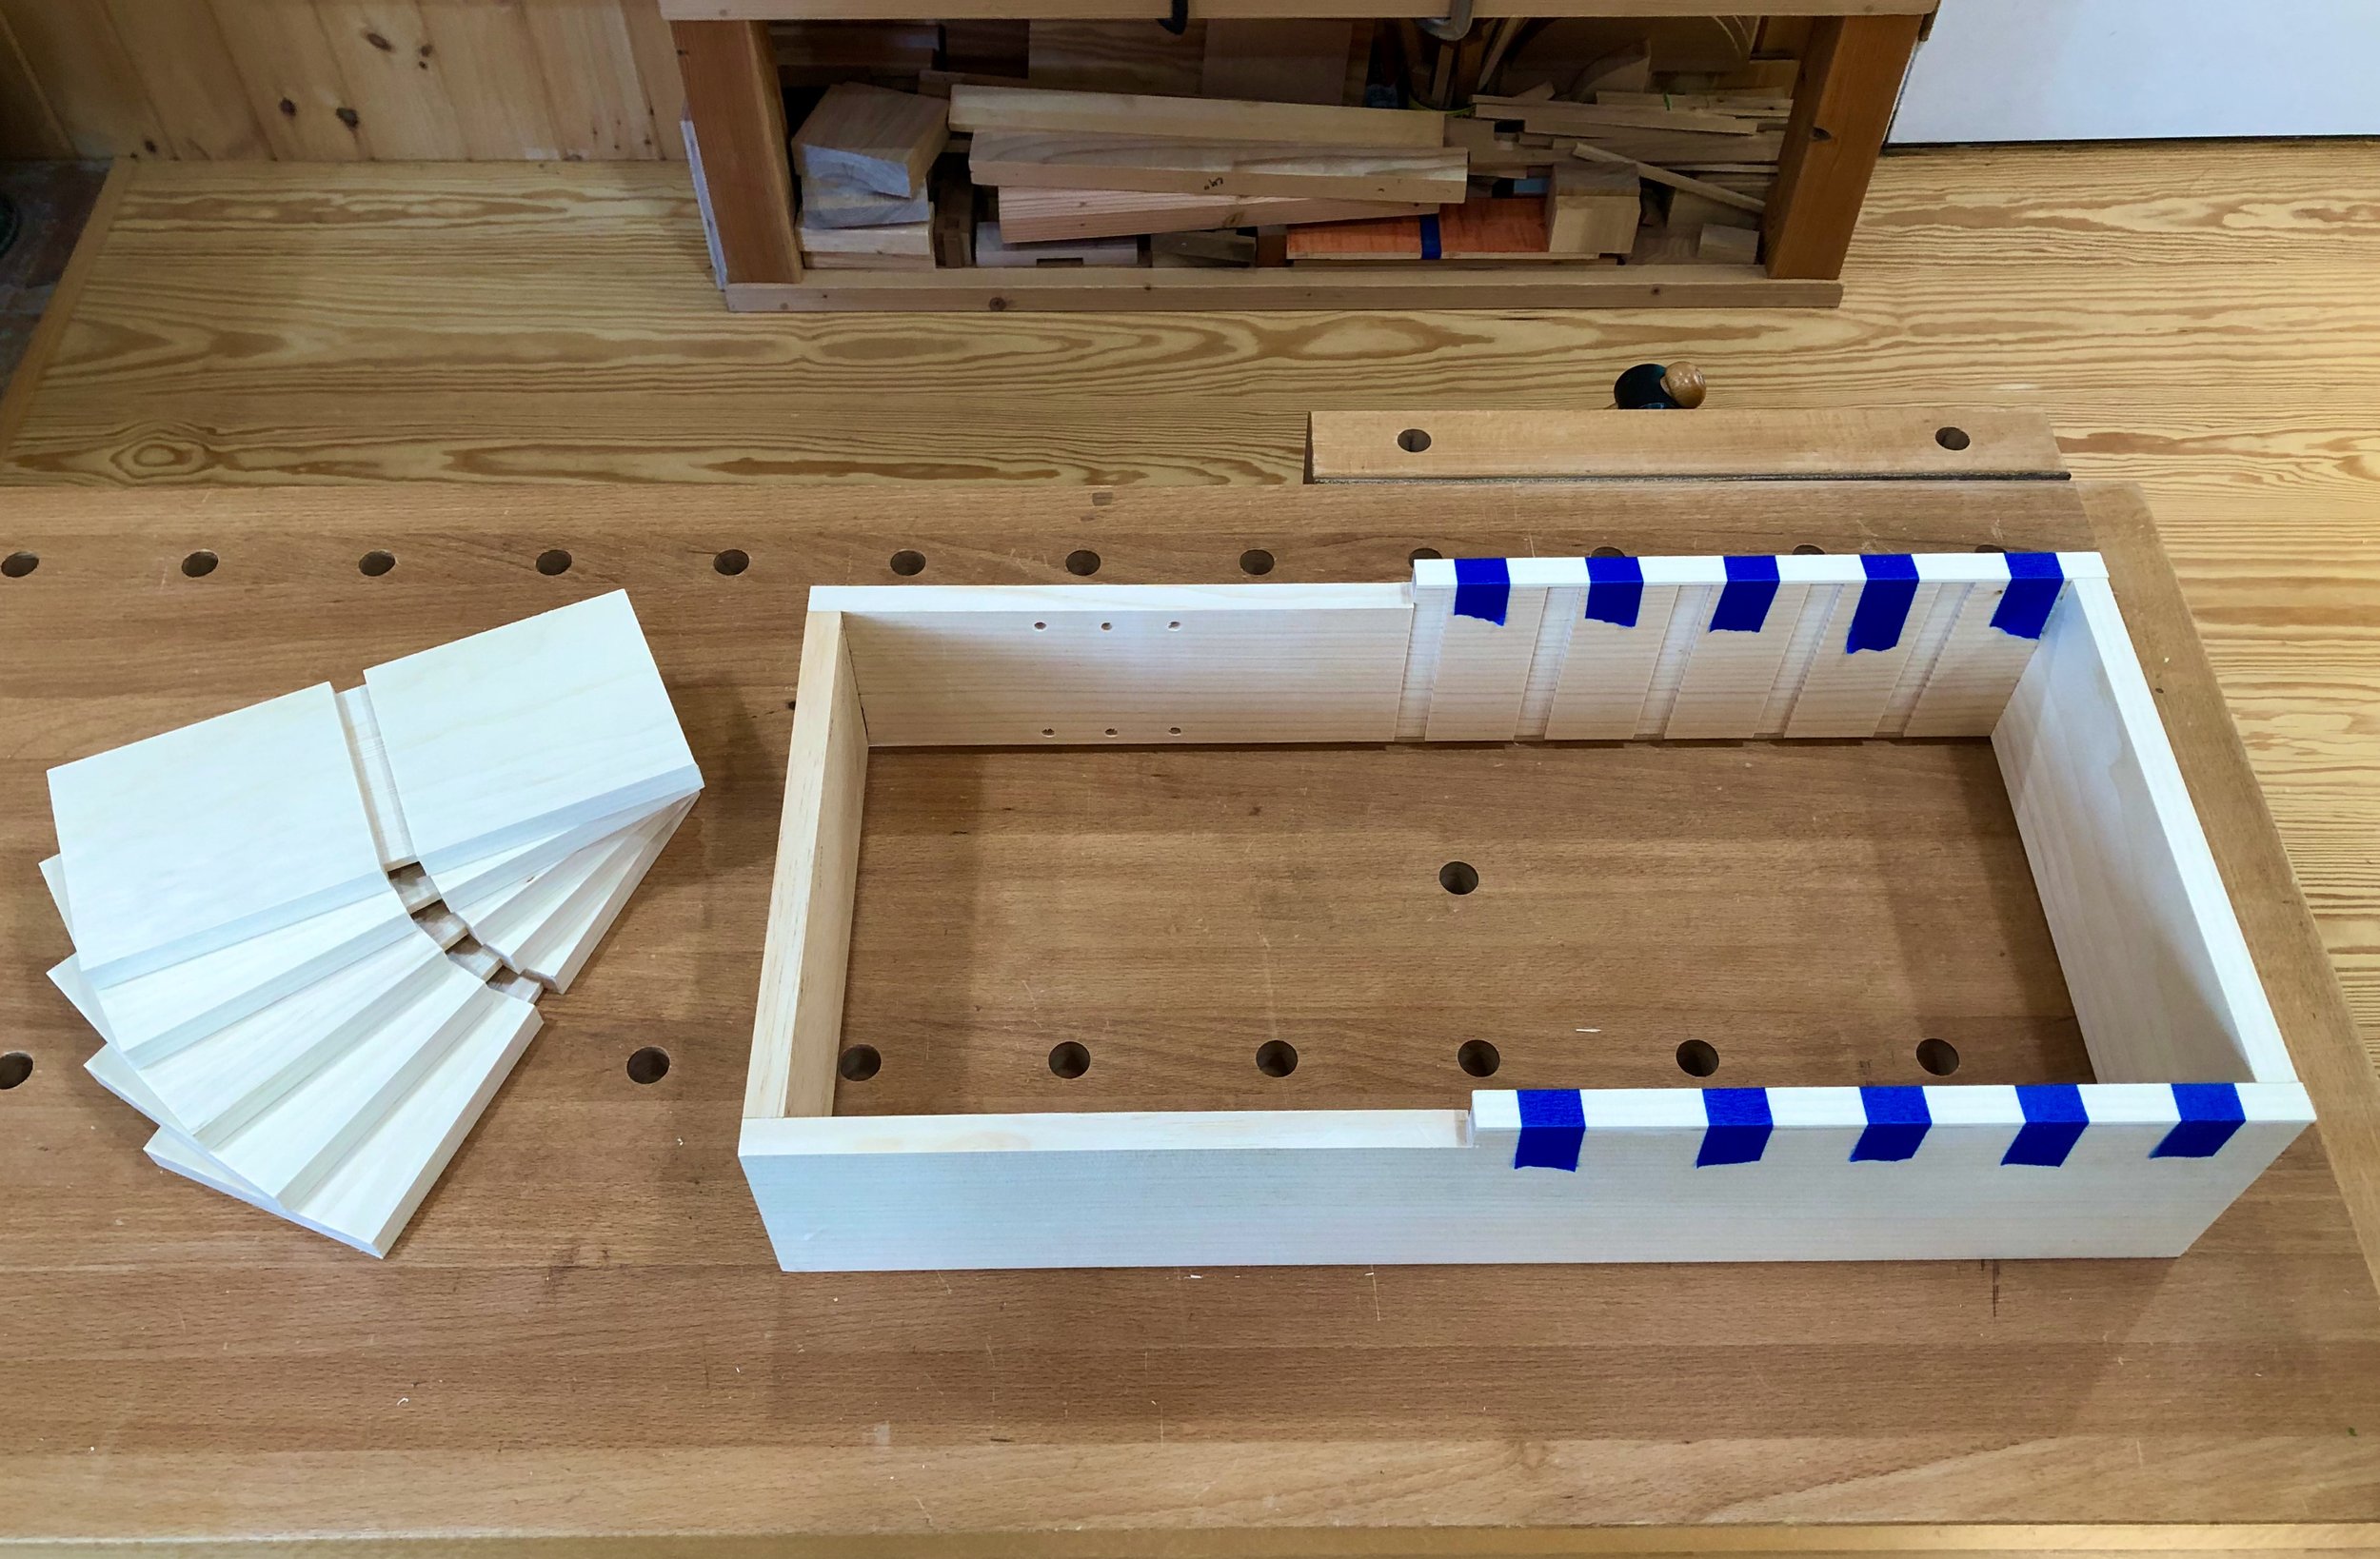
Gluing the face strips using painter’s tape as “clamps”; dividers at left.
Following the creation of five tiny vertical dividers the drawer chambers were formed by repeating a simple 3-step process, beginning at the bottom. From the backside:
tap a horizontal divider into place;
tap the vertical divider in below;
drill a pilot hole in the center of the horizontal piece and then join the assembly together with a small finishing nail; repeat.
A thin trim piece was then inserted into the vertical groove at the front.
The divided box
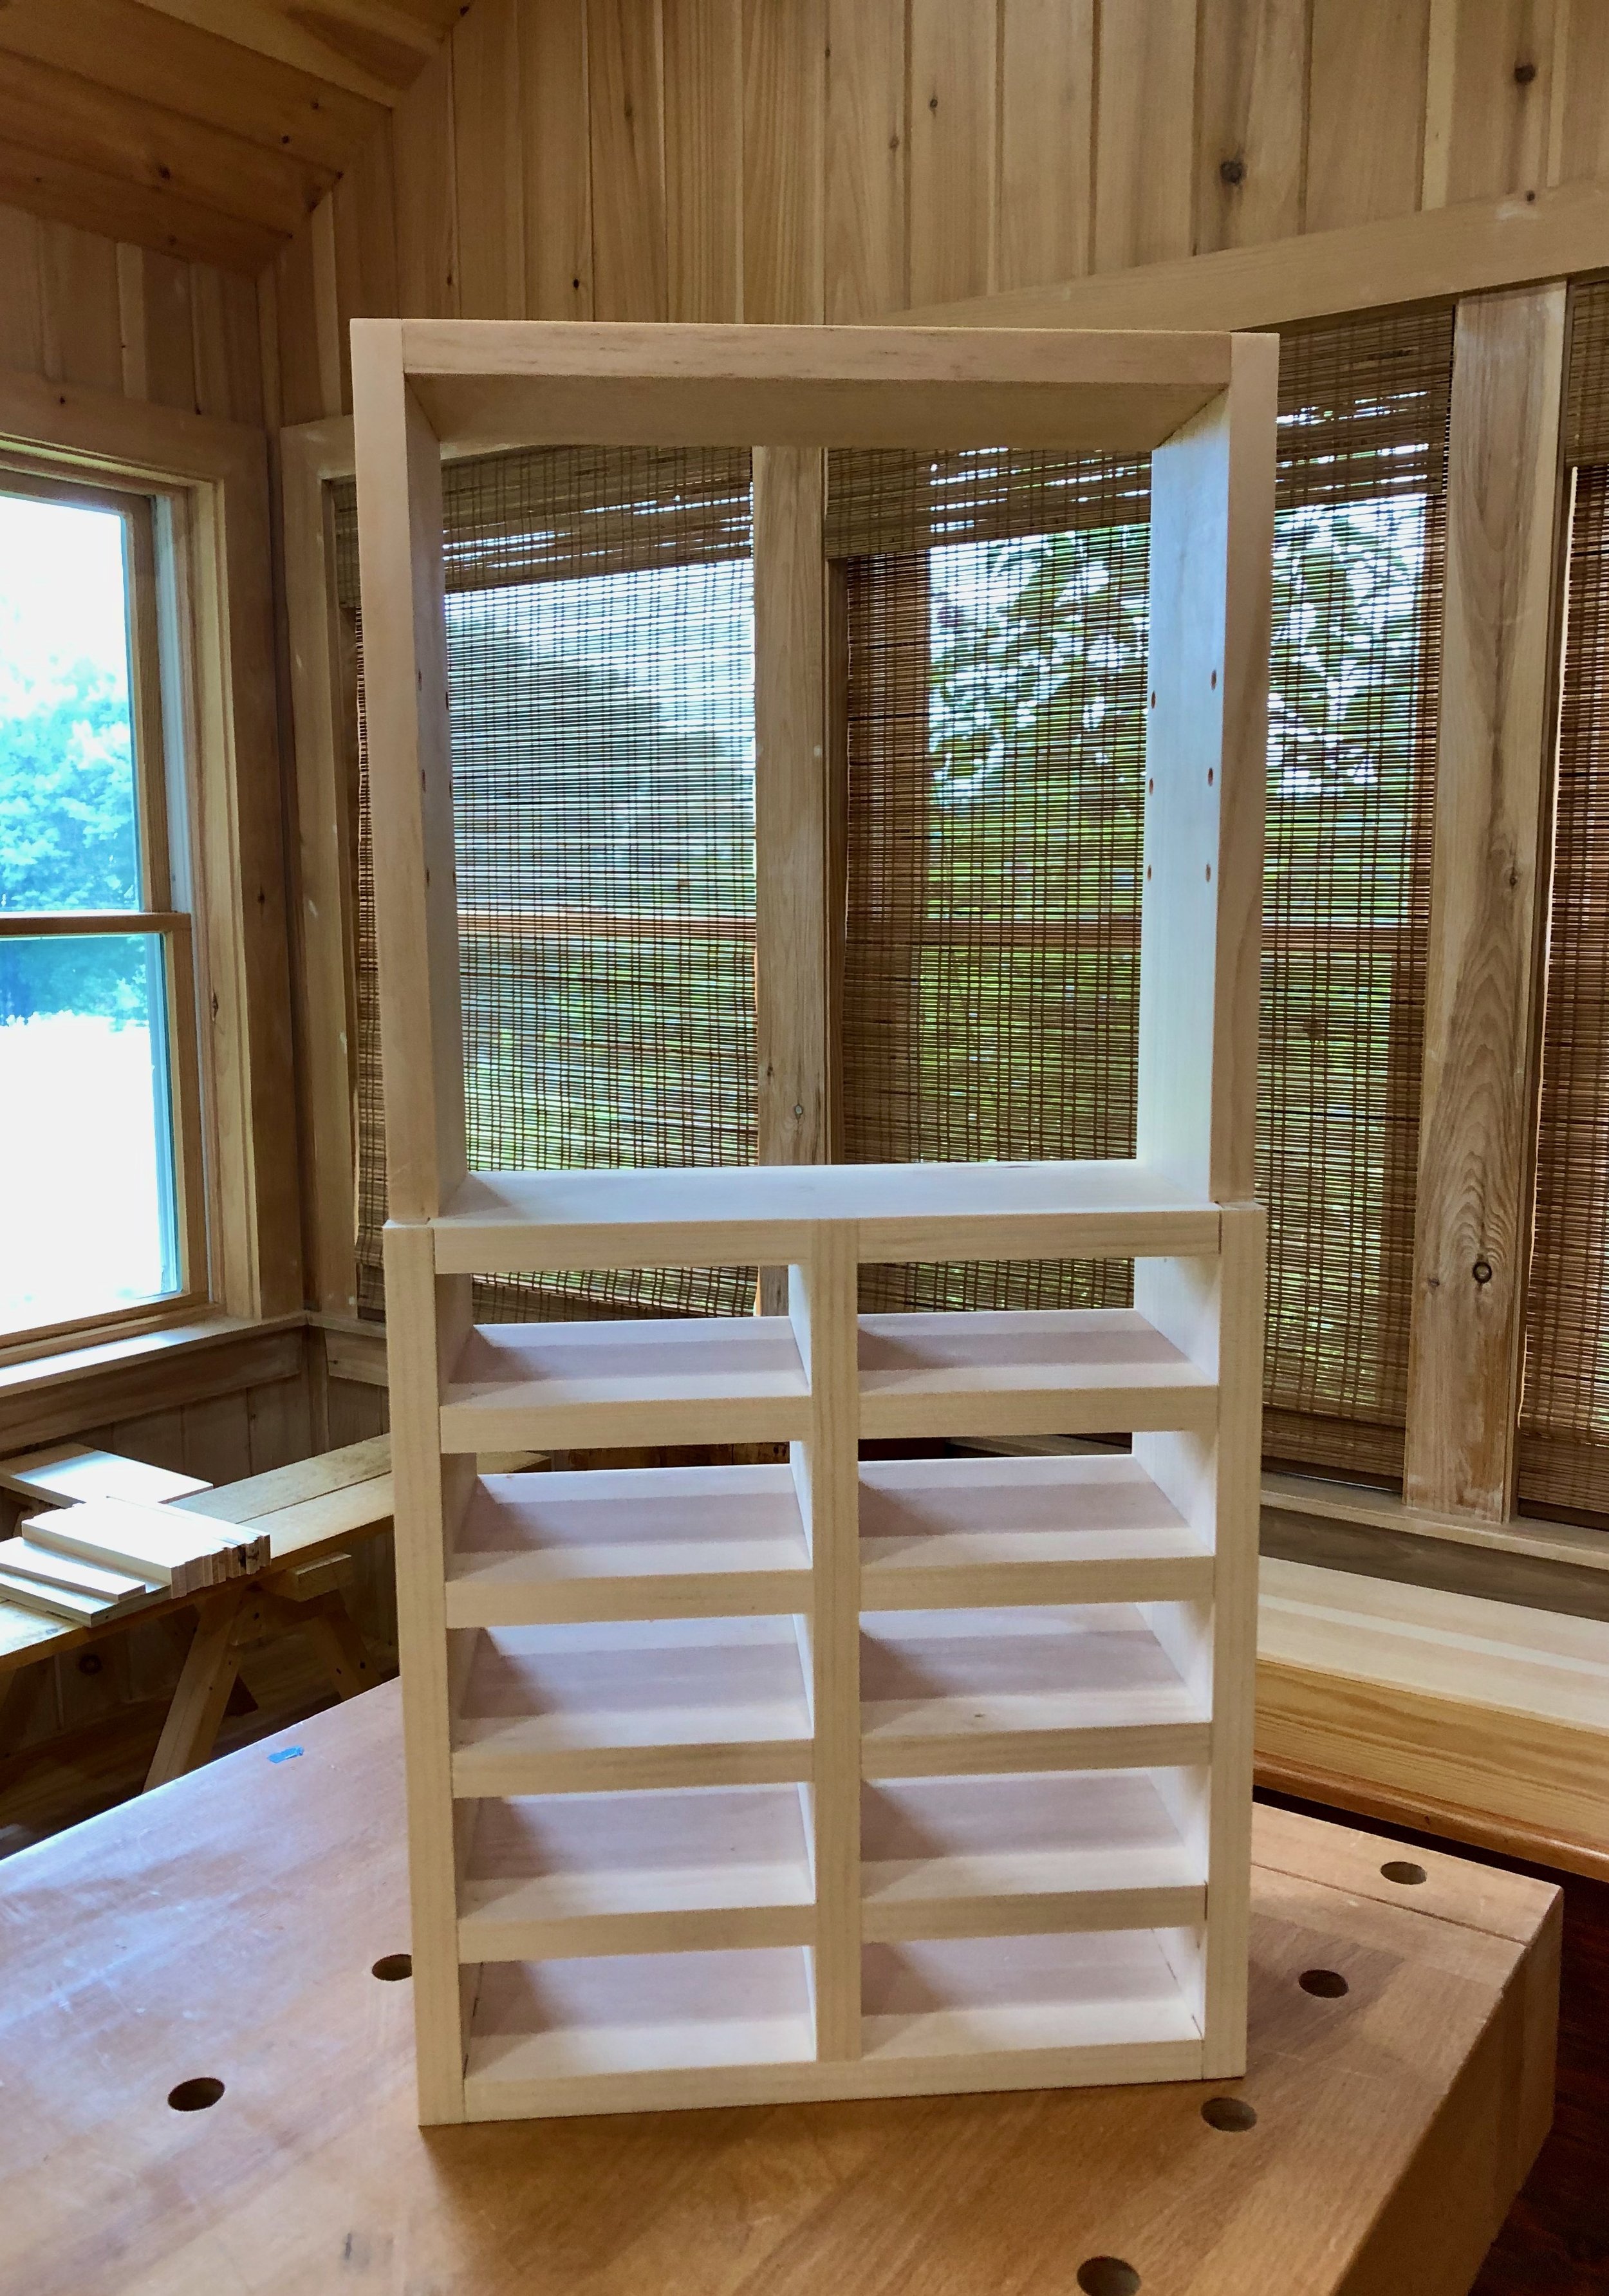
Next, two panels that form the face frame for the door were glued in place, and the proud edges made smooth using a hand plane. The whole case was sanded at this point and then the back, top and bottom boards were fashioned from appropriately milled stock. To keep the look consistent I used the same, quarter sawn pine board for all parts comprising the exterior of the case, but inserted wood from a flat sawn board for the horizontal dividers and trim pieces, as these would present a similar striated grain pattern on their edges. Glueing the top and bottom on was the final case assembly step.
Sandwiching the case between its top and bottom.
With all of the case parts in place the dimensions are now “fixed” for the door and 10 drawers that complete the cabinet. Please stay tuned.
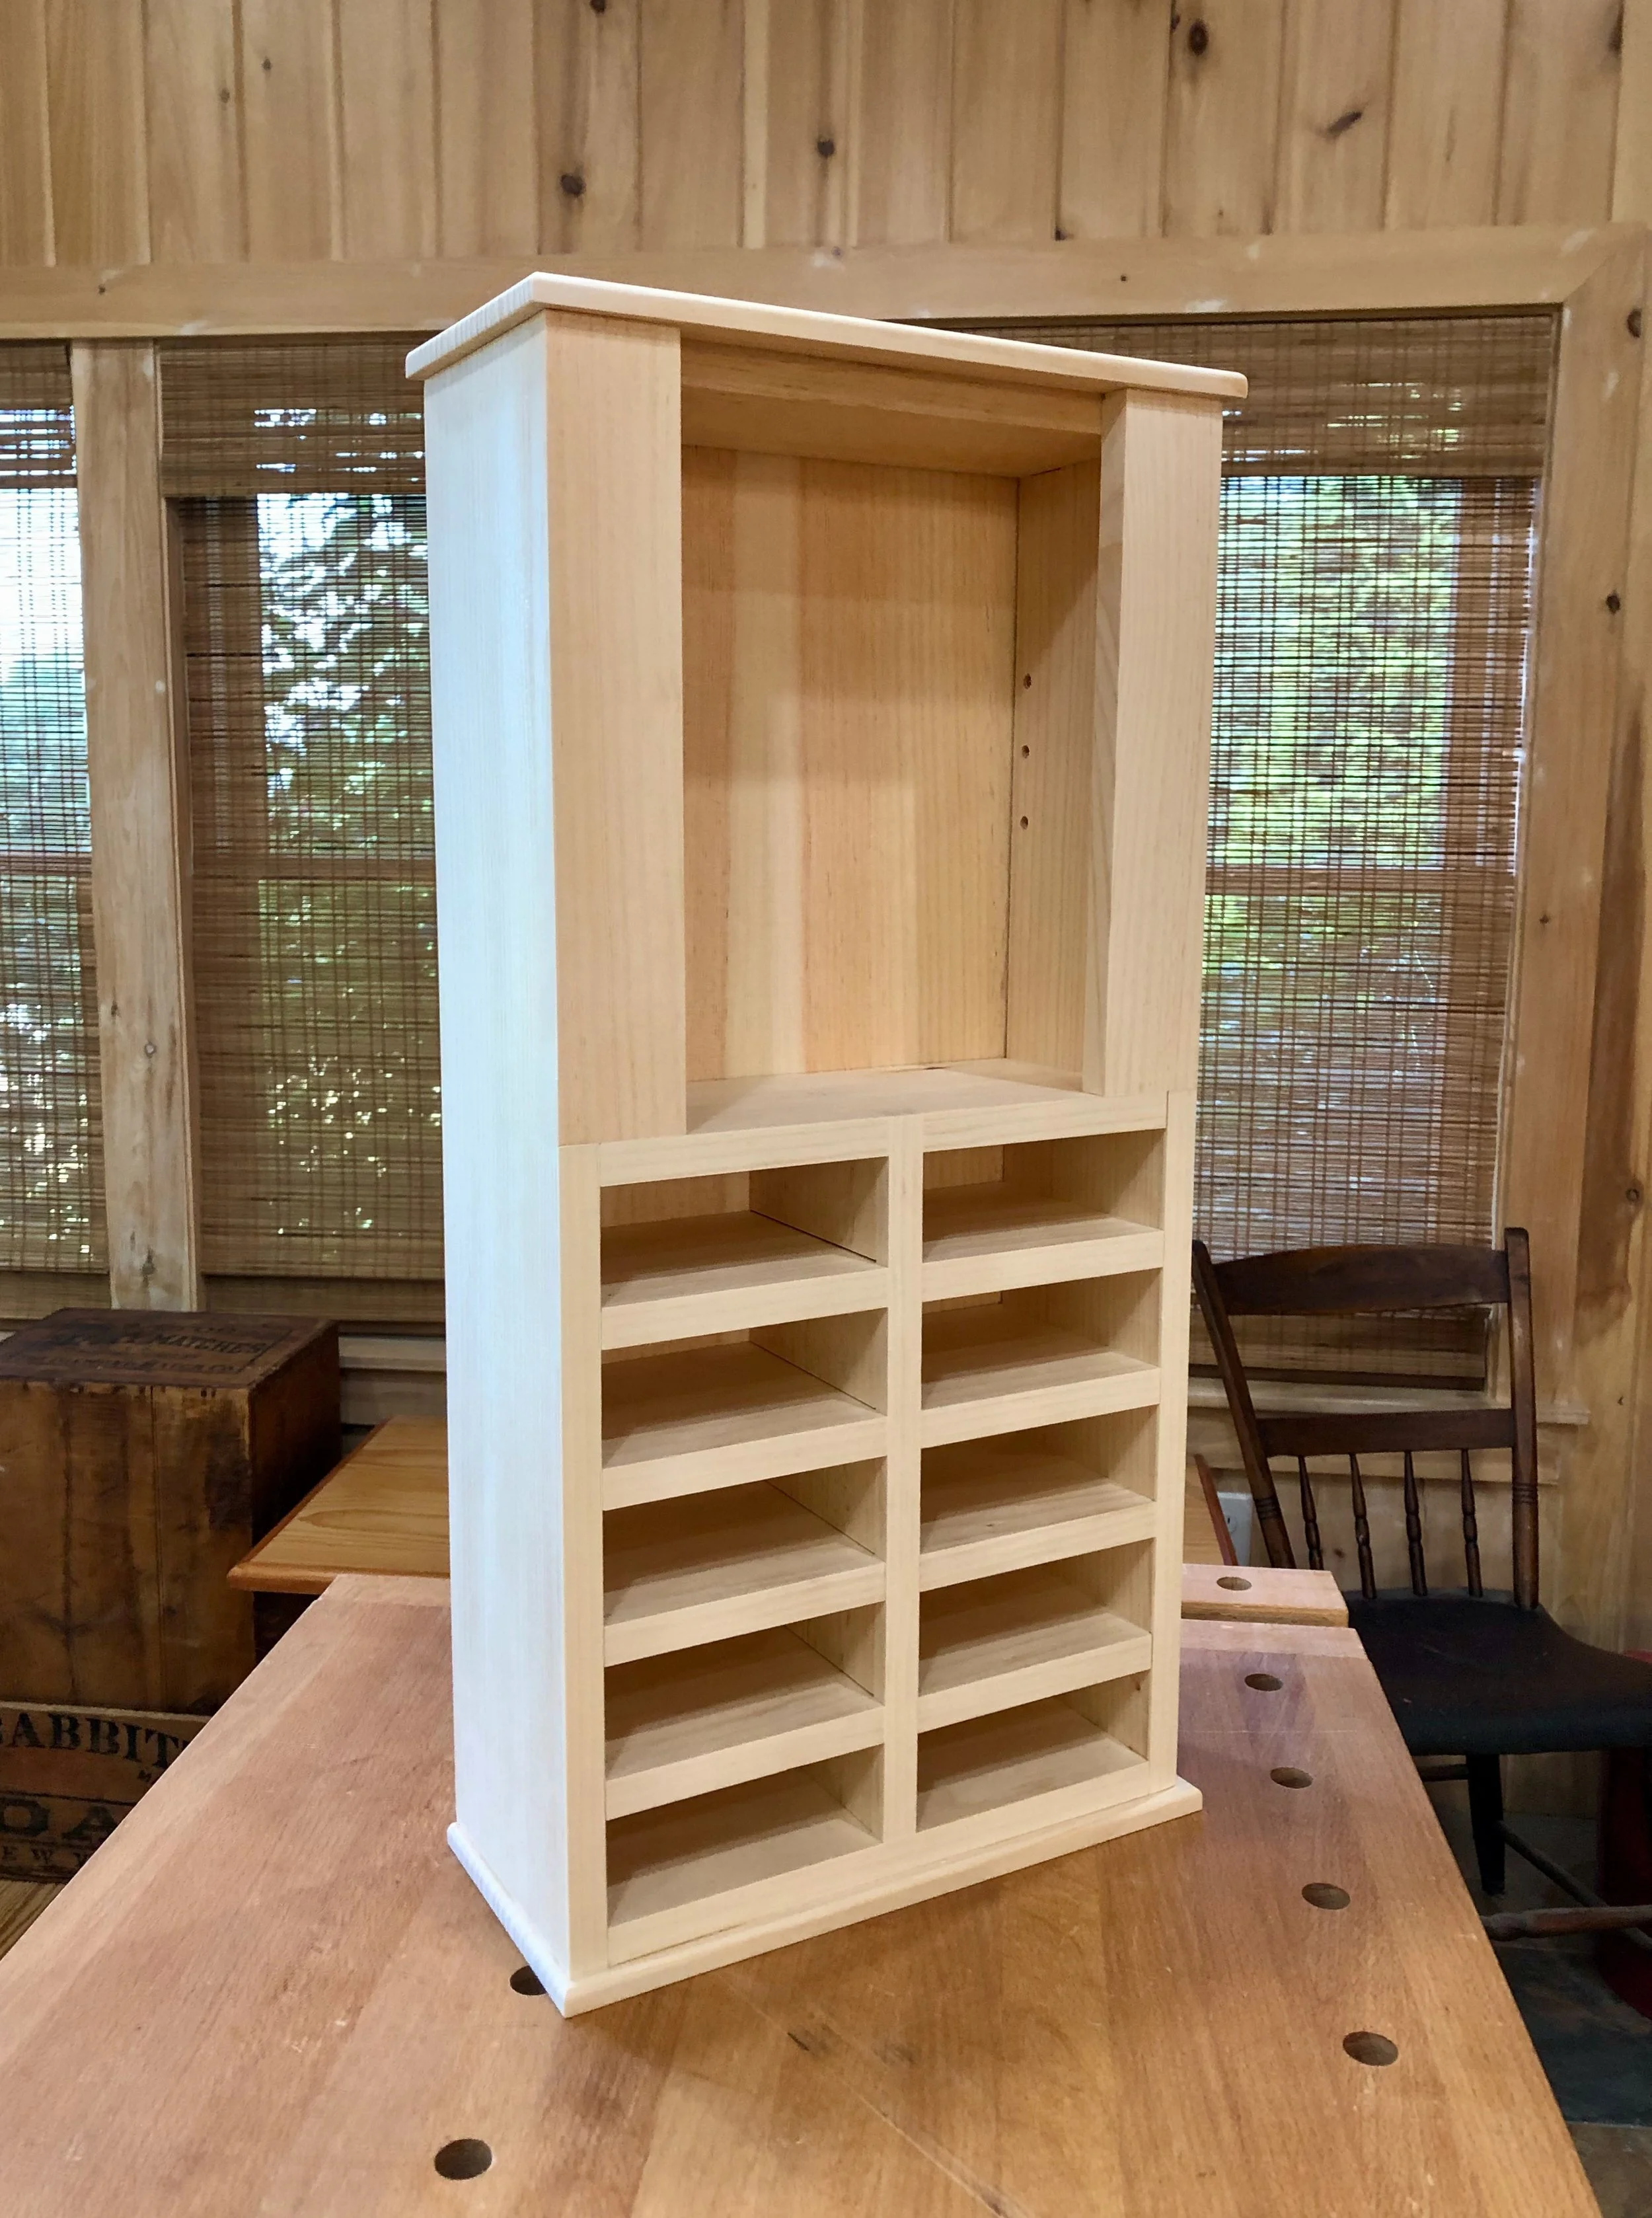
Canterbury cabinet case