

No. 220: the frame

The framework of most sofas is rarely seen nor thought of. Buried beneath padding and fabric, it performs its supporting role dutifully in the dark. And that’s just as well, for what you would see in the light would be unremarkable materials held together by the occasional wooden joint and various metal fasteners. Not judging. It’s the way frames are built when meant to be covered. The settles of a century ago were different, though. Supported by exoskeletons, there was no place to hide slapdash construction. In fact, their bones defined their being; upholstery was just a pretty gown. Even if Craftsman style is not your taste, you have to admire the honest presence of this furniture.
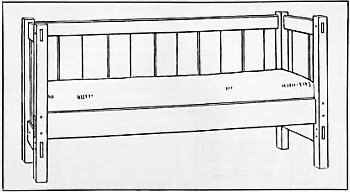
Gustav Stickley settle (No. 208) with pegged mortice & tenon joinery
The Craftsman, Vol. V, 4 (1904), p.407
The framework on our Project is different from these early examples, but just as forthright. Instead of the typical slat design, panels wrap the exterior of L. & J.G. Stickley’s No. 220 - like the walls of a boardroom. And then there are the arms! Built to serve, the massive arms impart an air of opulence while surrounding you in coffee table comfort. I find them to be both ingenious and beautiful - by design.
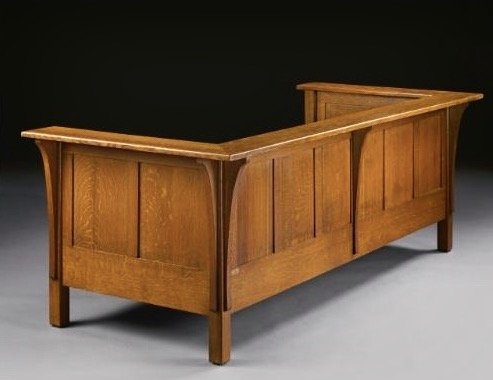
L. & J.G. Stickley’s No. 220 settle
reproduced from the online auction site: artnet.com
Completing the frame for No. 220 involves routine mortice & tenon and framed panel joinery, the challenge comes from scale. This thing is large; definitely the largest piece of furniture I’ve ever built. So to break the work into manageable portions, construction was approached as a sequence of “jobs” described below.
Job 1: Rails
Framed panel construction, commonly used to make things like doors and dressers, involves 3 components: stiles (the vertical members); rails (the horizontals); and the panels, themselves. Typically the stiles and rails are attached to one another through joinery and glue, while the panels float freely within this construct. In addition to 4 legs, the No. 220 settle contains 13 stiles and 7 rails, all of which will need to be dimensioned and then joined together. These are the joints that create the frame and, as such, should be fashioned with care.
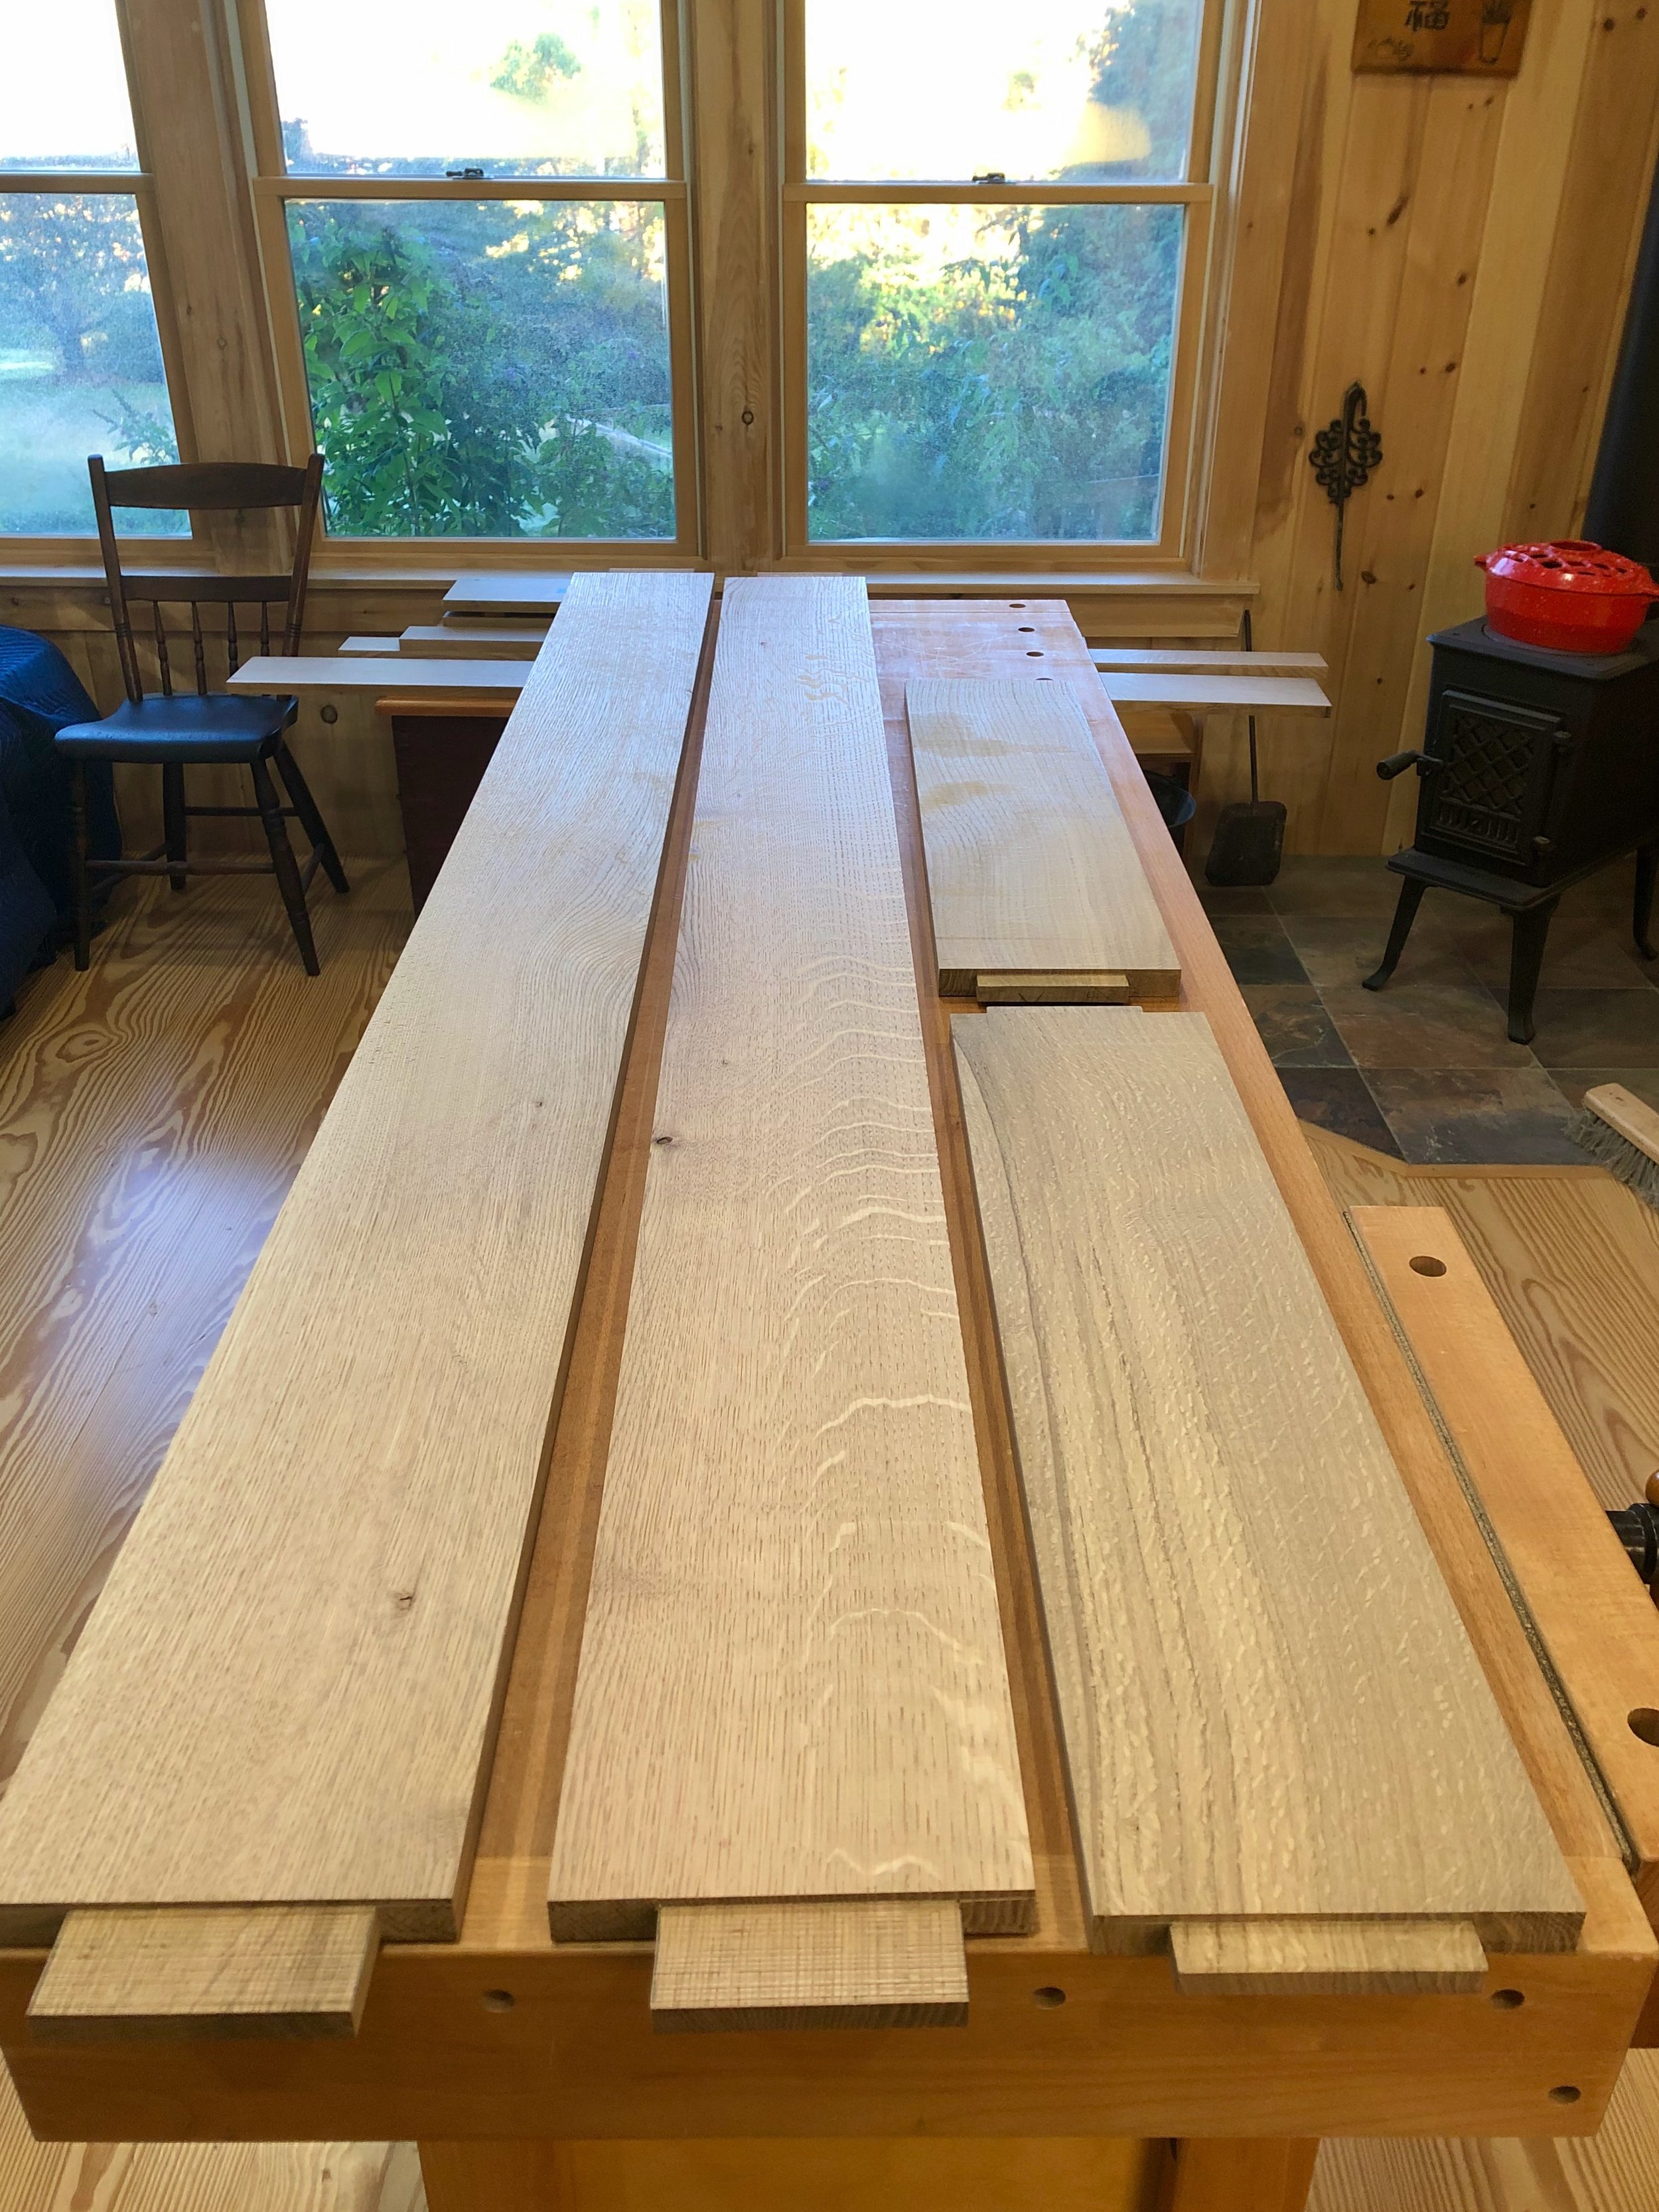
The job begins by prepping the rough 4/4 boards to make them smooth, straight and square. Now, it turns out that a stack of rough lumber “is like a box of chocolates …”. While one can make visual assumptions as to the grain and ray fleck pattern beneath the fuzzy exterior of our quarter sawn oak, it is only when boards are planed that they express their true “flavor”. Generally, a smoothened quarter sawn board reveals something rich and satisfying, but occasionally a fruit-filled one will turn up. (Let’s face it, we all hate when that happens.) Thus, I decided that before I commit stock to becoming stiles, rails & panels I should probably have a taste of every board and then classify them by character. Assuming proper dimensions, the showiest pieces would become panels, and the more modest ones the stiles, rails and corbels. In addition to rays and grain, color and the presence of natural defects (e.g., knots) are also a consideration. Eventually, this wood will be finished with stain and varnish where more visual surprises await, but for now I was content to make the best choices and move on.
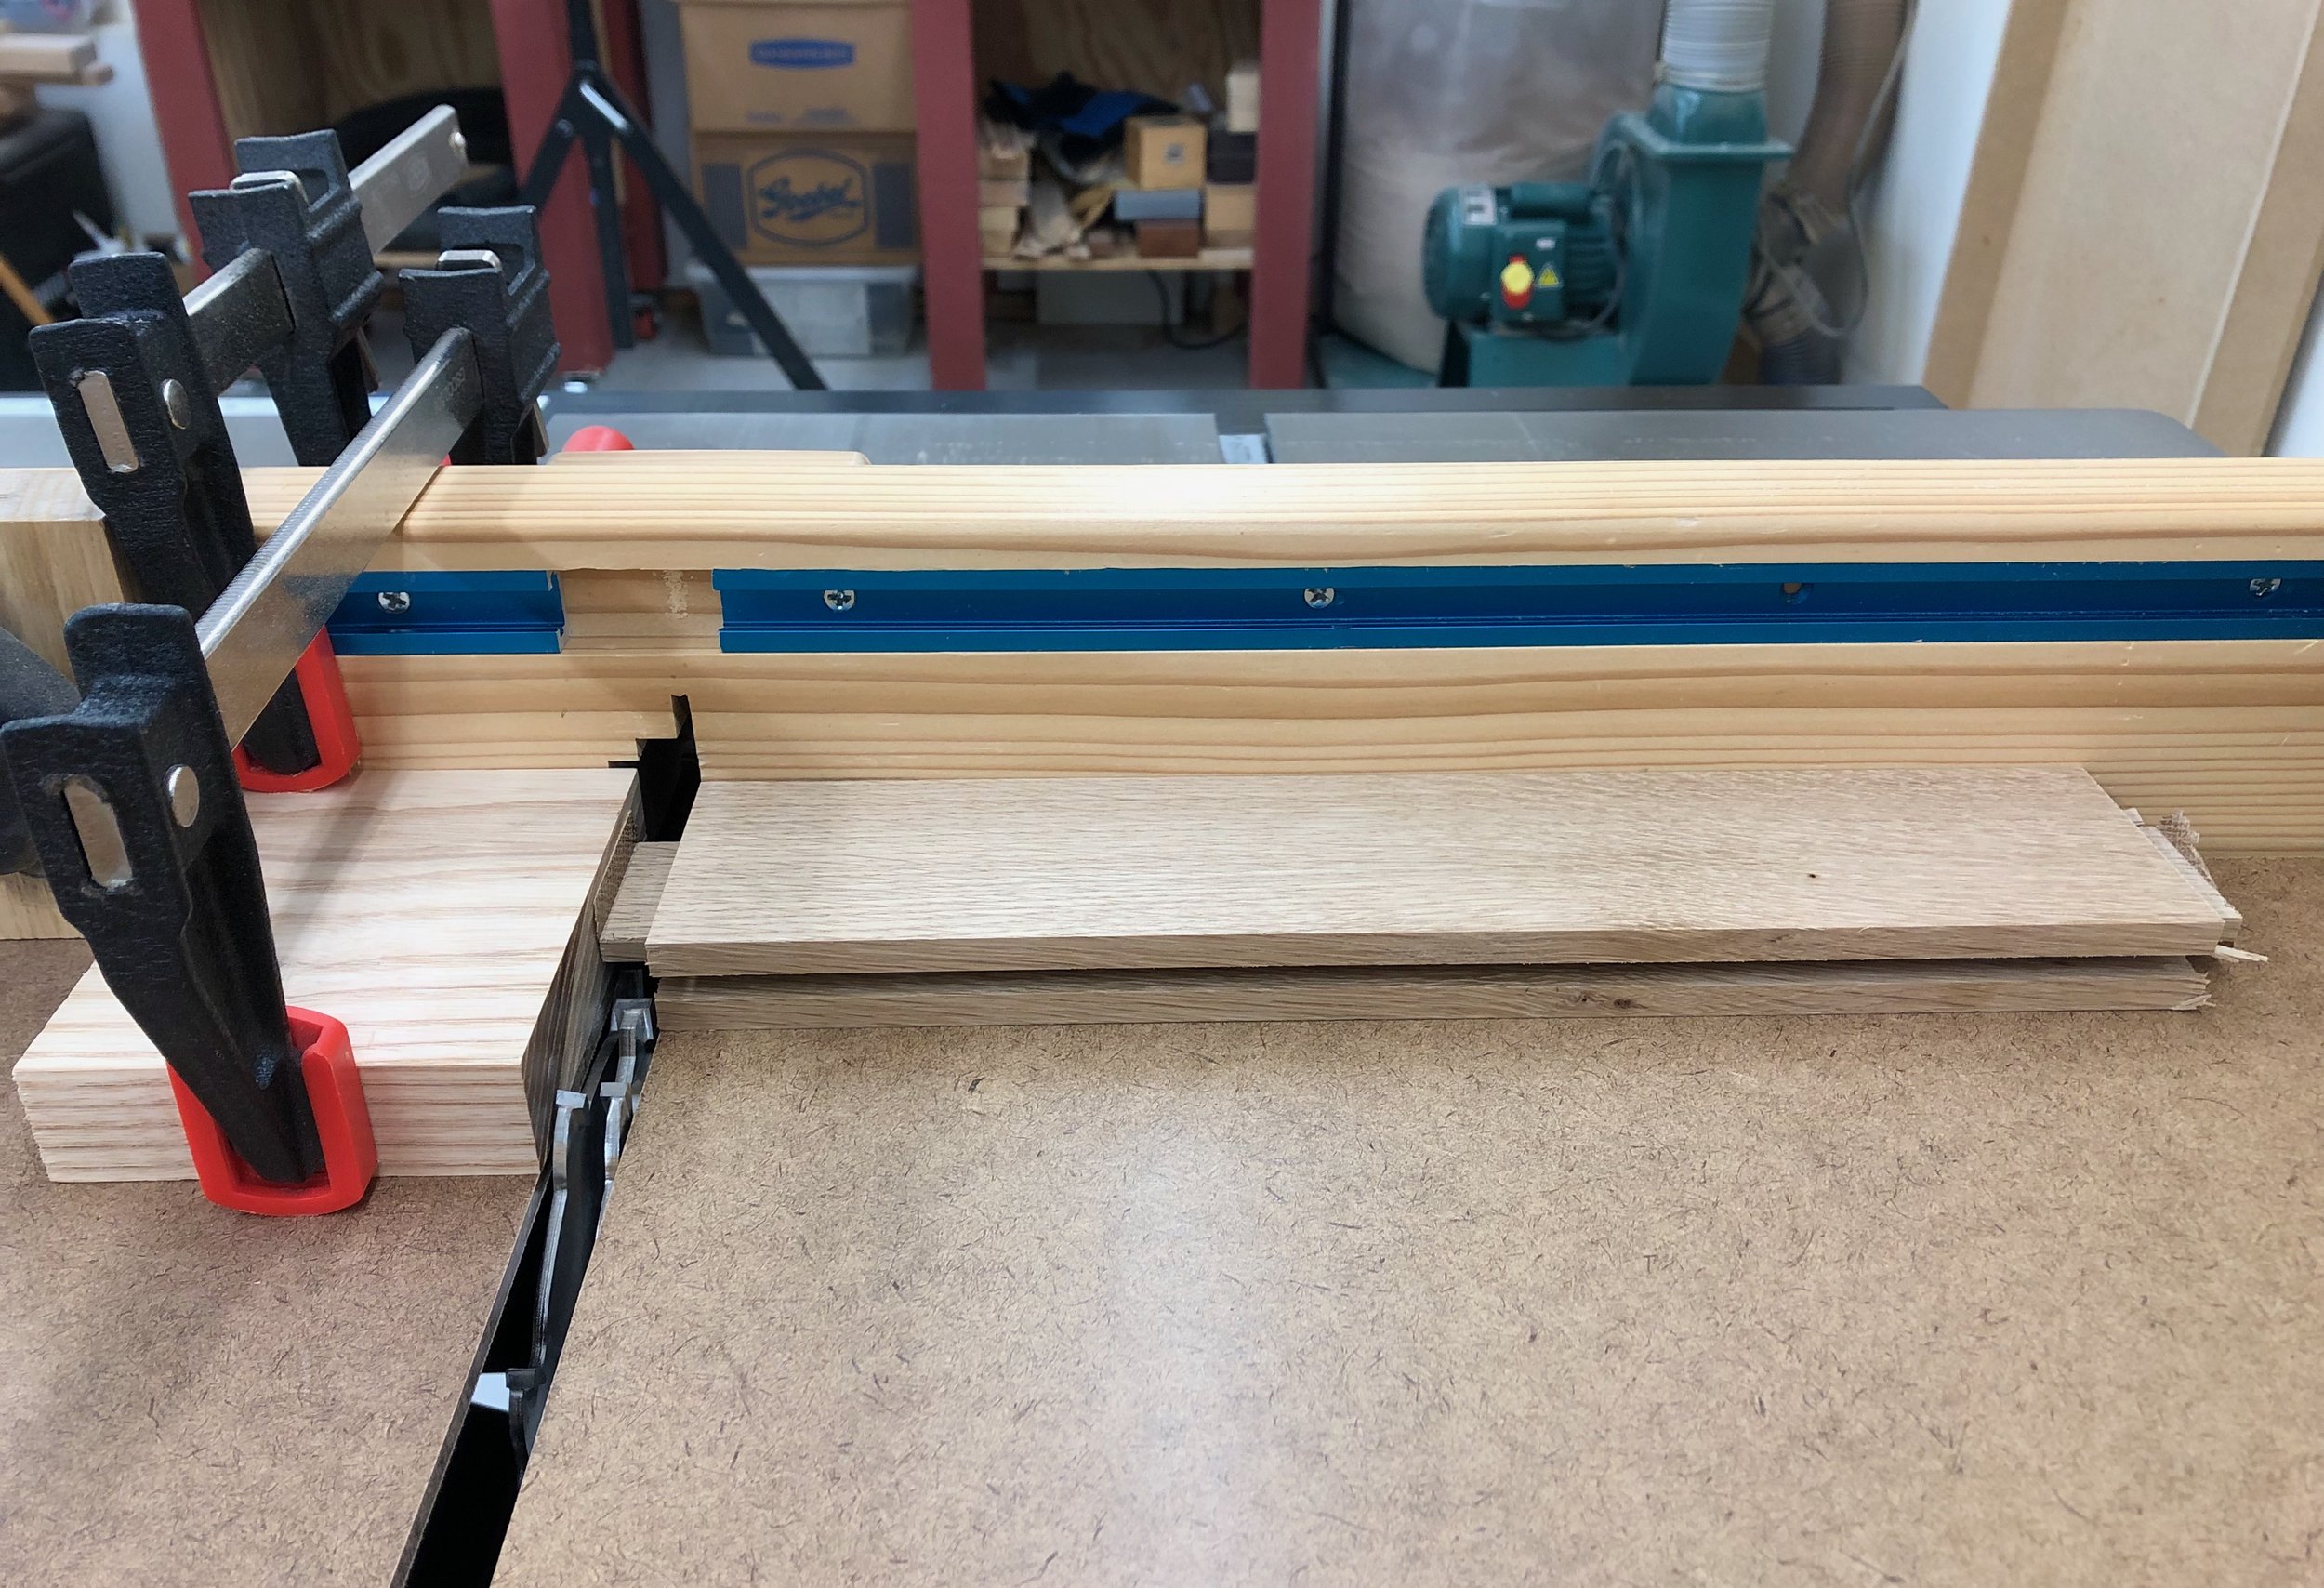
As a final obstacle, one of the 75 inch long rails would need to come from a board that was heavily curved along both of its edges In order to charm this snake I utilized a straight piece of maple trim material, found abandoned in my basement by a previous homeowner. This 8 ft. long “guide” was screwed along one edge of the oak board, protruding at least 1/4 in. all along the way. I could then ride that guide along my table saw fence during a rip cut to produce a straight oak edge on the opposite side. Removal of the guide then put this board on par with the rest of my stile & rail stock, which were then all jointed/ripped and chopped to size.
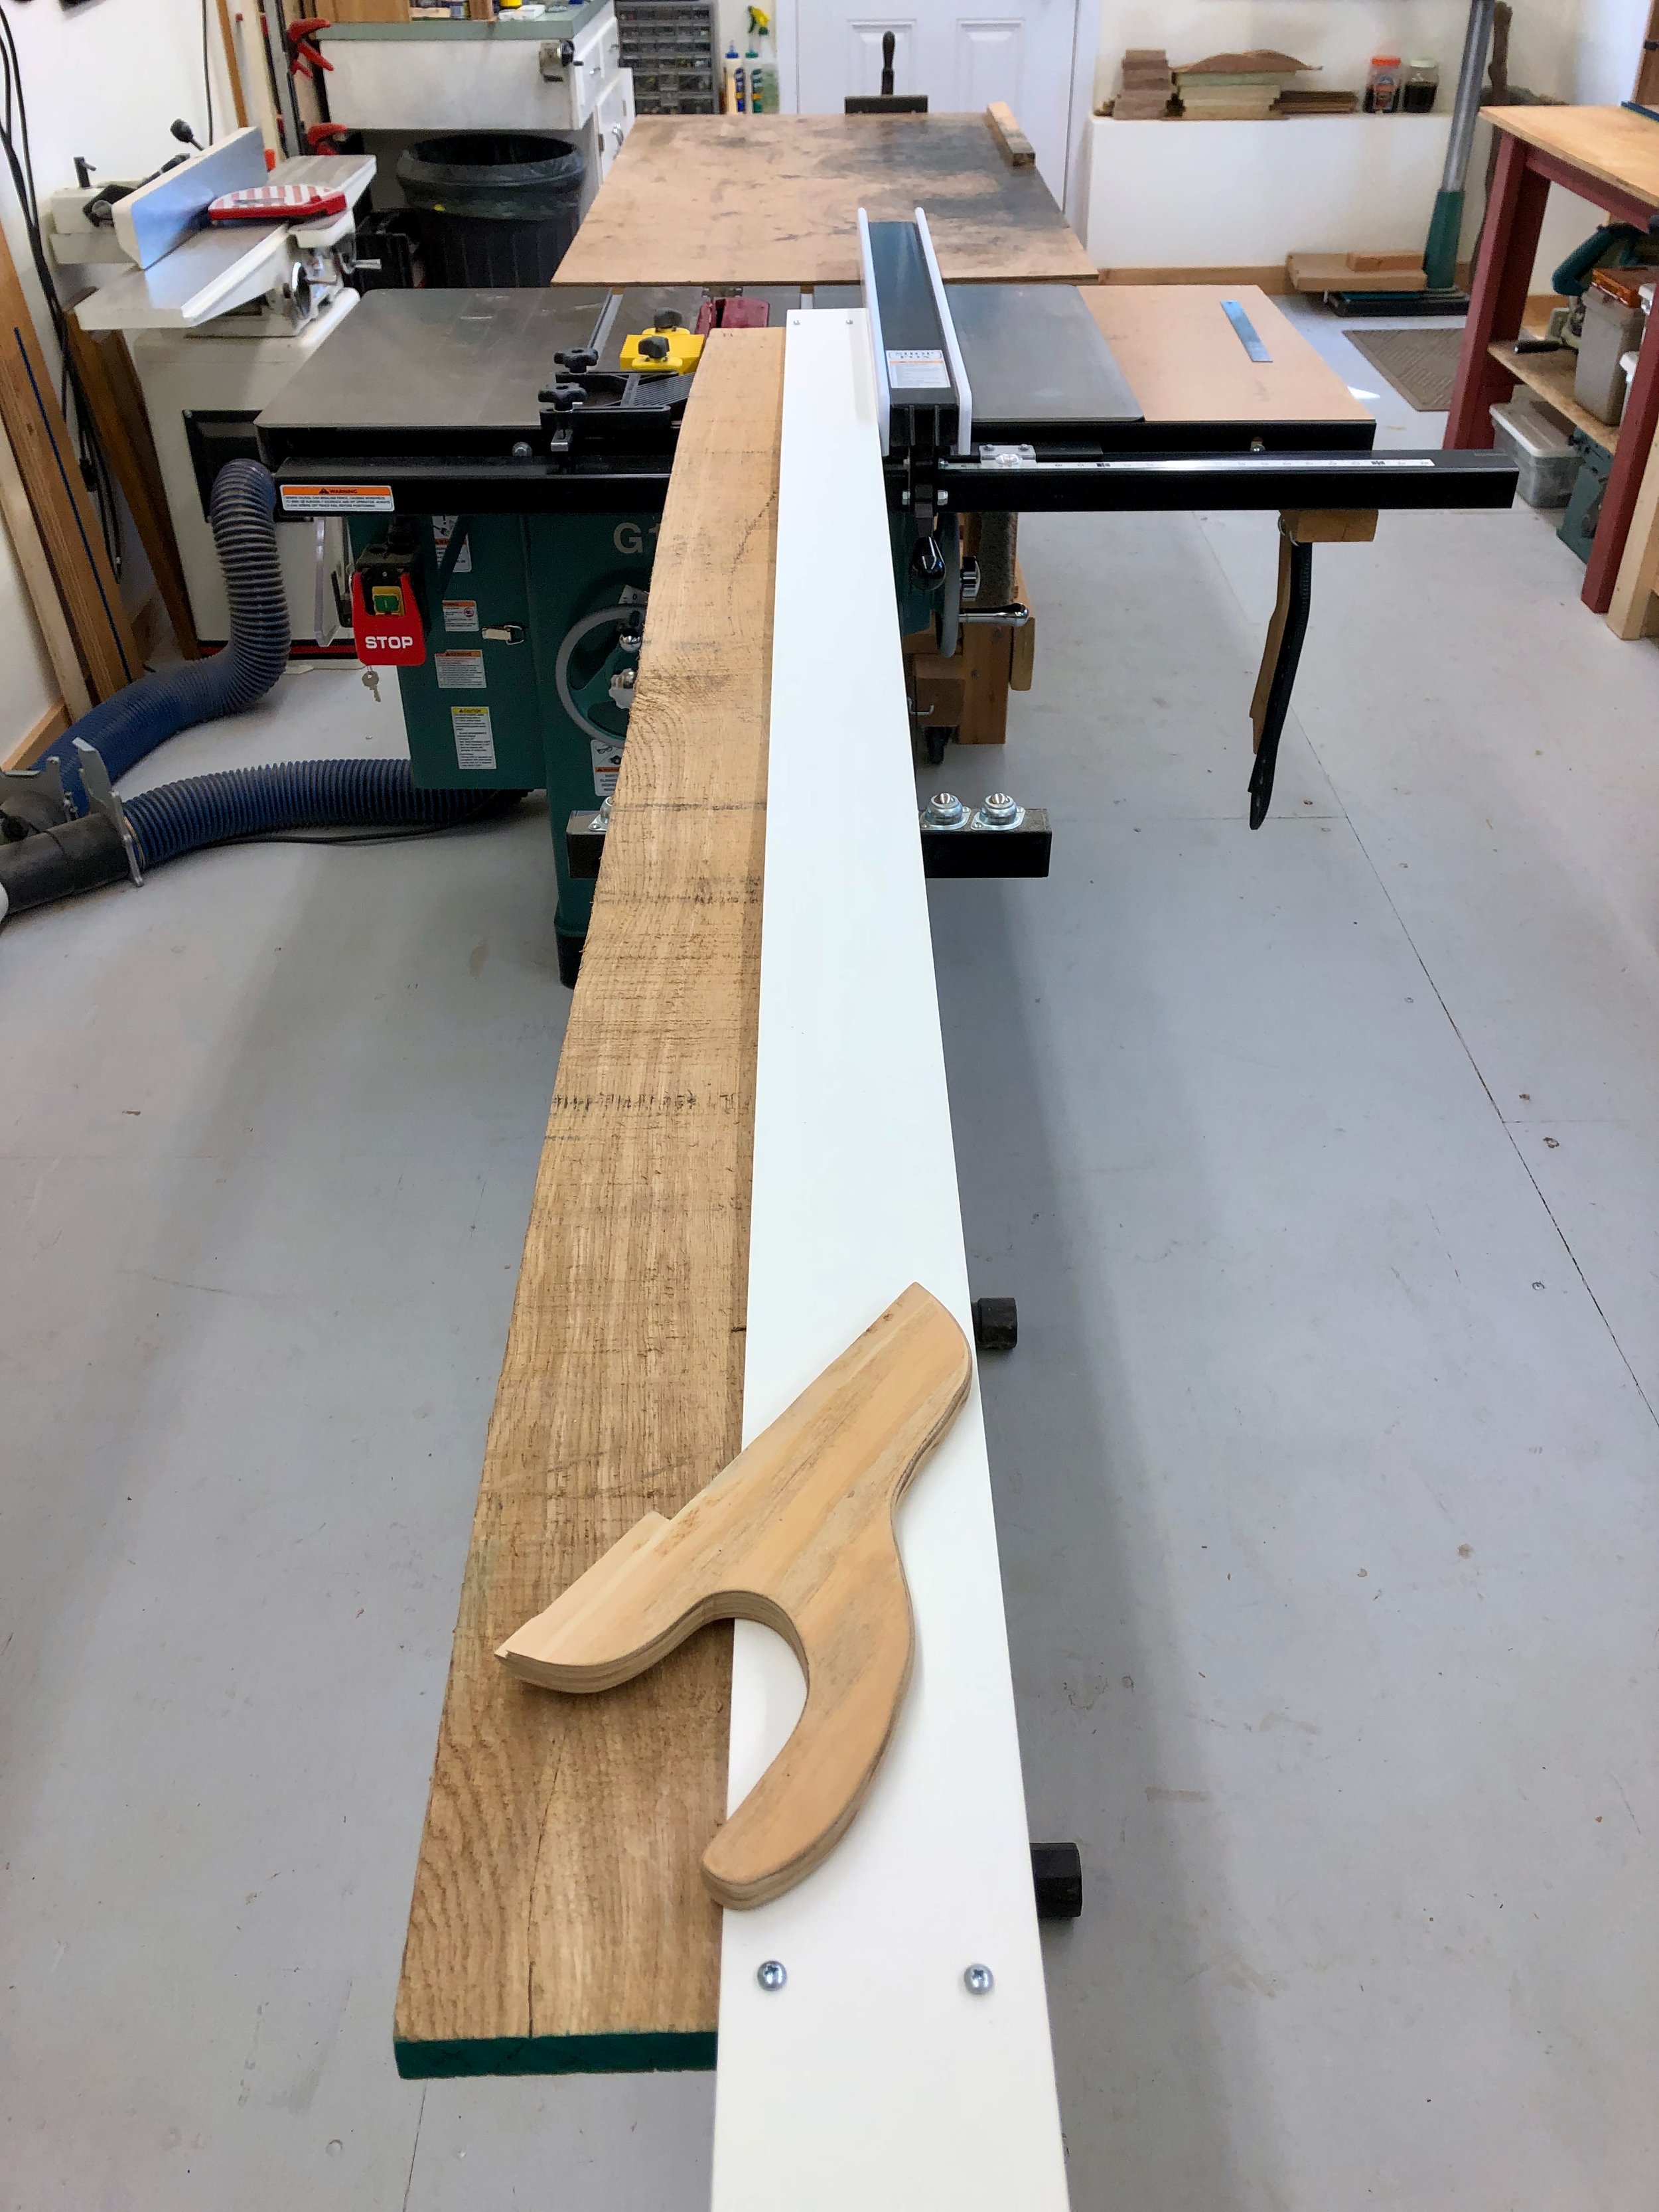
Riding the guide (in white) to straighten a wayward rail at the table saw
Now that the boards have been assigned their role and rough dimensioning achieved it was time to cut tenons on the rails. The bottom rails are a full 6 1/2 inches wide and, though destined to be lost in the wooden crowd, they are the most important members of the frame. Their tenons will fit within the mortices created earlier in the legs. The shorter, side rails need 3/4 in. tenons cut-out on both ends, while the ones on the front and back rails are to be 1 1/2 inch long. As the tenons are centered within the board’s cross-section, the “cut” will consist of making a shallow groove the width of a saw blade on one side, followed by flipping the board over and making the same depth cut on the other. These initial “slits” then define the position of the tenon shoulder. All tenons are approximately 1/2 in. thick and so setting the sliding miter saw blade properly to leave 1/2 in. of material behind is the key step. The tenon length, itself, is easily controlled either during this cut or by a subsequent trim, it is the exposed rail length in between the tenons that matters most.
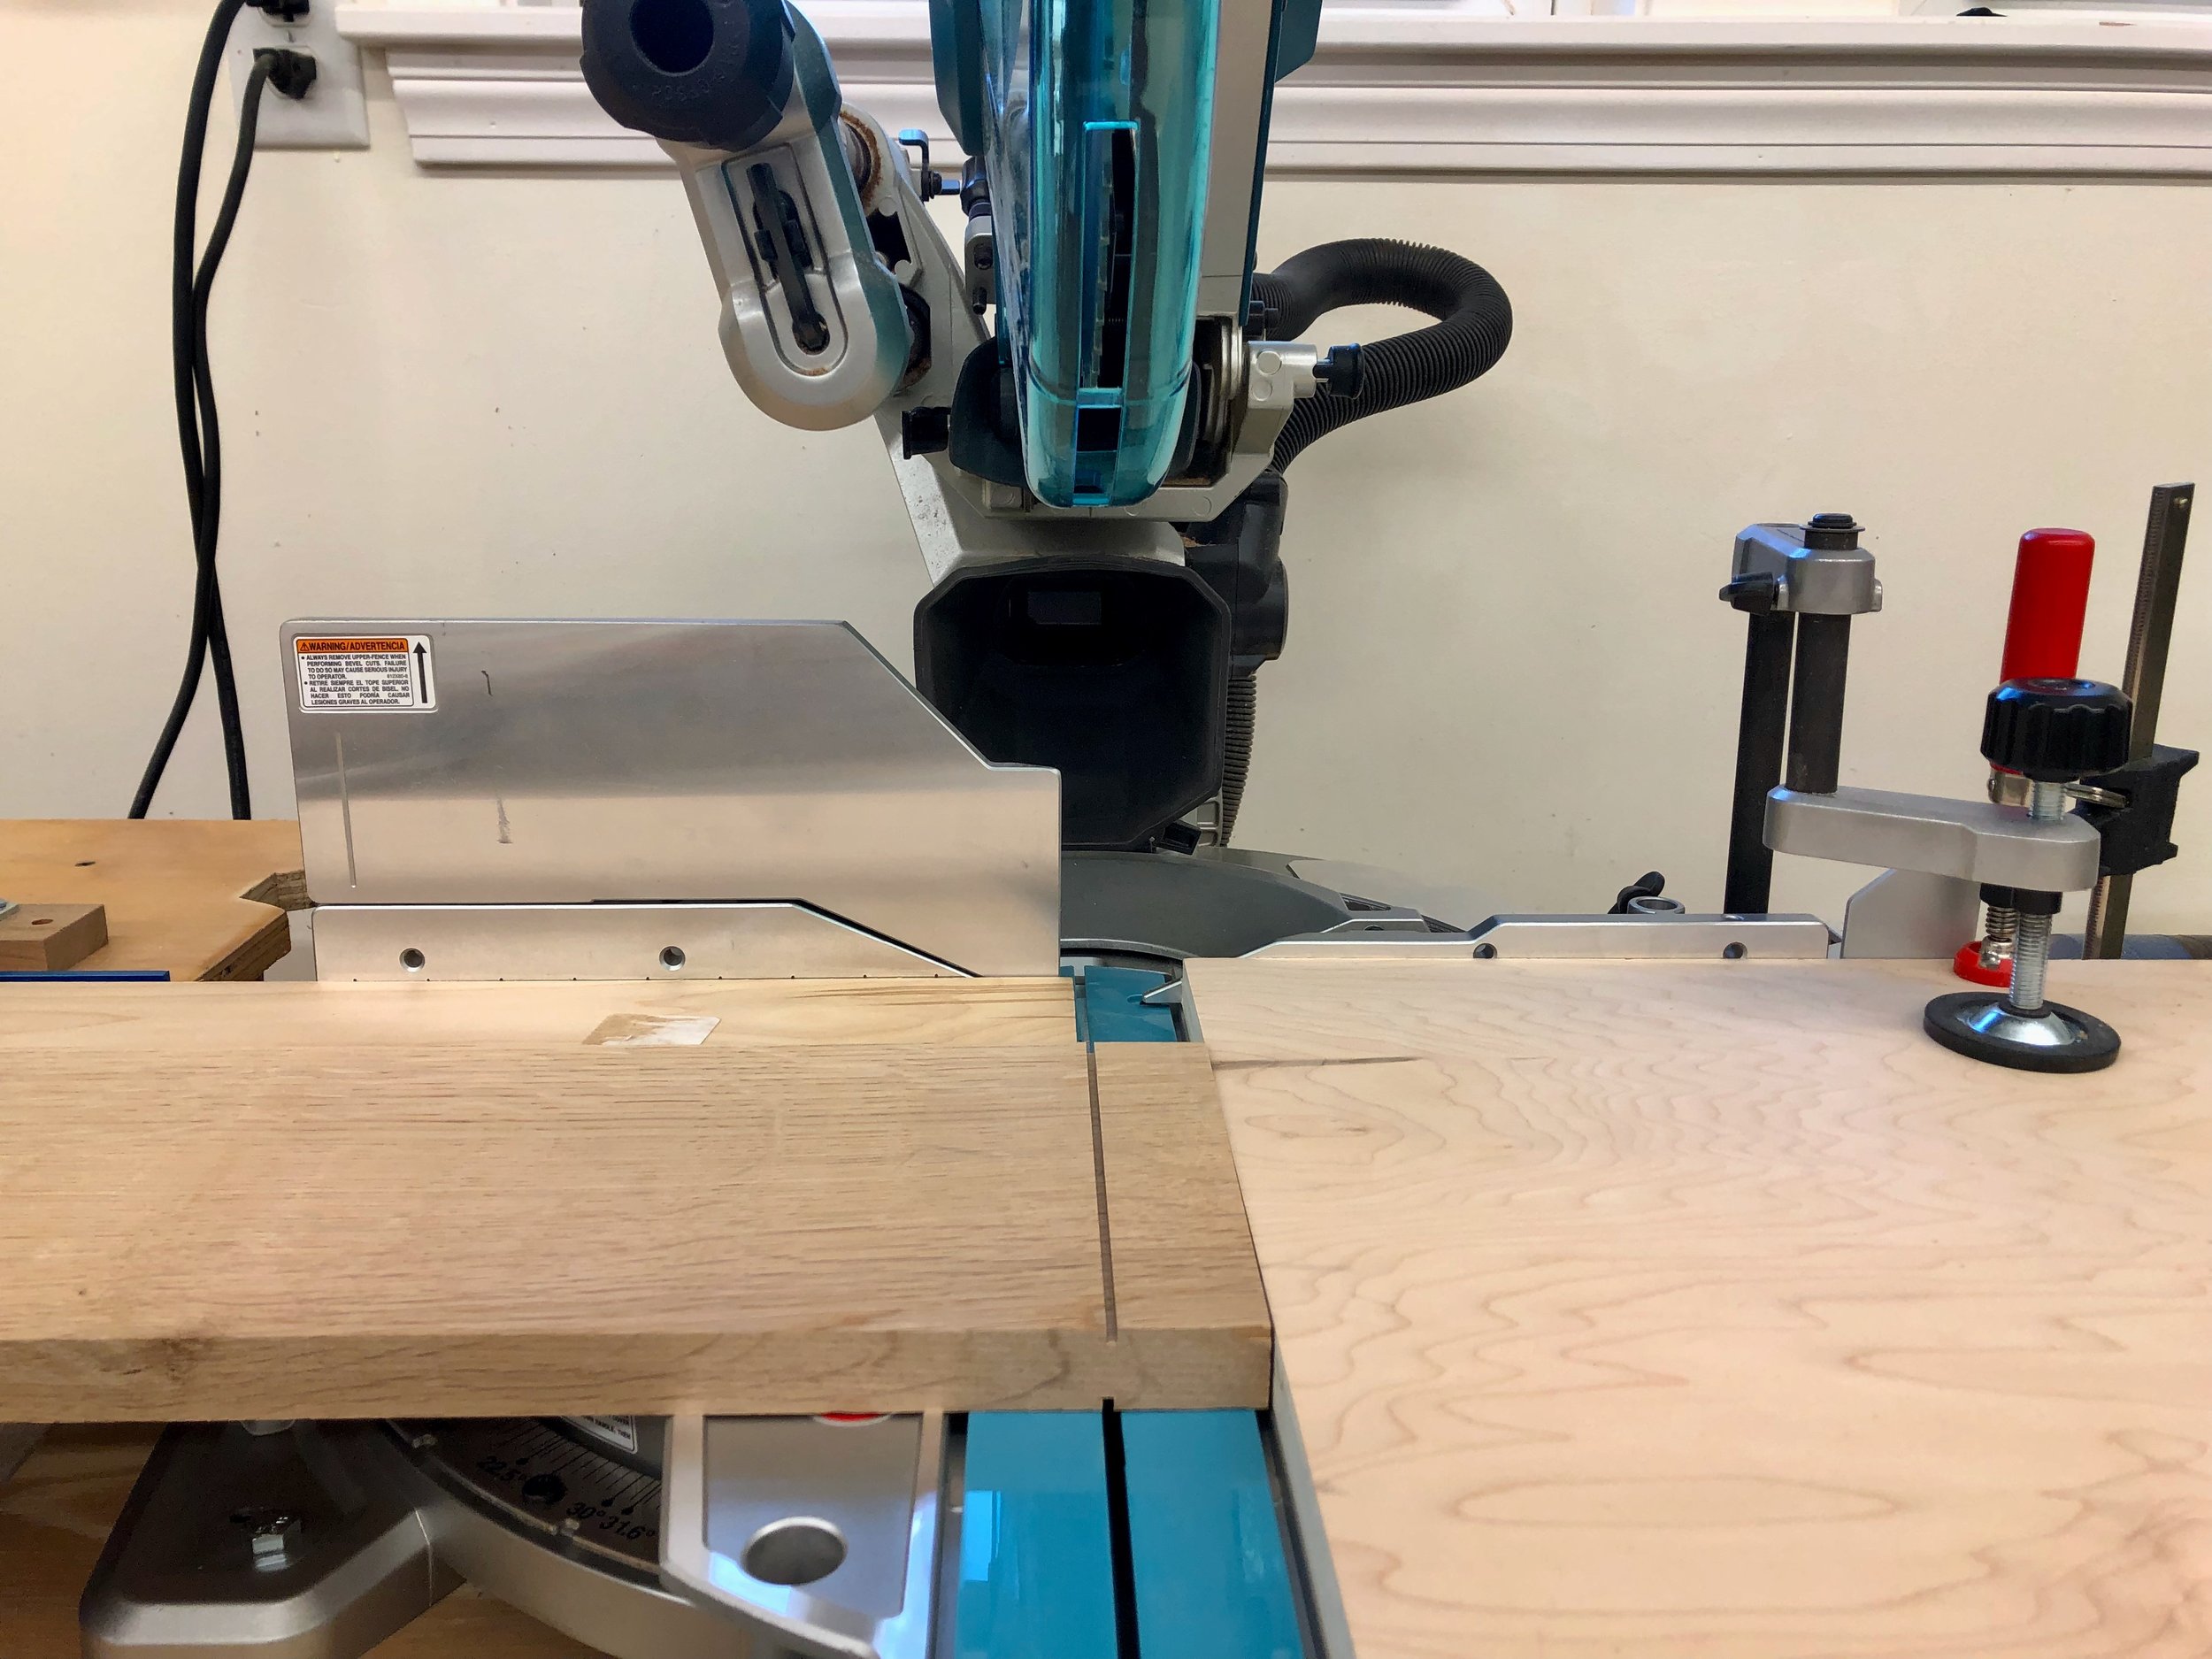
Making uniform tenon shoulders at the sliding miter saw
The rest of the tenon “cheek” was made by sequentially moving the board 1/8 inch “backwards” and cutting away another kerf’s worth, etc. The bandsaw also works well here for smaller pieces but these big guys are easier to handle prone. The tops and bottoms of the tenons were then cut off using a combination of hand saw for the cross-cut and a band saw to rip the final dimension, a 4 inch tenon on 6 1/2 inch rails.
Four tenoned bottom rails
If the job is done right, coming off of the saw the tenons should be just fatter than their leg sockets, and they were. These were then trimmed with a shoulder plane and chisel until a firm fit in a fully seated joint was achieved.
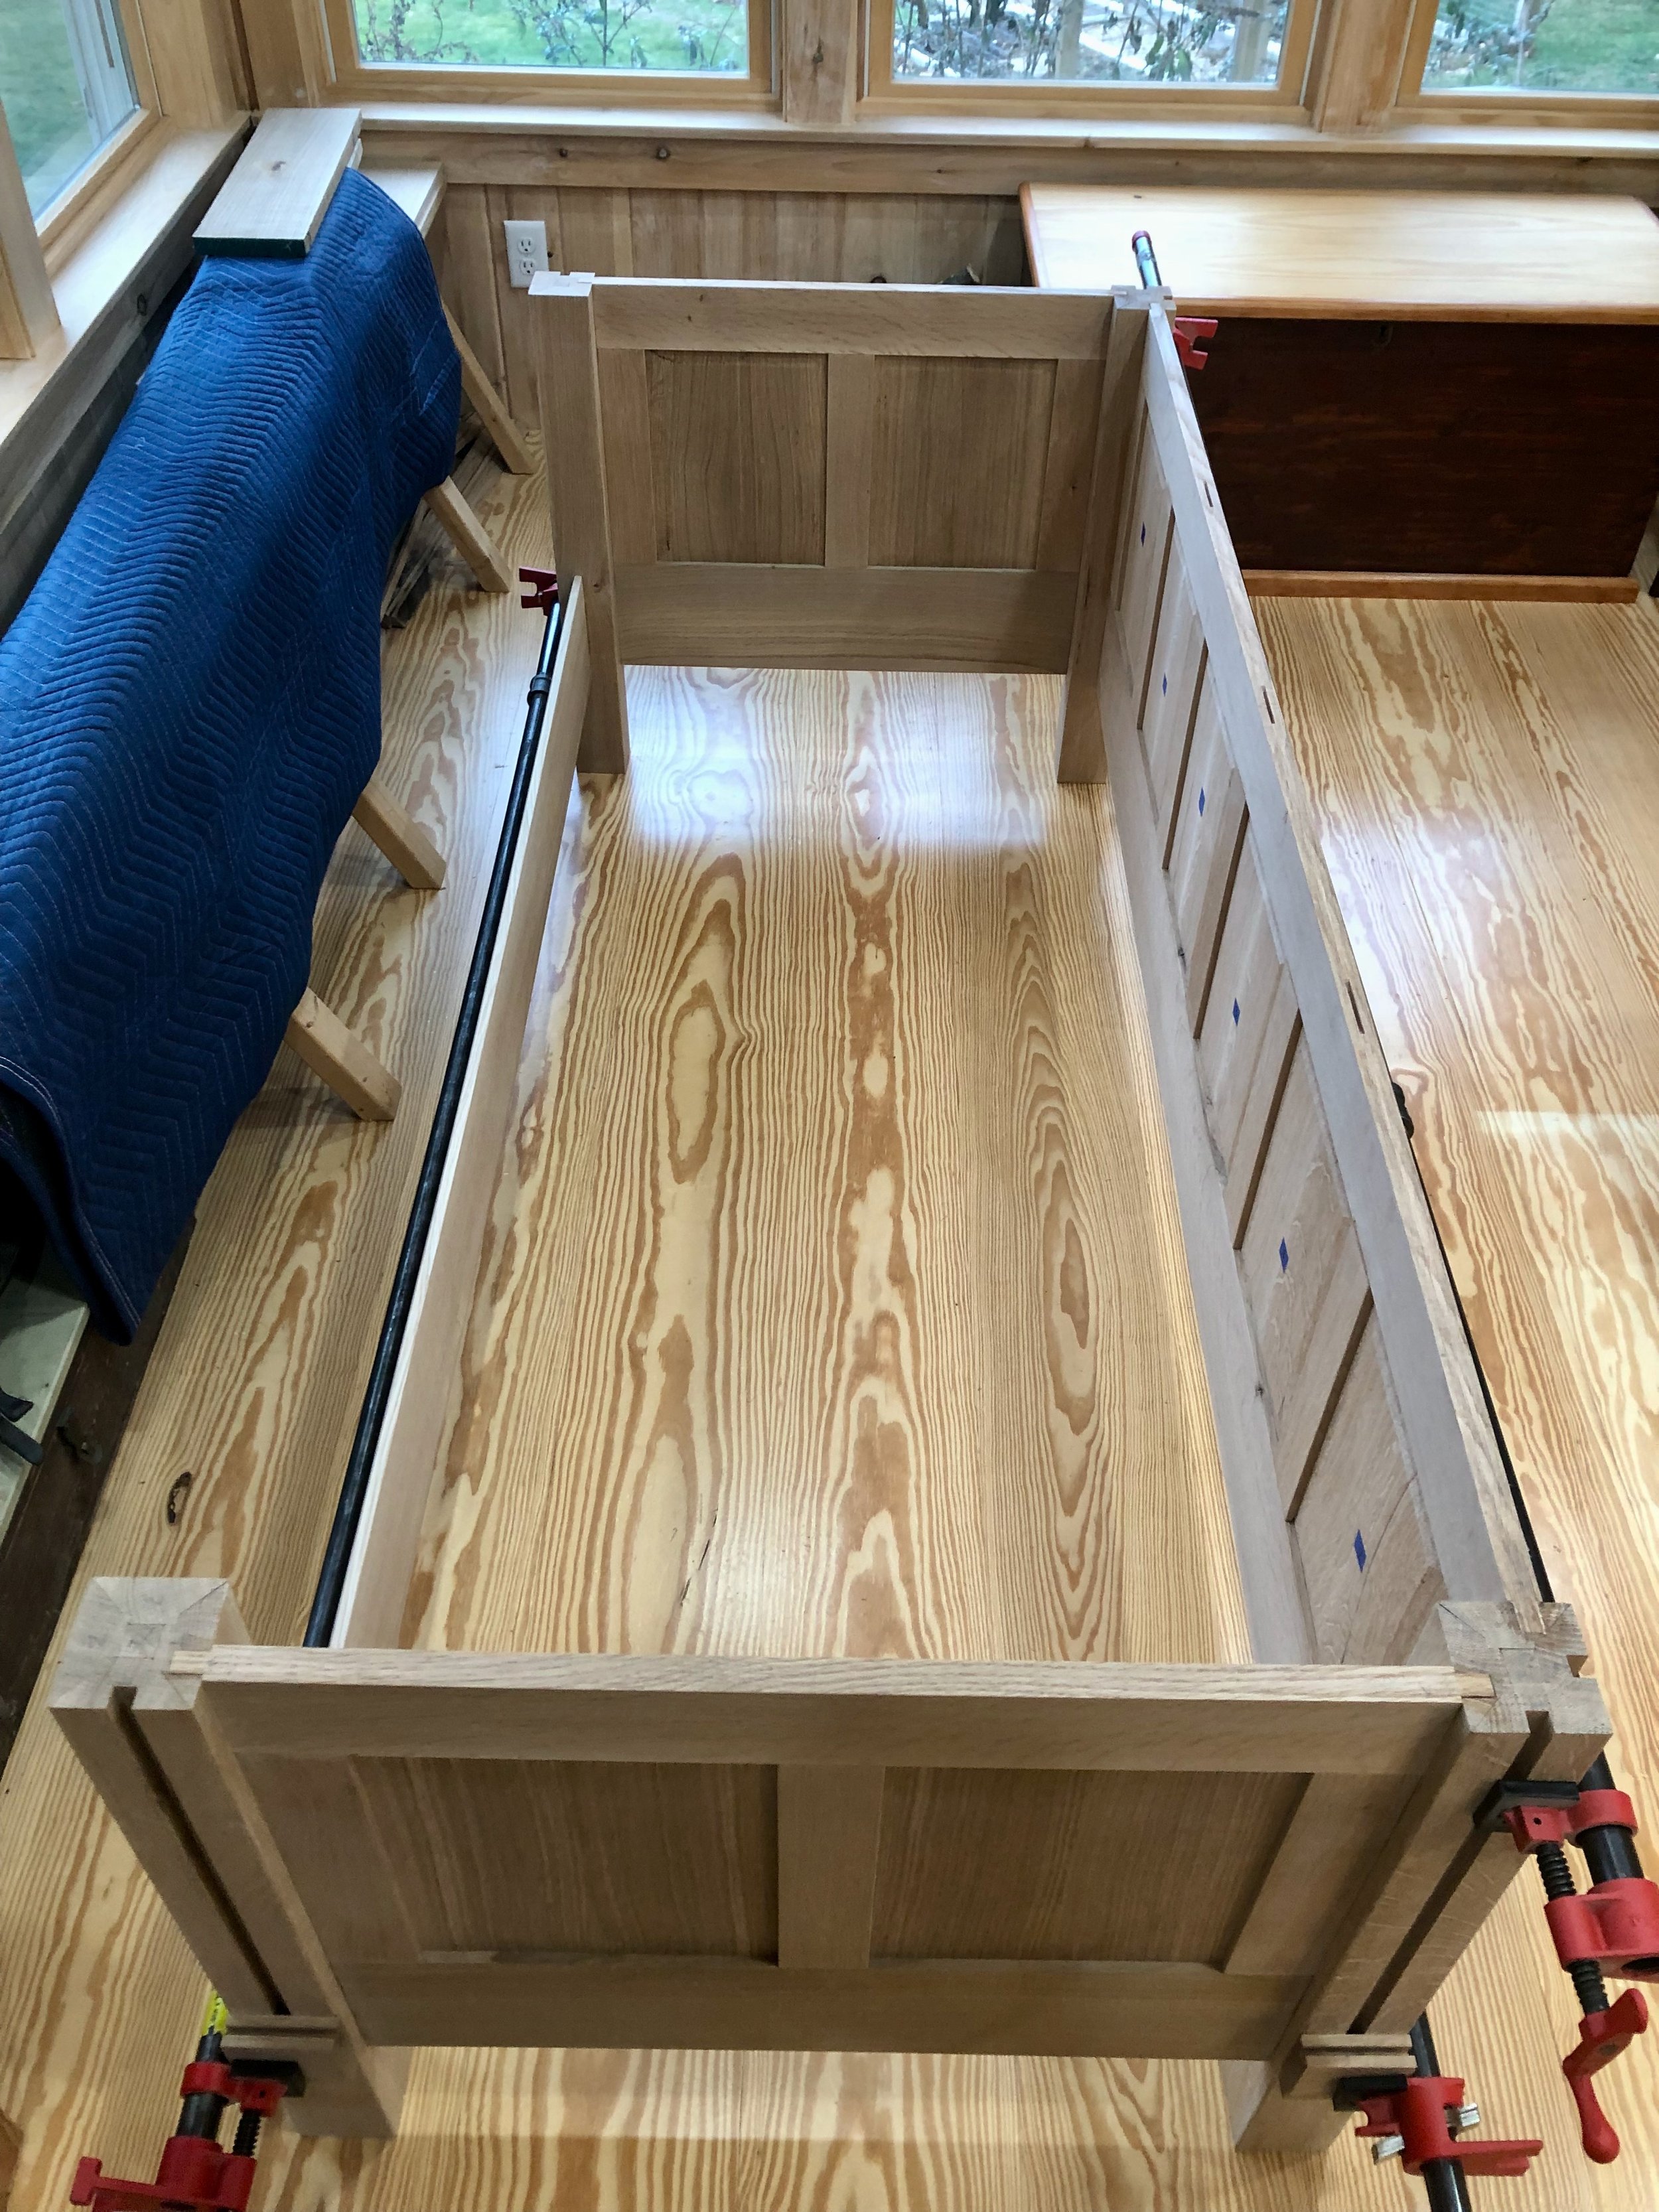
Next, I took a deeper dive into the published plans and decided to make some changes. For some reason, the plans called for six taller, so-called “outer” stiles to mate with all of the legs, on to which the upper rails would be attached. All of the seven remaining “inner” stiles would then sit in between the upper and lower rails. Hmmm … having the upper and lower rails attached at different points seemed like an odd feature to me and one that might actually make for a weaker structure. Sure enough, examining the photo of an actual antique piece (above) and trying to glimpse these joints in pics available on internet auction sites and Pinterest revealed the “original” joint repertoire to be simpler. Back in the day, the upper rails, like the lower rails, attached directly to the leg pieces. All of the thirteen stiles were the same size and rode in between these rails, visually elegant and strong. Unsure why the published plan would deviate from authenticity, and even though it meant refashioning some already dimensioned boards, this was the way to go. Now back on track, the new upper rails were dimensioned with 3/4 inch tenons on the ends and the leg and rail structure was assembled (dry) to check for fit and to mark the next cuts.

Dry-fitted leg and rail structure
Everything seemed to fit together properly (with barely enough room to maneuver in the bench room once assembled). Prior to disassembly, all of the edges to be grooved for housing panels were marked appropriately so that no mistakes would be made at the saw.
Job 2: Stiles
Next the thirteen stile parts were dimensioned to proper thickness, width and length before conducting the “value addition” steps associated with joinery. First, using a dado blade at the table saw, a 1/2 in. wide tongue, 3/4 in. deep was created along one edge of the six stiles that connect to the legs. These were then cleaned-up and tested for fit. The table saw and fence were then set up to cut 1/4 in. wide dados at 1/2 in. depth. All of the stiles and some of the rail edges would receive a full length dadoed groove that would eventually receive the panels. A few cuts and adjustments were made on a test piece and then, once satisfied with the result, all of the parts were run through the saw in succession.
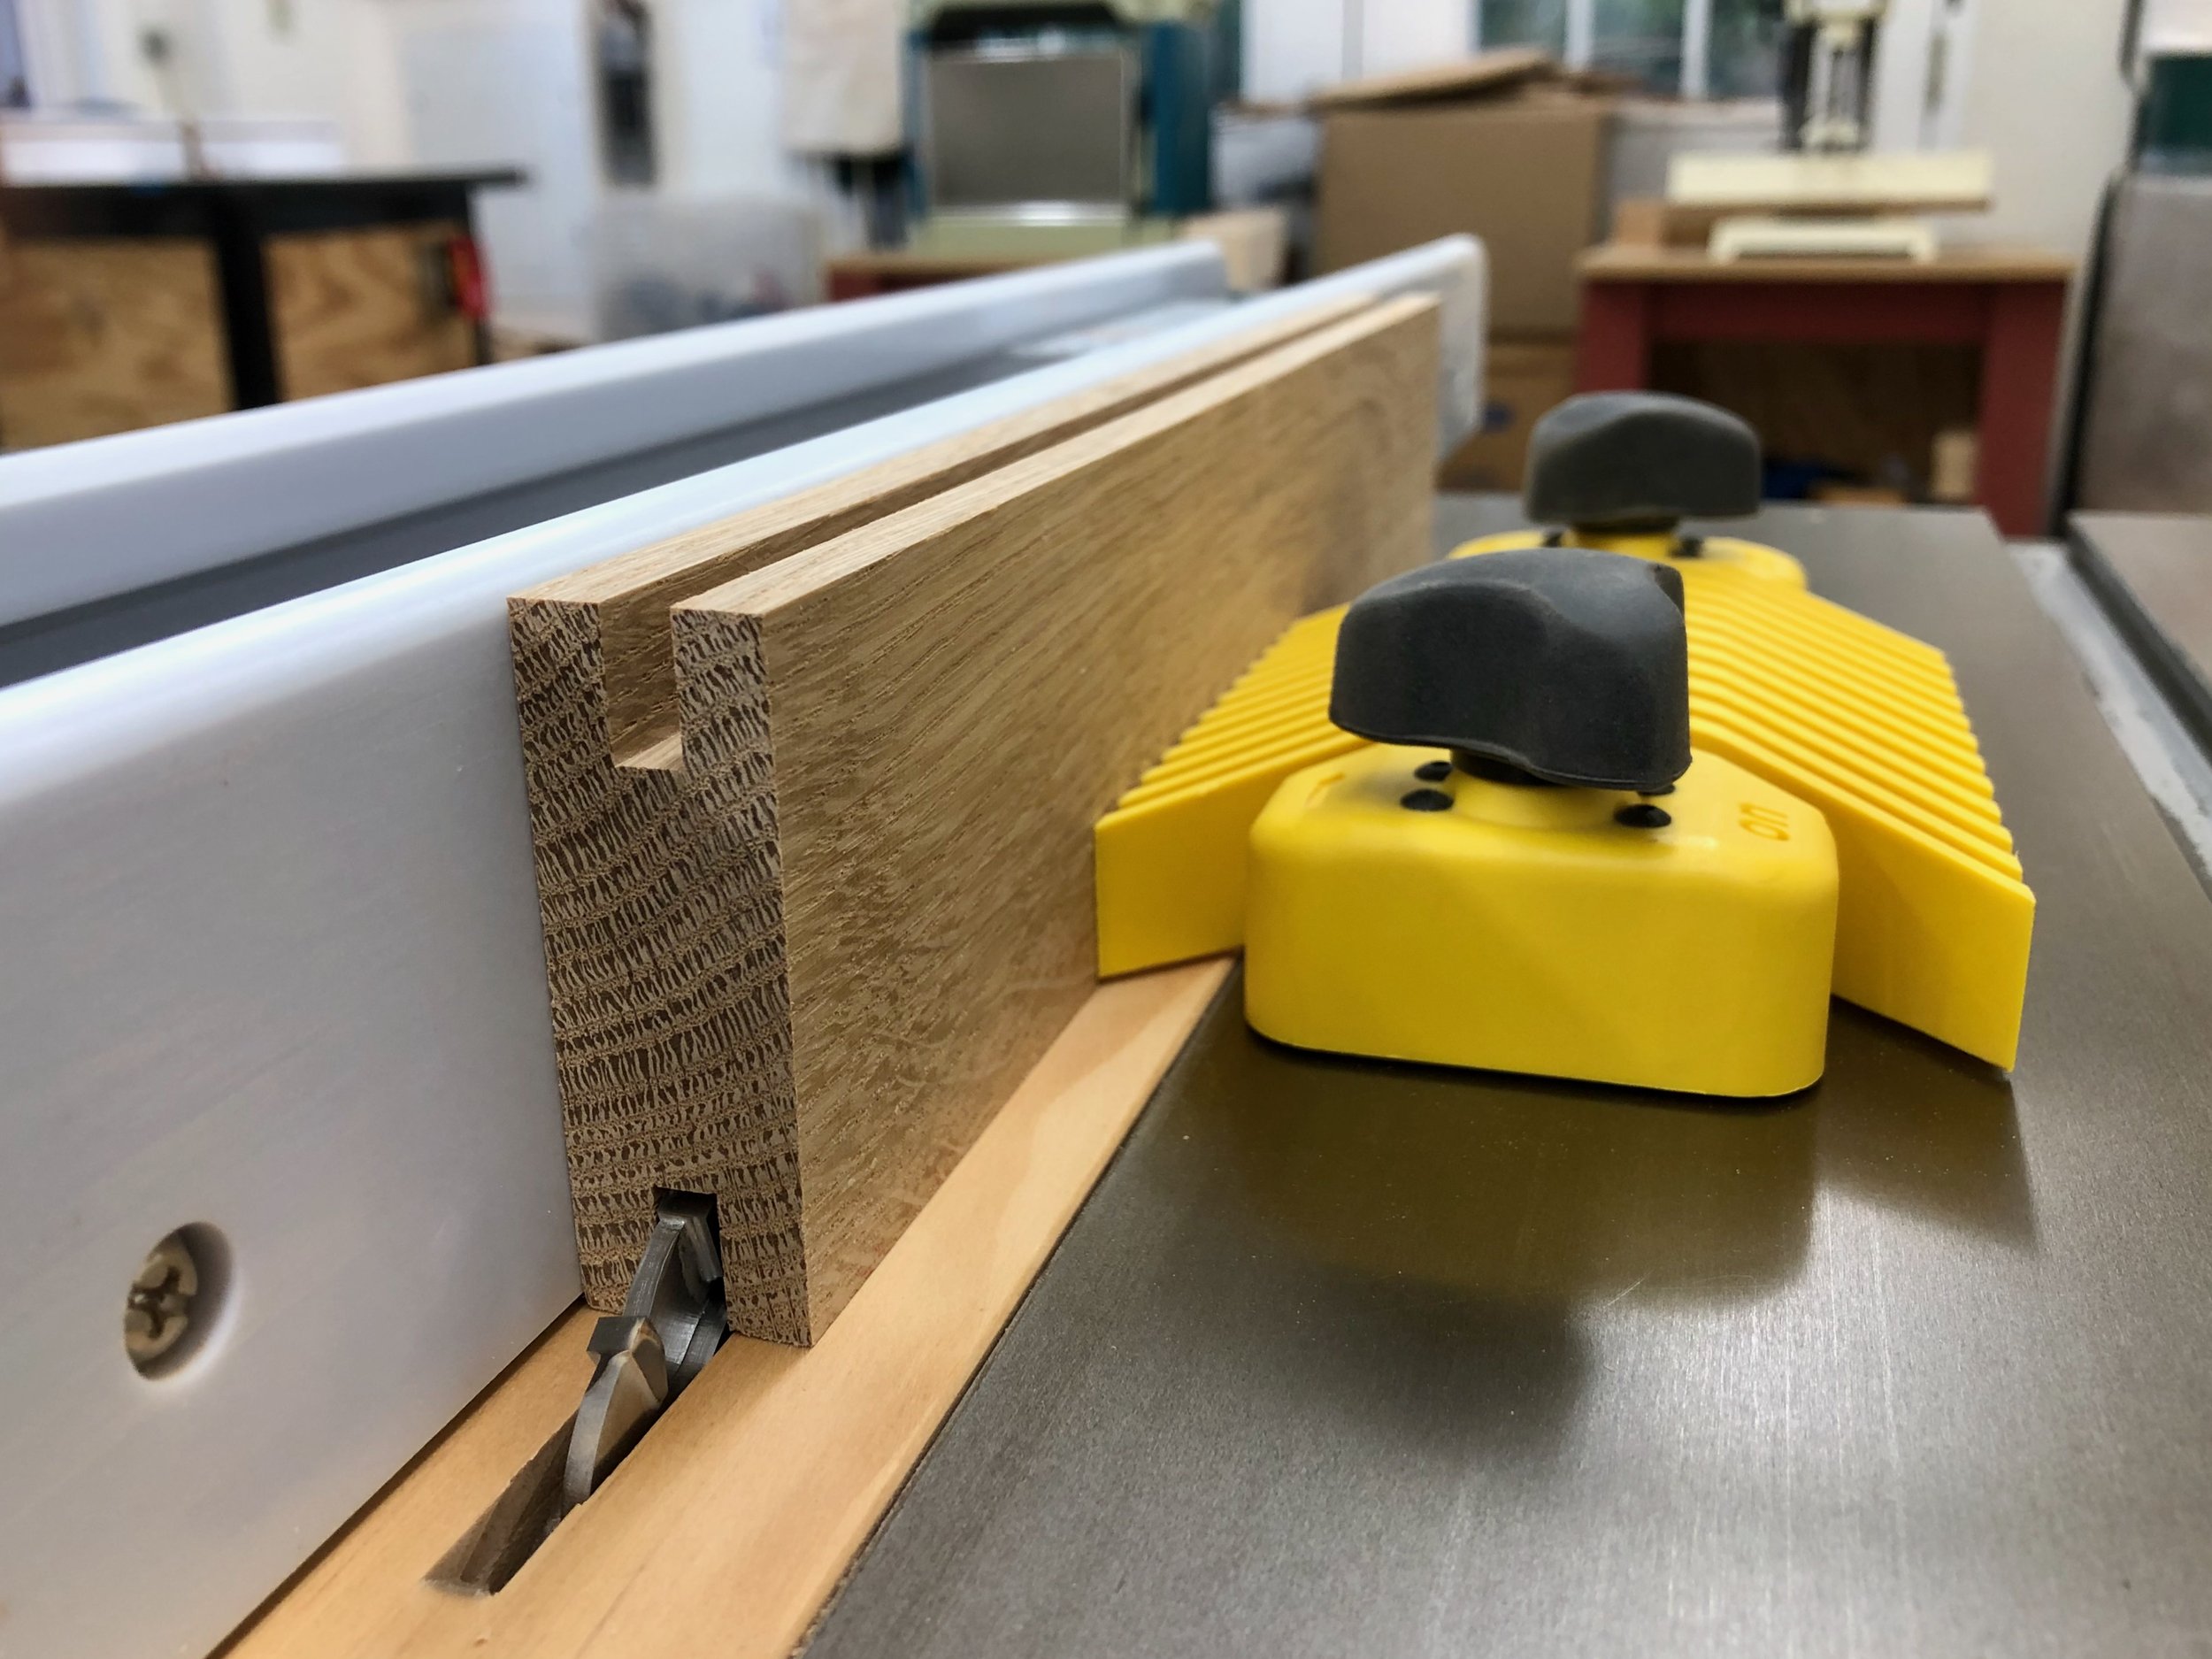
Cutting grooves in a stile
This operation completed the rail pieces, however, the stiles would still need to have tenons fashioned along their tops and bottoms to ride within the grooved rails. These were also fabricated at the table saw using a wider dado blade, the cross-cut sled and a stop block.
Cutting tenons on a stile
After a bit of clean-up with chisel and shoulder plane a dry fit of the 24 frame parts confirmed that all was on track. This also allowed for final measurement of the panel dimensions.

Framework fit together
Job 3: Panels
I’ll just say it: making panels is an enterprise that seems to take longer than it should. To be sure, there’s a beautiful payoff in the end, but one still has to be in the proper mood for panel-making if the exercise is to be enjoyed. So after cleaning the shop, sharpening some chisels and re-surveying the remaining boards I managed to muster enthusiasm for this next task. To start, you cut the lightly thickness-planed 4/4 boards to rough length and width at the miter and table saws, respectively. You then re-saw them along their narrow dimension into two pieces at the band saw, and finally thickness plane these thinner boards to a uniform 3/8 in. depth. This creates a bunch of panel halves, twenty to be exact. To construct the panels, the “interior” edge of each re-sawn pair is squared-up at the jointer and then, after aligning the grain in a book match orientation, they are glued together and clamped; two at a time given limitations in both clamps and space.
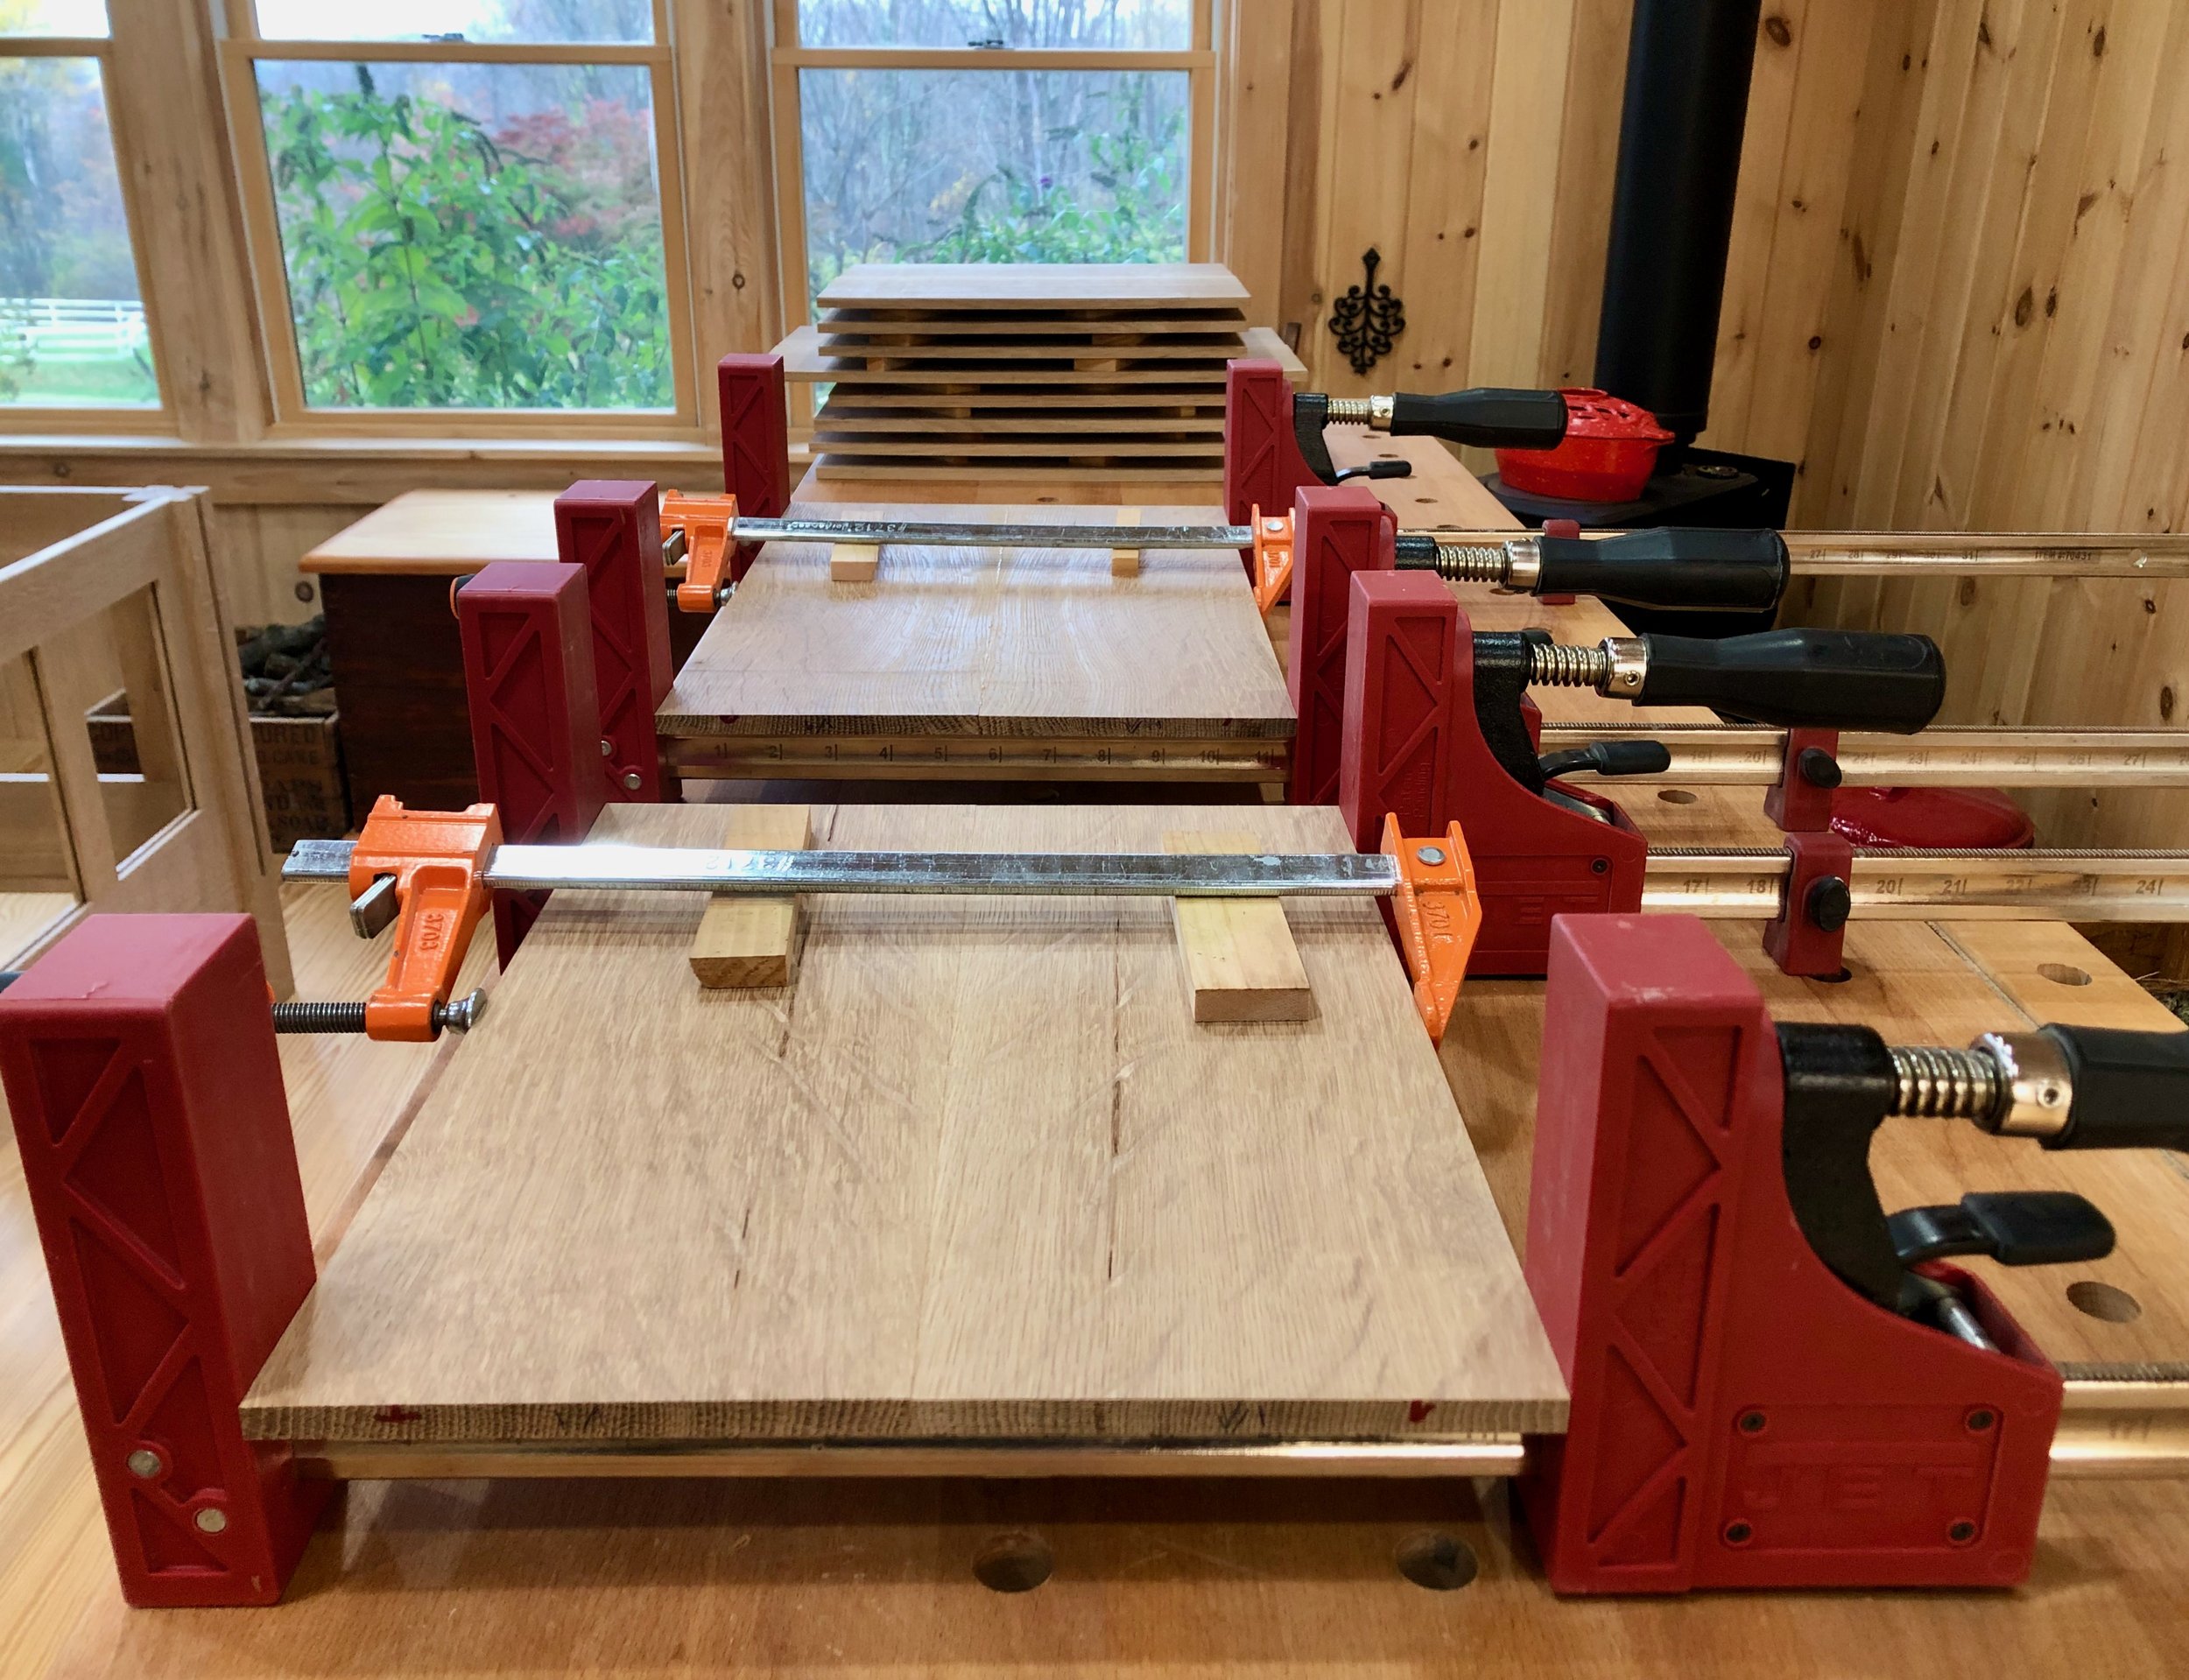
Panels in production
Once the glue has dried the rough rectangles are smoothed with a card scraper and orbital sander (150 grit) and then cut to their ultimate width and length dimensions, again at the table and miter saws. For appearances sake I made sure that the glue seam exactly bisects the finished parts. At this point, and by design, the boards are still too thick to enter their grooves. To achieve a fit all of the edges (n = 40) need to be beveled, thereby creating a “paneled” feature on the interior face. For this I used the table saw panelling jig made a while back during the candle box Project to create 1 inch wide tapers along all sides sufficient to provide a snug fit into the grooved stiles and rails.

Panelling the panels at the table saw
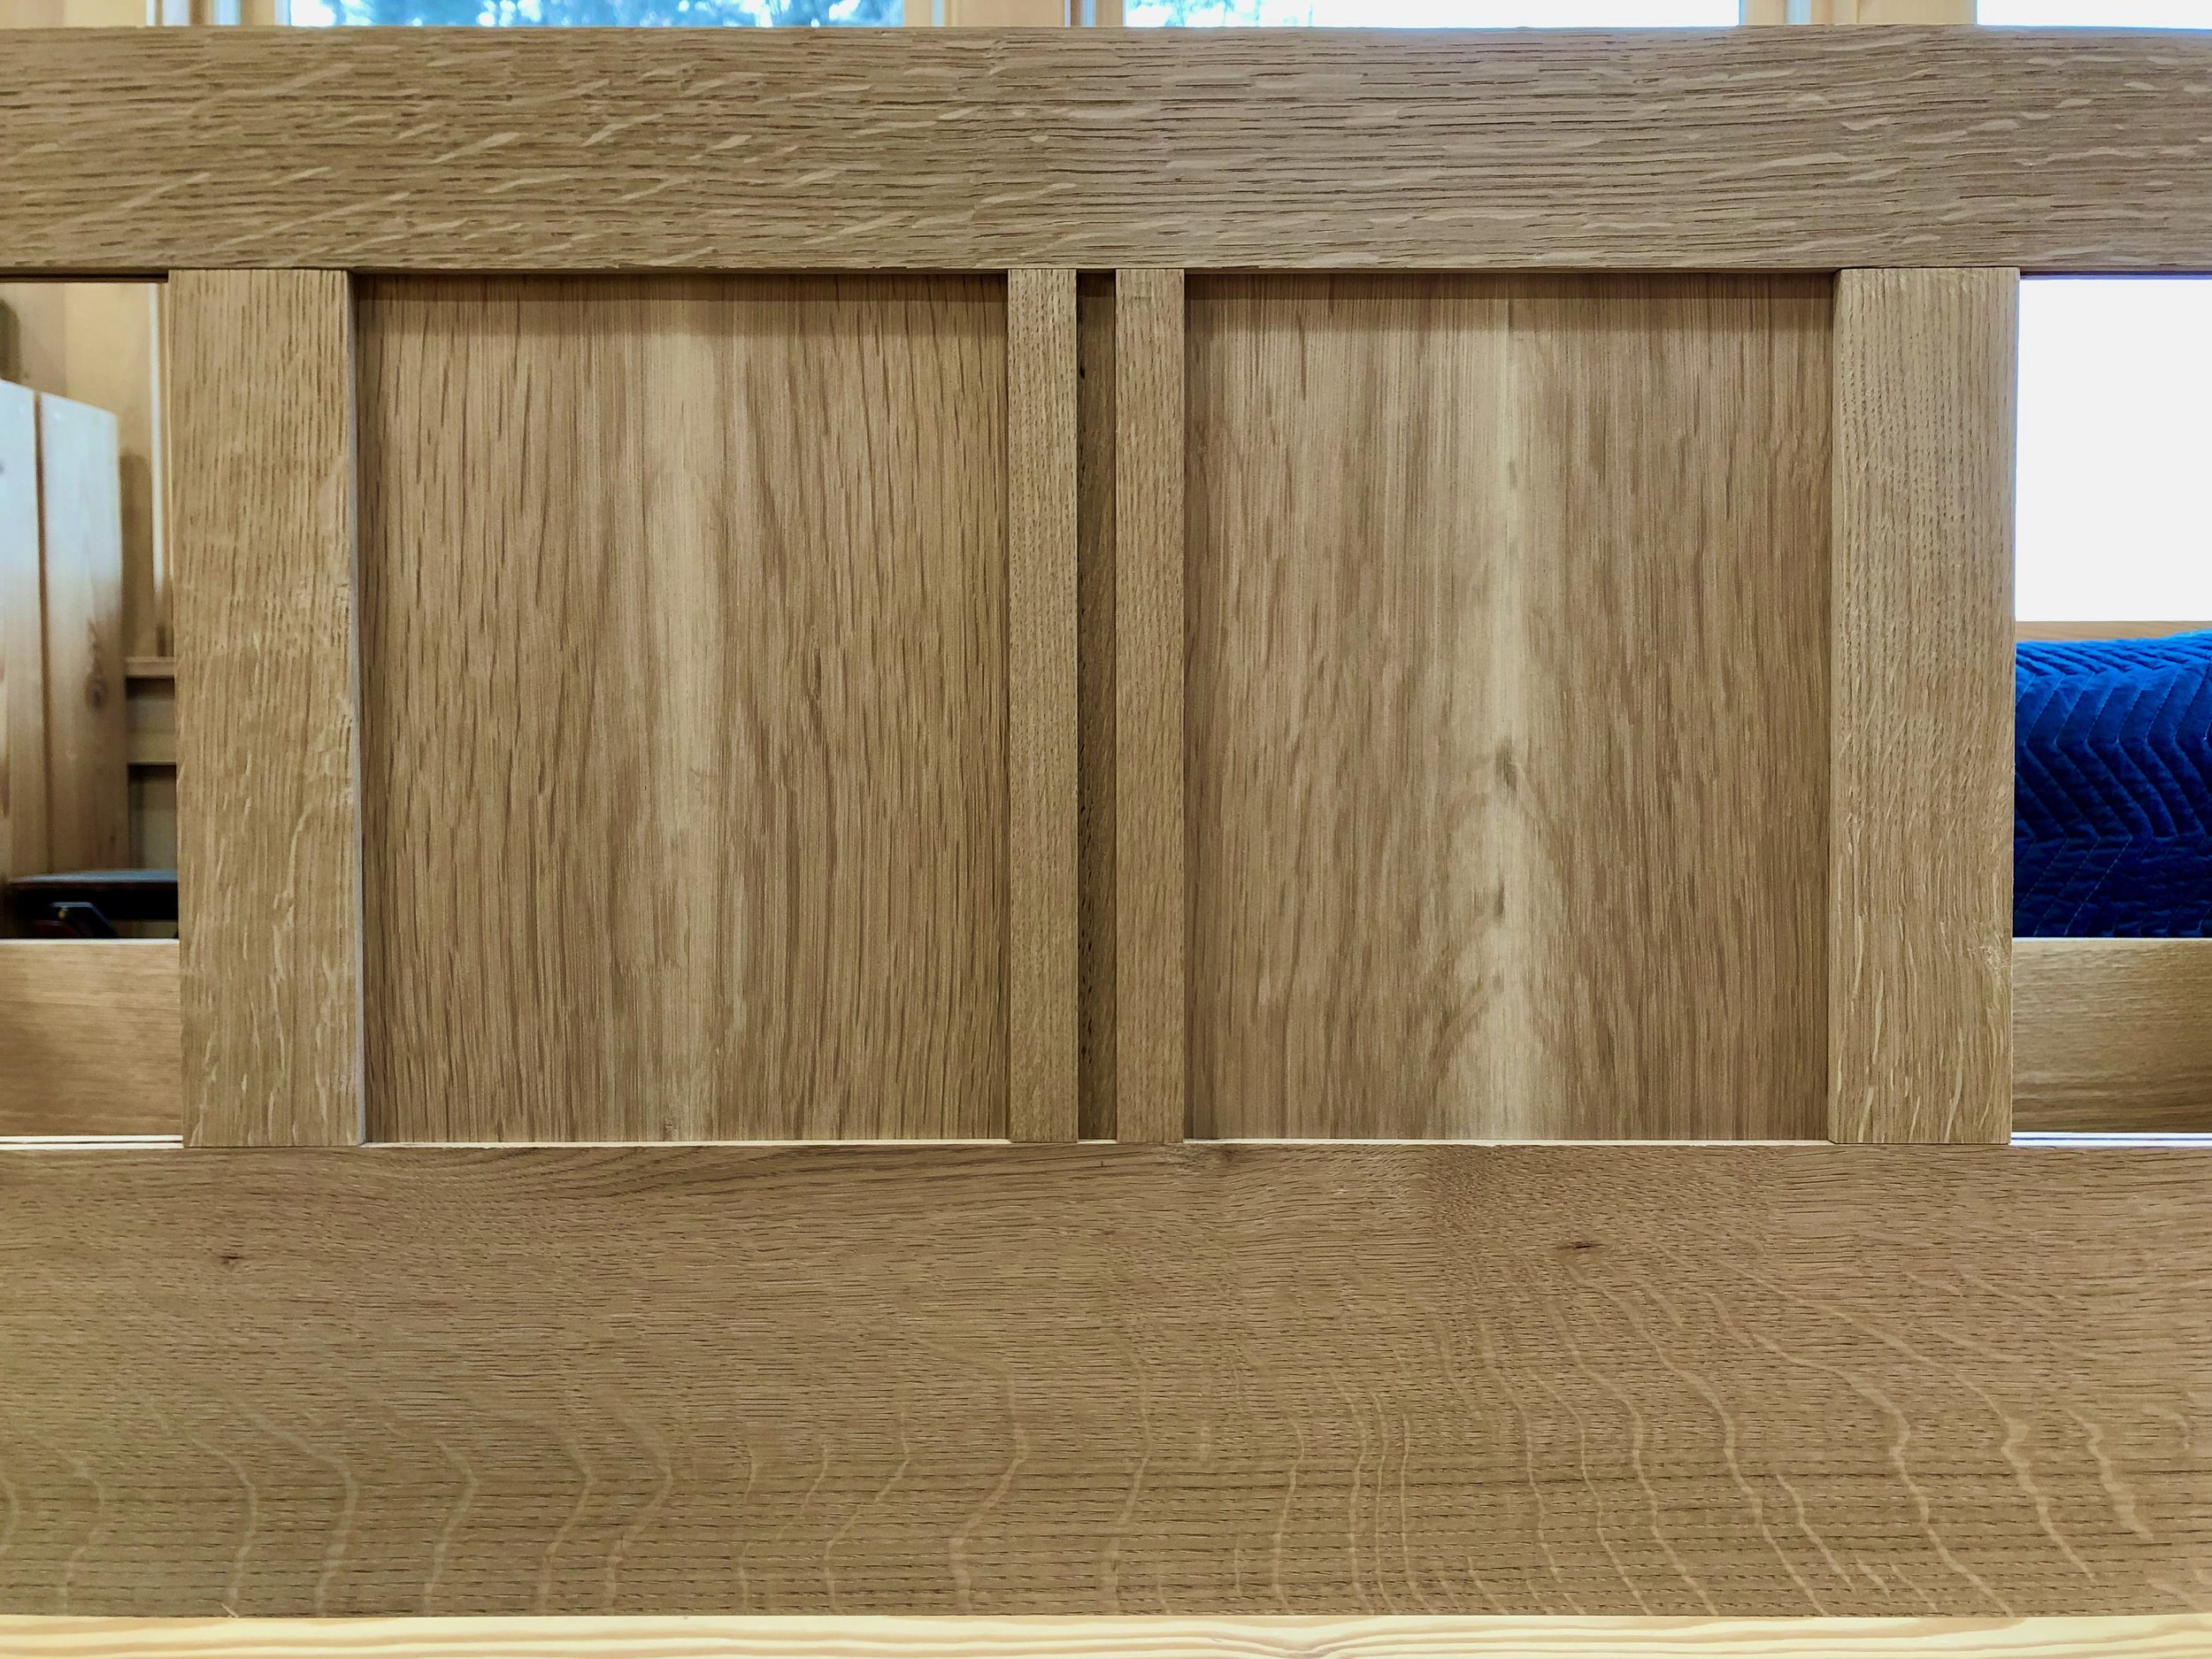
The newly cut perimeters were then smoothed lightly with a card scraper, sorted for their position within the framework and nestled into place. As each individual panel exhibits its own grain & ray “personality”, there is some artistry here in their placement with respect to patterns present on the neighboring rails and panels. Once upholstered, the un-paneled sides of the panels are the only ones that show, and my desire was to frame each of these to their best effect. The “interior” sides have their own uneven beauty, too, revealed during the dry fit.

Dry fit panels in frame
Job 4: Details
Almost ready for the glue-up, but first there are a couple small details to attend. The stiles need to be planed flush with the rails and then labeled for their position during assembly. This was done individually by first identifying any “proud” edges on the end of a stile-rail joint, dismantling that part from the frame, diagnosing the wood grain direction and carefully hand planing away the excess until it tests “flush enough”. The trick is to not plane too deep here as a post-assembly sanding job can accomplish a final smoothing of these joints.
Next, the center stile along the back needed to be grooved to accept a corbel that will support the wrap-around arms. A 1/2 in. wide dado was cut 1/4 of an inch deep into the center of the stile at the table saw. This joint is not mentioned in the plans so I assumed it would be like those that mount the other corbels to the legs. However, I was reluctant to make a groove the full-length of the corbel, and in the process weaken the associated rail members with a cross-cut dado, so I decided to leave the top and bottom rail alone with the intention to use screws from the inside face to further secure the corbel during assembly. This is certainly a departure from authenticity, but an invisible one at least.
Grooved center stile in place
The front rail also needed to be beveled along the top edge so as not to irritate the legs of those seated above. This was accomplished at the table saw, applying an 18 degree angle to the blade and beginning the cut 3/8 in. into the thickness dimension. The rough edge was easily smoothed by hand using a card scraper.

Beveled front rail
Finally, those corner seams about the quadralinear legs needed to be dealt with. Recall, the formation of these pieces left a noticeable gap along many of the edges. I had been puzzling on the best way to remedy this situation when my furniture maker son, Andrew, suggested using a burnisher (the tool otherwise used to fold a cutting edge onto my card scraper) to gently crimp the gap shut. He then proceeded to show me how easy this was to accomplish. The result is a smoothly rounded over edge on all of the legs!

Seamless leg corner and burnisher
Assembly
With all of the jobs complete, it was time to glue the frame together. This meant completely disassembling the dry-fit structure and amassing my collection of long clamps for duty. I started with the Left side sub-assembly. These nine parts were put together with ample glue, clamped tight & square and left standing upright. Four hours later, the clamps were liberated and the process was repeated for the Right side, being sure that everything matched exactly in a mirrored sense. The rail-stile joints were then lightly sanded flush with an orbital sander using 150 grit.
Having completed the sides the final step was to join them together with the Front and Back rails. Of course, this included the remaining stiles and panels where there were a lot of wooden junctions to get right. To begin, the two bottom rails were glued to the sides, creating a free-standing rectangle. The back center stile was then affixed, followed by the two flanking panels, and, from there, assembly proceeded outward in both directions. The stiles were fastened with glue, whereas the panels were tapped-in dry. Gratifyingly, following another such iteration, there remained sufficient space to slot panel nos. 1 and 6 into place. After checking that the stiles were all mounted squarely, the top rail was then tapped down into place. Various pipe and bar clamps were applied as the structure was checked and adjusted for squareness one final time before lockdown. Big job!
Glueing-up the frame
Finishing touch
A defining feature of Arts and Crafts furniture is the pegged tenon joint. Adding equal parts strength and character, this element was highlighted by the Stickleys perhaps more than any other maker. The pegs (dowels) in this piece secure the front and back rails to the legs and are shaved flush with the surface once installed. I chose 1/2 inch diameter round dowels for this task, which first needed to be fashioned in the shop.
In the mature craft of woodworking there is at least one tool for every job, and the tool for creating wooden dowels is as simple as they come. A round hole cut neatly into a metal plate is the implement used for dowel-making; that and a hammer. The dowel material comes from a straight-grained, knot-free white oak scrap. This piece was first cut to rough dimensions on the table saw (9/16 x 9/16 x 24 inches) after which the edges were further relieved by shaving with a knife. The resulting irregular-shaped rod was cross-cut into 2.5 inch segments, trimmed further along the exterior with a block plane and then pounded through the circular opening of the “tool” to produce perfectly sized cylindrical dowels. While the act is violent, the result is beautifully Euclidian. Using a pencil sharpener, the penetrating end of each dowel was tapered slightly before use.

Pounding out the pegs
To peg the tenons, two 1/2 inch dia. holes were drilled to a depth of 2 inches at each of the rail-leg joints. I used a hand drill and shop-made jig to keep the holes uniformly positioned and straight. A glue-coated dowel was then tapped firmly into each opening and, once dried, the protruding end was sawn off using a Japanese flush cut saw. Finally, the rough surface was smoothed with a block plane.

Pegged rail joint
At last the frame is done and this brings the Project to a natural pause. Left to be completed are the arms and their support structure, the upholstery and the finish. Well on our way!
