

The Ledger Chest, ep 2
“Anybody up for some D&D*?”
- common query among First World youth of all ages
*Doors & Drawers (What were you expecting? A game?)
When we last left our Project, the ledger chest was brimming with adolescent potential. Although fully grown, it possessed less than half of its eventual 97 parts, was partially varnished and still devoid of adult features (doors & drawers). Sitting obediently in a corner of the bench room it was like an adorable puppy, in cherry. This post describes the events associated with its maturation.
Now, books have been written on the subject of door & drawer construction - good books. The best I’ve found is imaginatively titled: Building Doors & Drawers, by Andy Rae. Better late than never, I came upon this gem midway through the Project. It thoroughly covers all of the bases but, since every project is different, it is ultimately up to the furniture maker to take in the accumulated wisdom and then go figure things out for themselves. The “things” being design, construction and fitting.
Design
Doors: Like the sides of this chest, the sliding panel doors would be horizontally barred. And because of the door’s slender, 5/8 in. build (dictated by the grooves already fashioned within the carcass frame) it would be best to insert the panels as individual slats housed within these “bars”, rather than apply them to the backside as a mirror board. This should result in a sturdier door, meaning one more resistant to warp. This “frame-and-panel”construction method differs from the carcass work, however, it was apparently the one used most prevalently on tansu doors*. The remaining design decisions then relate to the widths of the door stiles, rails and panels. These were worked-out and drawn as a pattern on graph paper for handy reference in the workshop.
*Details of tansu construction were gleaned from the well-written and beautifully produced reference book: Heineken, T., Heineken, K. Tansu: Traditional Japanese Cabinetry, Weatherhill: New York, 1981.

Working plan for the door panels
Drawers: This piece has 3 drawers of the so-called “flush” or “inset” variety and, like all drawer types, the primary design decisions relate to corner joinery and sliding mechanics. The bottoms of authentic tansu drawers slide on a platform without the use of guides and that was the mechanism to be used here. Tansu drawer corner construction, as I was surprised to learn, relied on butt joints, further secured by the use of wooden pins (dowels). The typical dovetail joints used in China, Korea and the Western world were not generally applied to the drawers of Japanese tansu. Tansu, being storage chests, arose from the box trade and were not produced by bone fide furniture makers until the later years, which might explain this difference in technique. Anyway, I came across a sophisticated variant of the butt joint called the rabbeted half-dovetail joint which, when pinned with dowels, is reputed to be a strong fastener for drawer corners. It looks sharp and would be easier to fashion than the familiar, but in-authentic, half-blind dovetails so I thought I would give it a go.
Materials
Cherry milled to 4/4, S3S at the lumberyard would be used as the primary wood, with yellow poplar and Baltic birch plywood employed for the non-visible drawer elements. I chose the S3S (surfaced 3-sides) cherry material so that there would be no surprises with regard to grain pattern or sapwood. The actual 3/4 in. thickness of this material was also perfect for our needs.
Dimensioning
Doors: The vertical, stile, portions of the doors are the most important contributor to structural stability and, as such, I sought to use the straightest grain wood for their construction. I have read that the edges of typical flat sawn boards will often possess grain at a 45 degree angle to the board face. Extracting wood from this area, then, is equivalent to procuring a rift sawn board - a most stable configuration. At the lumberyard I had selected two flat sawn boards of similar color and grain (most likely derived from the same tree) for the door elements and, sure enough, both contained “rift sawn” edge character. The boards were ripped at the table saw to liberate this portion, and the remainder then used to create the rails. The long planks were then chopped into 48 in. halves, flattened at the jointer and then thickness planed to 5/8 in. Finally, they were cut to the dimensions prescribed in the plan.
All of the fourteen door frame parts were then scored down their centers to create a 1/4 in wide groove that would receive the door panels and rail tenons. Deeper mortice sockets were also created at the ends of the stiles to receive longer, haunched tenons from the top and bottom rails. I also wanted to create a deeper mortice to house the middle rail to be sure that the alignment of rails between the two doors would be co-linear, as intended. Were I to simply stack in order: panel; rail; panel; rail; panel; rail; panel during door construction, a slight mis-alignment near the bottom would mean everything would be off on the way up. It was my hope that registering the center rail of both doors would head-off any propagation of error. Anyway, these deeper sockets were easily bored at the mortiser.
The exposed portion of the rails were all the same length, of course, but door construction required either 3/8 or 3/4 in. long tenons on their ends. To ensure uniformity, all of the rails were fashioned at the table saw to be identical, with 3/4 in. tenons, and then the ends of some were trimmed to create shorter parts, as required.


The door panels were made in the same manner as the side boards of the carcass described in episode 1, slip-matched. After scraping and sanding smooth, these constructs were ripped to the desired width and then cross cut into 3 inch tall “mini panels”. During construction, the “minis” would be inserted between the door rails and, in order to maintain the illusion of grain continuity, a small waste strip was cut and discarded before sawing every keeper panel. A fence set at 3 inches on the table saw and a stop block set to 1 inch at the sliding miter saw allowed me to jump between tools to made quick work of the 8 panel parts.
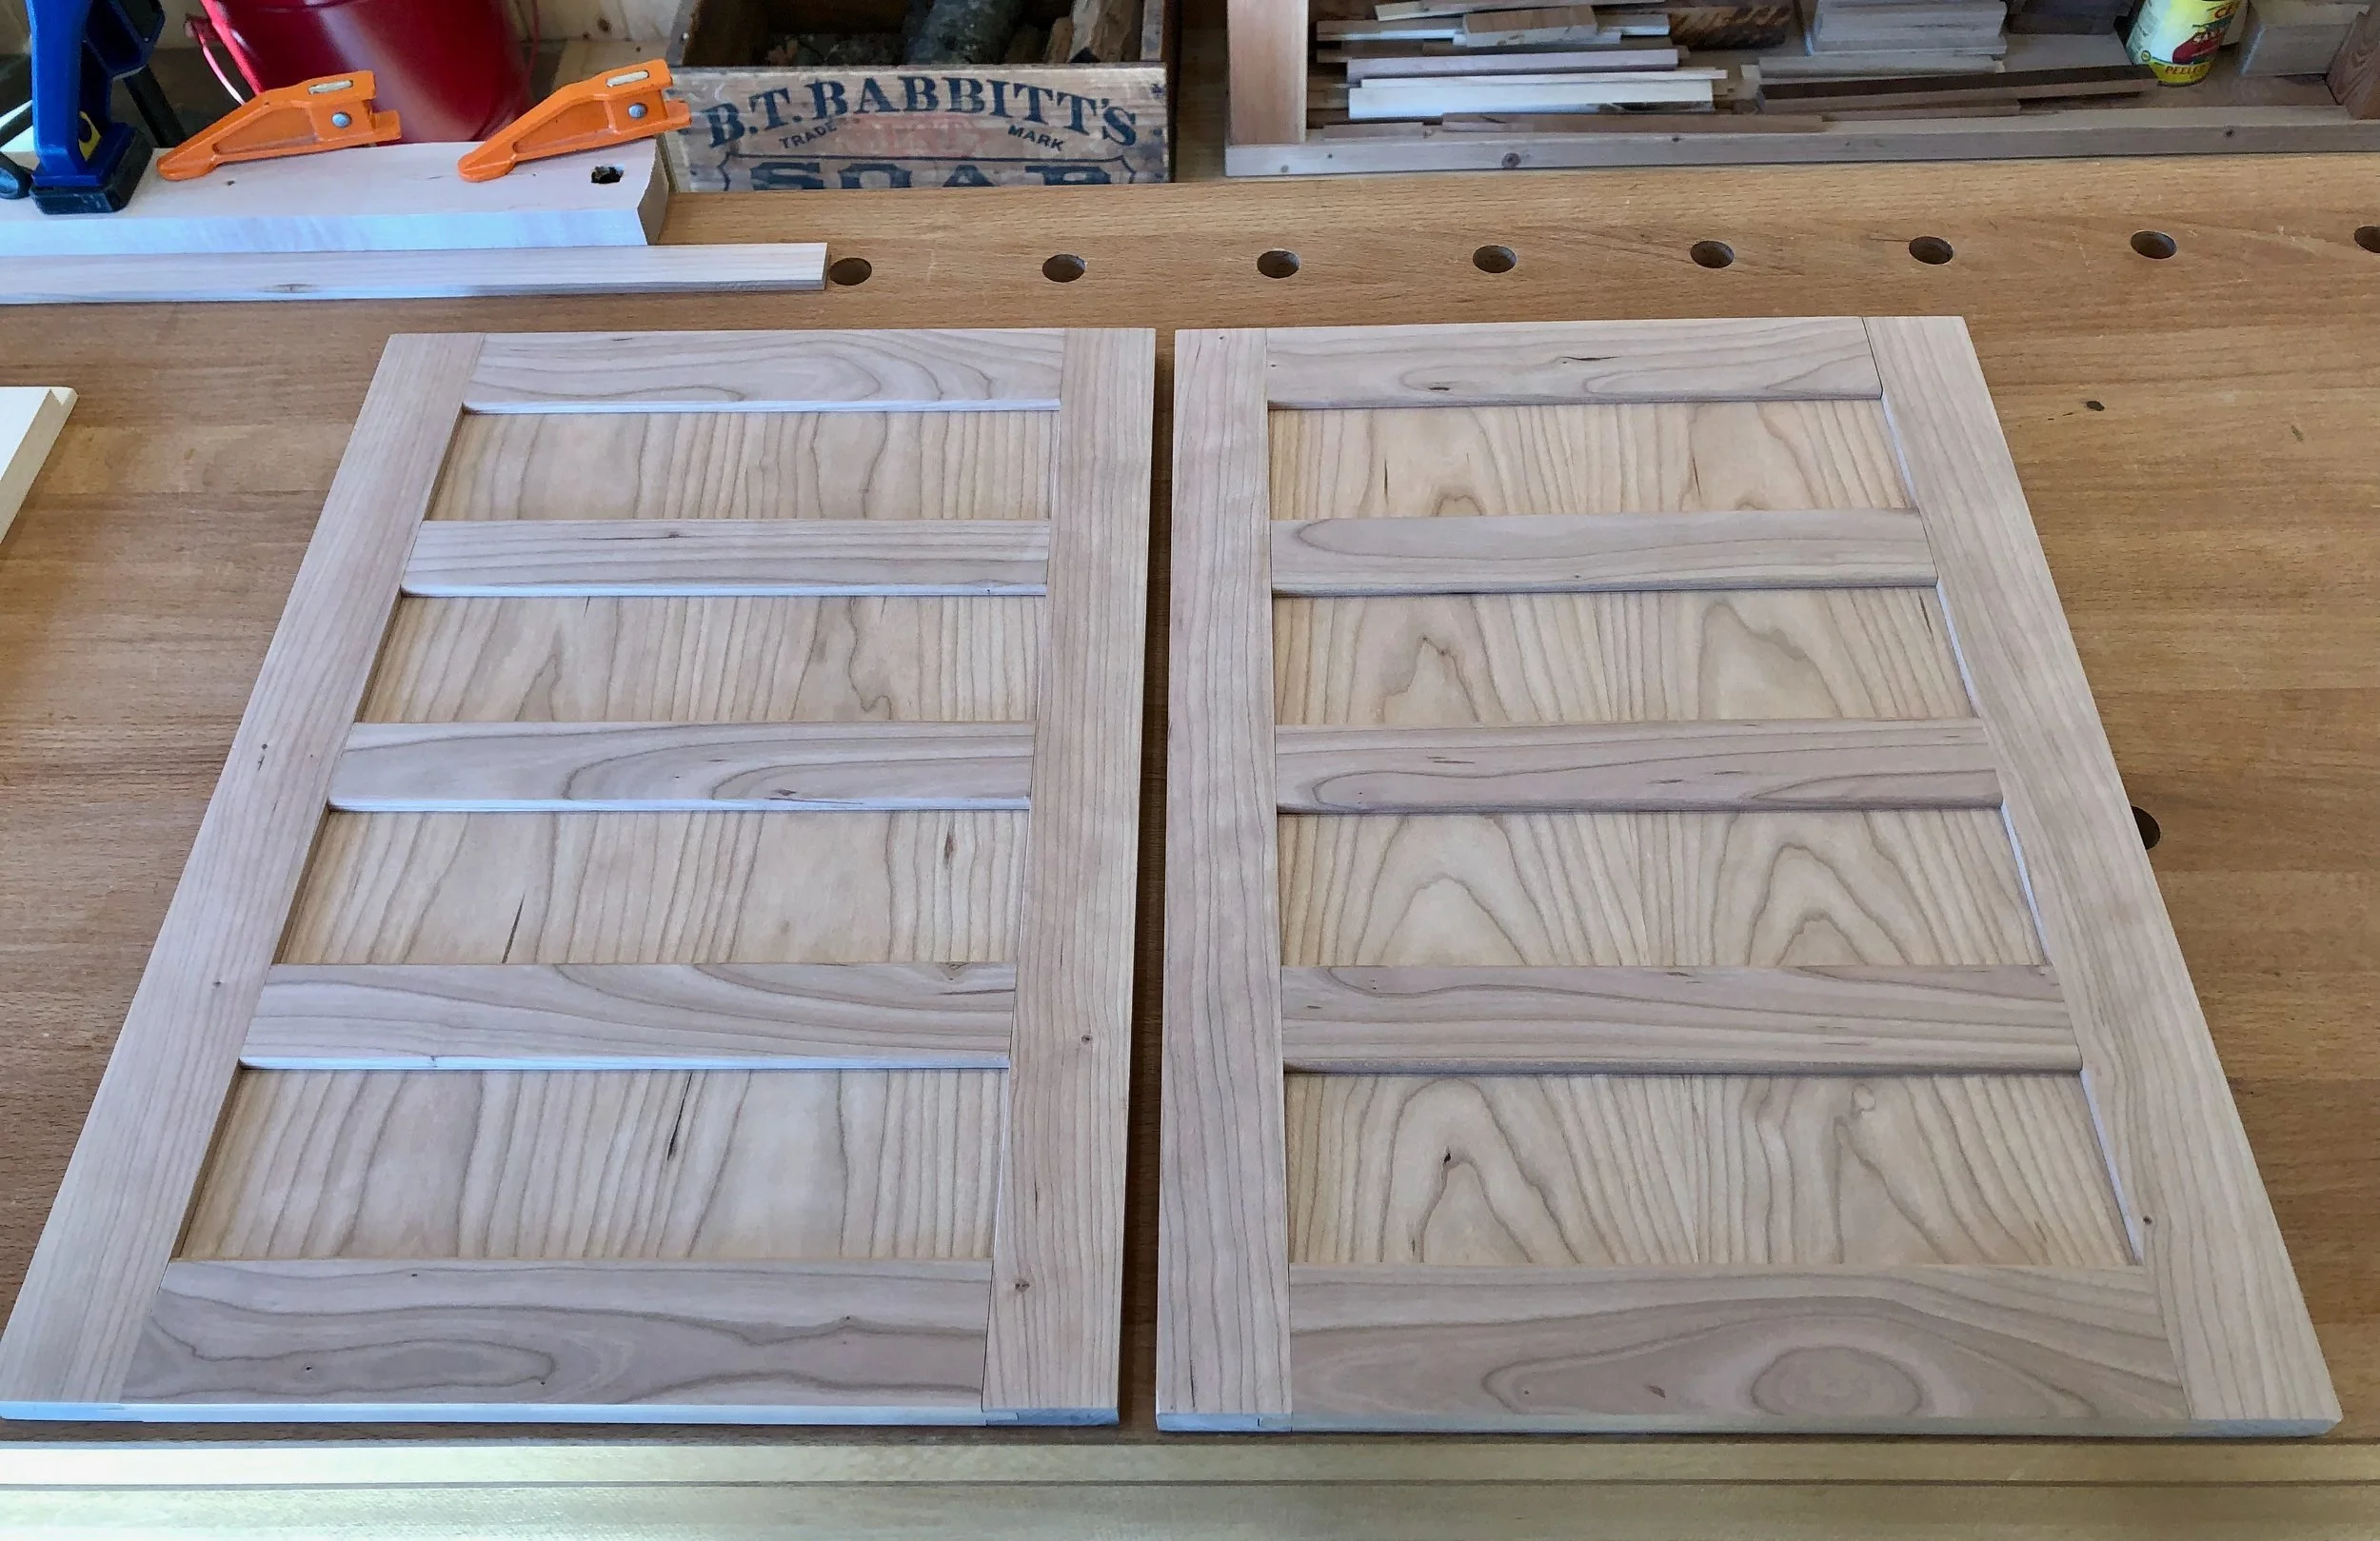
Dry-fitted panel doors
The final door elements to be added were the finger pulls. Thin, metal-lined “troughs” will fill the pull opening and these required a 3/8 inch deep recess into which they could be tapped once the varnish had been applied. The openings were fashioned at the mortiser and then cleaned-up with chisels to make a smooth fit. On to the drawers!
Drawers: During my early years as a synthetic organic chemist I learned the value of “model studies”. Here’s how they go. In the course of conducting the total synthesis of a valued molecule (an often pioneering and lengthy endeavor), whenever a crucial series of chemical reactions were planned they were often first carried out on a simpler, structurally related “model” compound. These valuable detours served to demonstrate the feasibility of an idea, develop technique, and preview any unforeseen “gotchas” that could otherwise derail the main effort. I decided that working out my drawer plan on a “model system” would be prudent in this case, as well. It’s not that drawer construction is a such novel or heroic undertaking, only that it is to me! I will spare the details of the experience here and just list the 10 steps in sequence to give you an idea of how these drawers came together. The trail was blazed with the model and then readily traversed by the three keeper drawers. There are other patterns and joints that could be used to make this element, but following these steps created a nice, solid drawer.
dimension and smooth the cherry drawer face stock (miter saw, table saw, jointer, thickness planer, card scraper)
fit the drawer face to exactly match the dimensions of the opening, leaving a little extra space along the top for seasonal wood expansion, given a wintertime assembly (table saw, hand plane)
dimension the drawer sides and back from yellow poplar stock (see 1.)
cut a half dovetail along the inner sides of the cherry drawer face (router table)
cut a matching half dovetail along the front edge of the drawer sides (router table)
create vertical dados in the drawer sides to house the drawer back (router table)
create horizontal dados near the bottom edge of the drawer front, back and sides to house the drawer bottom (router table)
dimension the drawer bottom from Baltic birch plywood (table saw)
futz around [see below] with the dry-fit drawer and refine the sides and top edges to achieve a comfortably snug fit within the cavity (hand plane, sandpaper)
assemble (clamps, square, ruler, hand drill, cherry dowels, glue).
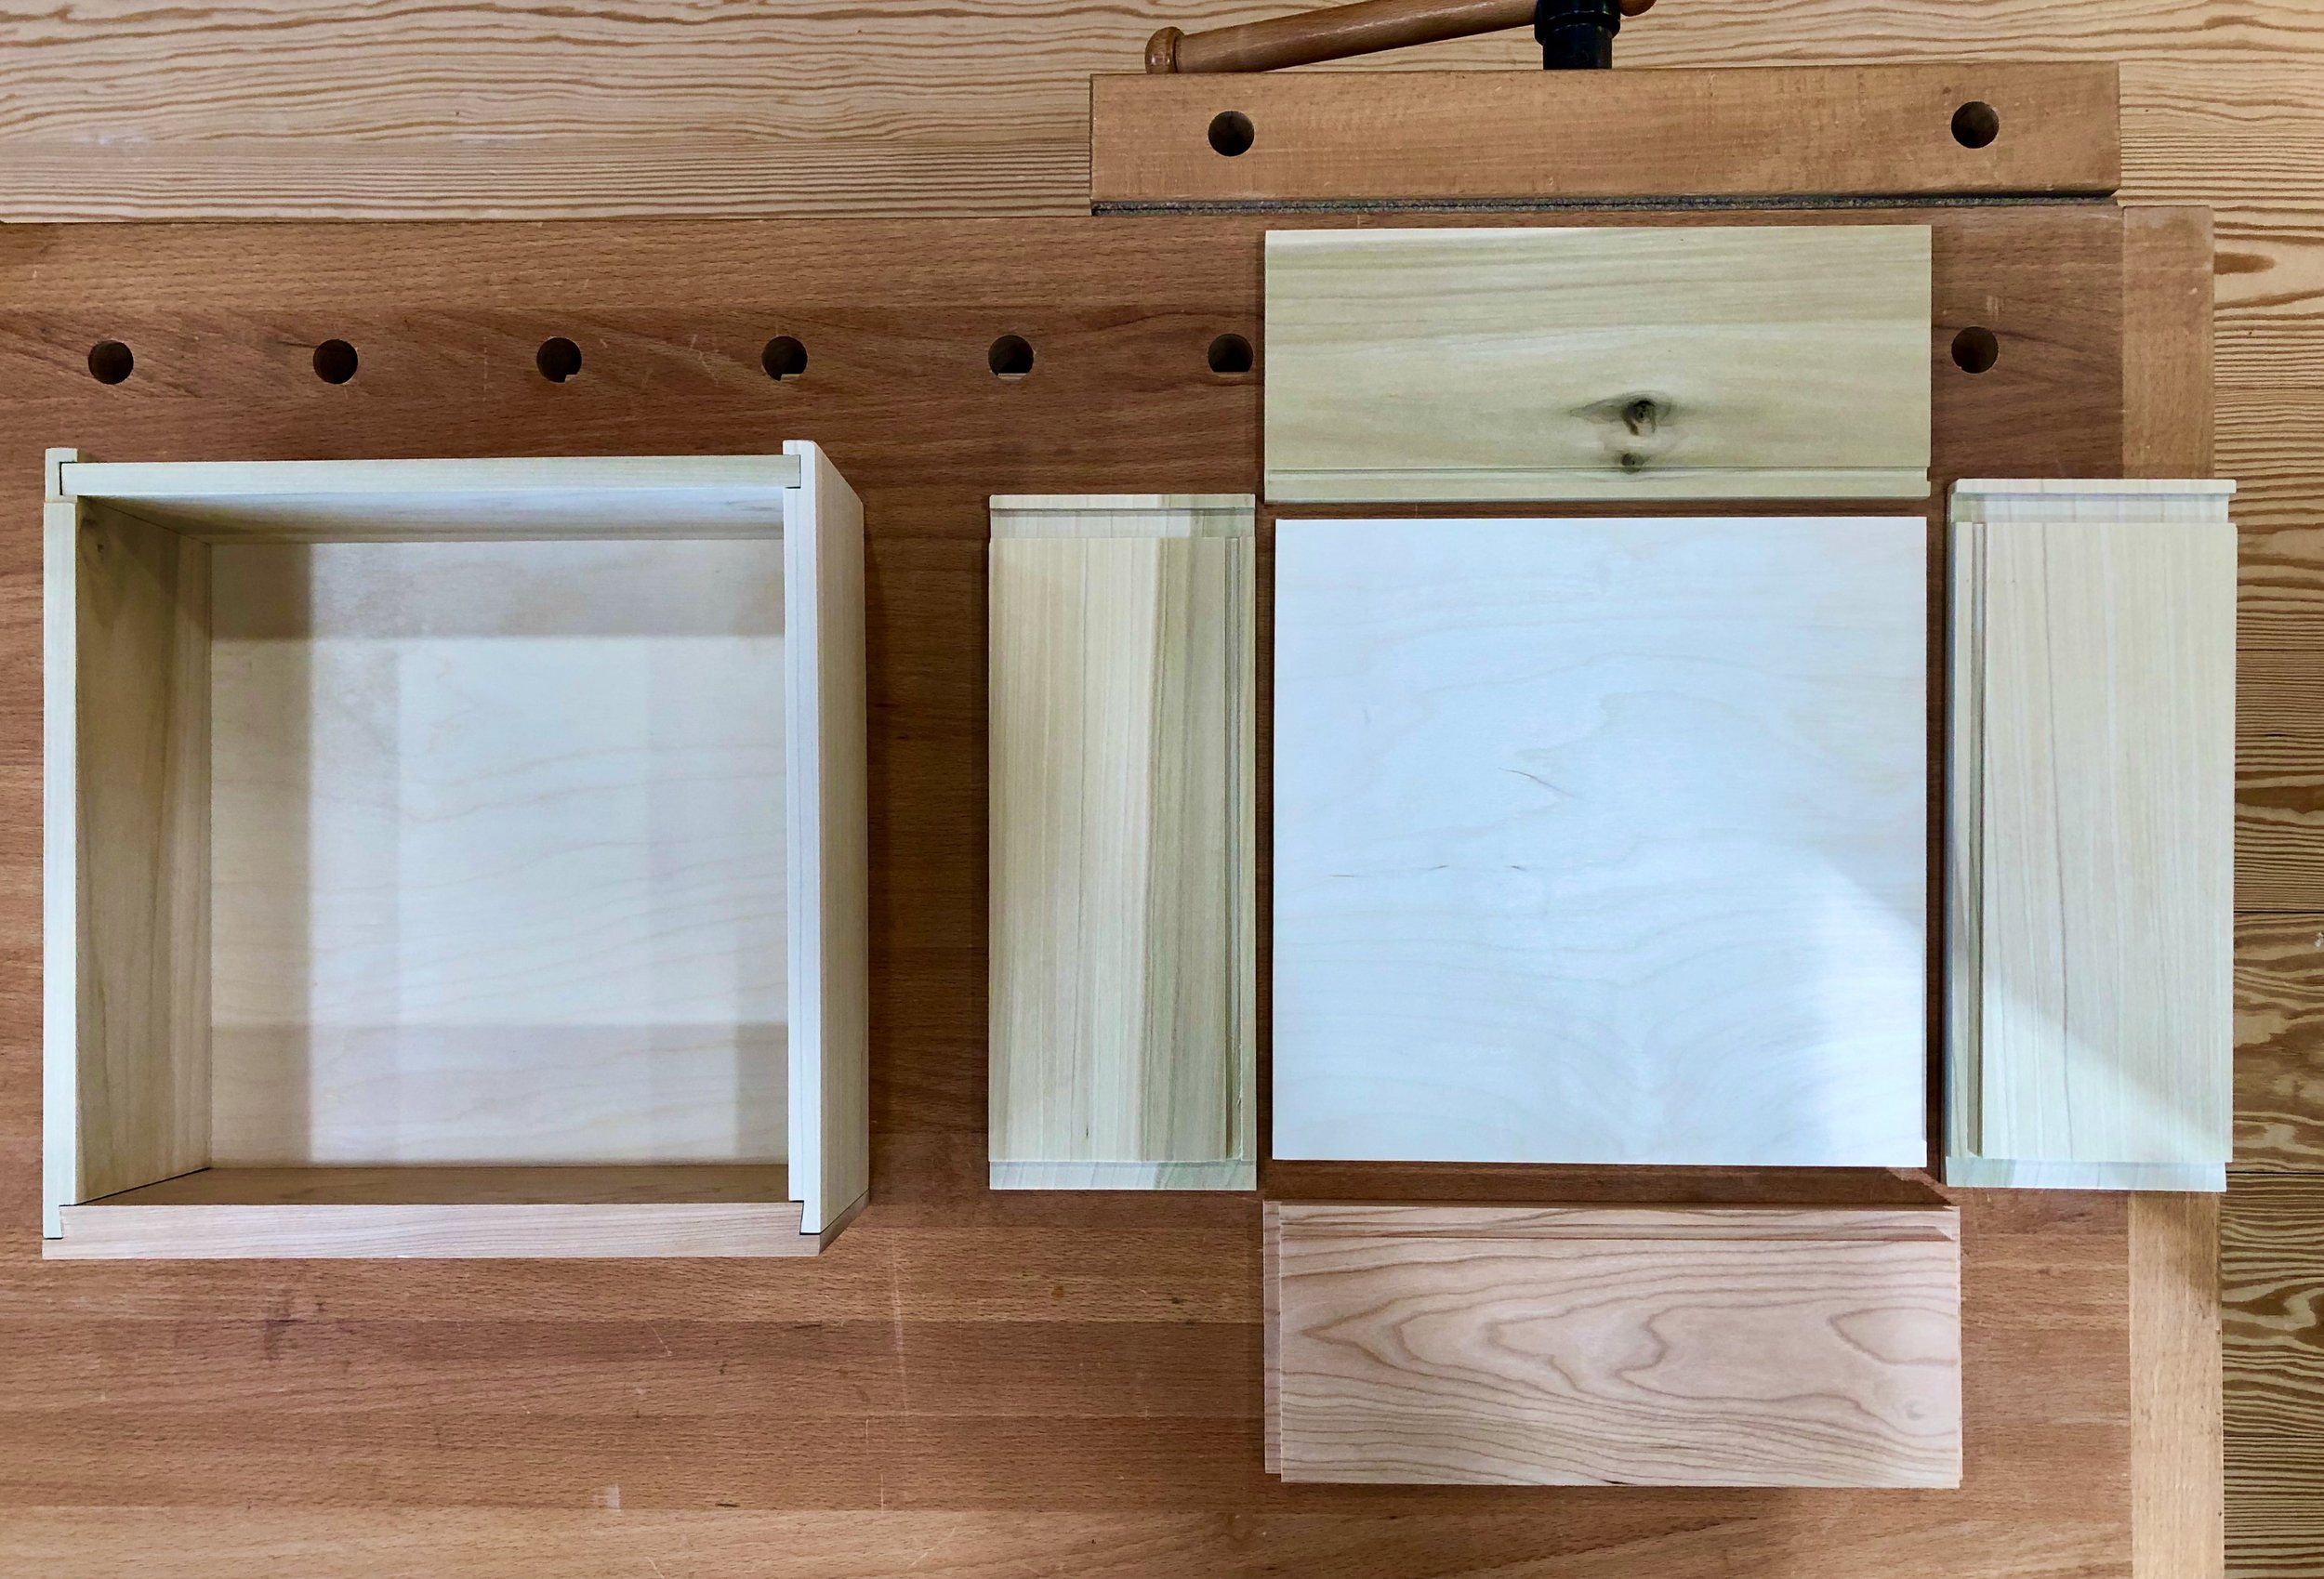
Top drawers prior to glue-up
Assembly & Finish
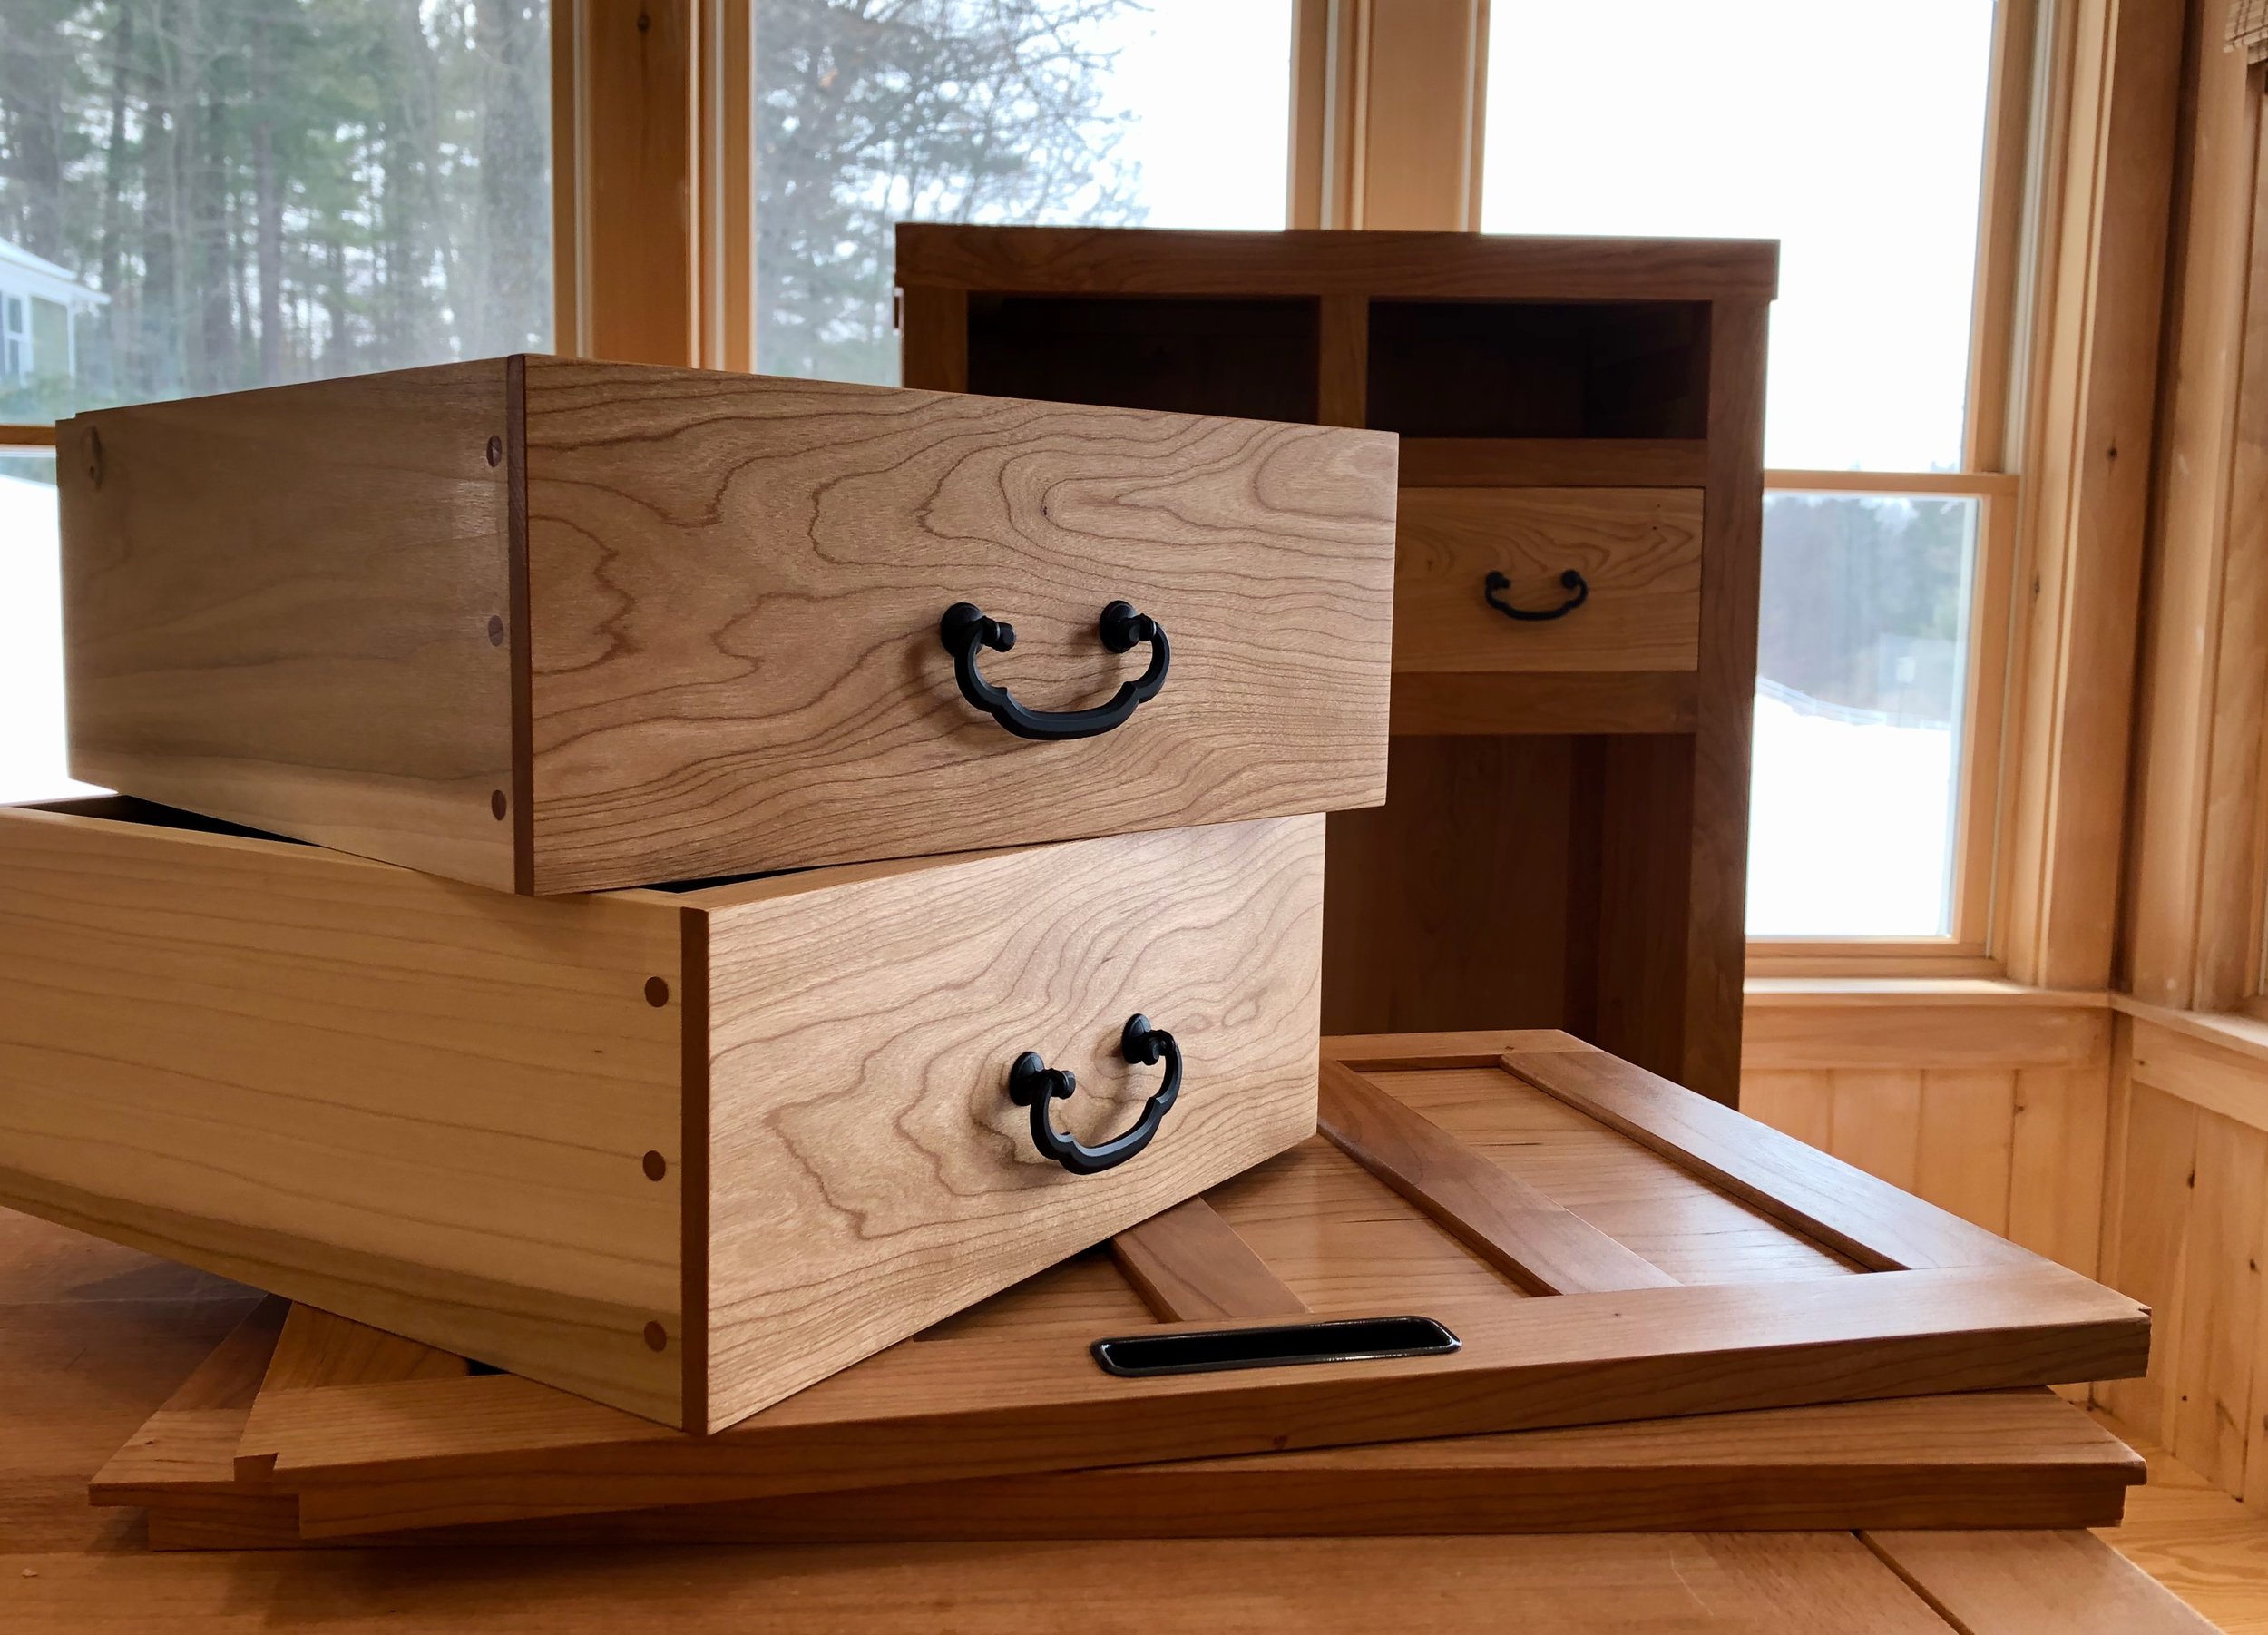
“Futzing”, or “to futz around” is American slang from the 1930s that essentially means “fiddle with”. According to The Random House Dictionary of the English Language (Unabridged) the term was formed by combining two words: the Yiddish “putz” (def., spend time in an aimless manner); and the “F-word”. Webster’s proposes a different but equally unsavory origin. Still, I like the word. My belief is that it was coined by a furniture maker, for it colorfully captures the act of drawer fitting. No complaints! Futzing with drawers (or wooden joints, in general) is a big part of the woodworking allure. I thoroughly enjoyed the hours spent futzing with the ledger chest drawers, even given the added challenge of what I call comparators. You see, this chest includes a pair of “identical” drawers, mounted side-by-side, as well as a larger drawer of similar style positioned directly below, and these provide an ample opportunity to compare gaps, alignments and overall workmanship that is absent in single drawer pieces. This chest was a futzer’s dream!
A good deal of the fitting occurred while getting the drawer front shaved down to size during step 2 and, traditionally, drawers are only futzed with again during a final fitting after glue up. However, since I was completely enclosing the drawer bottom in my design, making for a very stable, glue-free construct, it seemed to make more sense to tweak & establish a proper fit prior to committing the glue. When the dry-fit drawers were offered to the cabinet they slotted themselves almost halfway before binding along the sides. That’s good. Additional planing, sanding, futzing (repeat), eventually tucked the drawers into place. These were then disassembled and put together again with glue and dowels. A bit of extra sanding and some touch-ups with the hand plane and the drawers were “done”. Not perfect, but close enough on a first attempt to feel satisfied with the product.

Drawers in place
It was now time to assemble and fit the sliding doors. Since these contained floating panels I opted for the pre-finishing maneuver used for the cabinet sides (see, ep 1). Two coats of gel polyurethane were applied to all of the parts which were then clamped square and glued for assembly. During my study of doors & drawers I came across a handy product for assuring that floating panels remain tight in their chambers. “Panalign strips” are tiny, 1/4 x 1/4 in. synthetic rubber bars that are squeezed into the grooves along each stile during assembly to occupy the small void where an expanding panel will creep during humid weather. The rubber is intended to compress and expand during seasonal wood movement to ensure that the panels stay centered and are never free to rattle about. Neat!
Once the doors were assembled the top and bottom tongues were created as a result of rabbets cut at the table saw. After a bit of futzing the doors slotted nicely within their tracks. Additional polyurethane was applied to the newly exposed wood and a third coat added to the rest. Tapping the metal finger pull hardware into place completed the sliding doors.

Sliding doors in their tracks
No more wooden parts to assemble; just apply finish to the surfaces and make it look good. The carcass, which had endured a couple weeks of heavy futzing, was lightly sanded to remove the new nicks & scrapes. Three coats of gel poly were then applied to the cabinet and drawers and, after a thorough buffing, this was followed by the application of paste wax onto all surfaces where the cabinet contacts the doors & drawers. Everything now slides smooth as silk. Finally, drawer hardware was installed to complete development of this new take on the venerable choba-dansu; a nice, sturdy chest for storing your ledgers (or games).

