

The Ledger Chest, ep 1

OK, it’s not exactly a traditional Japanese ledger chest (choba-dansu) but that is the closest recognizable form and the inspiration for my most recent Project. Here’s the story.
Recently, I was asked to build a stand/cabinet-type piece - something that could be used for both storage and display. The dimension requirements of this piece, while fairly specific, fit within the range of many authentic cabinet examples and so the design decision came down to style. Well, I immediately went to my “go to” list of East Asian and Craftsman chest archetypes that I am anxious to explore when opportunities allow, presented several options to the customer, and for this Project the Japanese ledger chest got the nod.
Design
The history of Japanese chests (tansu) is a fascinating subject to explore. These mobile, utilitarian pieces have been made for over 300 years in all sizes & forms and for a myriad of storage functions. As a recognized (named) object they were most prominent during the late Edo through Meji periods (1688-1912) but their evolution can be traced back centuries before that. Tansu are categorized into a dozen or so canonical forms (e.g., clothing, merchant, staircase, etc) and within these forms the styles vary further depending on both the region and era of construction. Except for beautiful patterns occasionally worked into the metal hardware, these practical chests were constructed without ornamentation. Their character comes from the design proportions, wooden materials and craftsmanship exhibited by the box makers/joiners of the day. Much like the Shaker and Craftsman furniture of North America, less becomes so much more once these honest attributes are appreciated during everyday use. If you’d like to learn more about this furniture I encourage you to read Tansu: Traditional Japanese Cabinetry, a masterful book by Ty and Kiyoko Heineken.
One particular tansu form, the so-called ledger chest (choba-dansu, literally: account chest), is notable for its heavy materials, sturdy construction and strikingly barred design. While configurations varied, these chests generally possessed several drawers and a doored compartment used by businesspersons for storing necessary items such as: an abacus; writing implements; signature seals (hanko); and, primarily, documents. They often contained a locking compartment used as a safe for storing valuable records and cash. After all, in the days before briefcases and banks what was one to use for conducting business? Answer: furniture. Over time these pieces grew more lavish in their use of fine woods and hardware - the better to impress customers. My attraction to this style is the heavy framed construction and the combination of doors and drawers. There is a lot packed into one of these pieces, most of which is new to me as a furniture maker.

* Koizumi K. Traditional Japanese Furniture, A Definitive Guide, Kodansha International: Tokyo, 1986.
The design of this Project was adapted from a 170-year old example found in another book on Japanese furniture.* This piece is a bit too large to fit the customer’s needs as a reproduction, but reproducing antiques is not the goal. Our choba-dansu inspired chest will result from slicing-off the right-hand third of the piece and tweaking proportions of the remaining elements. Altering the drawer configuration and changing the door hardware would complete the re-design. With this Project we hope to capture the essence of stately tansu in furniture crafted to fit today’s needs.


Materials
Back to cherry with delight! Kiln dried black cherry lumber (Prunus serotina) is an excellent material for furniture construction and my favorite wood to work. It’s not too hard, not too stringy, not too … anything. And beautiful when finished. Following Projects made from pine, white oak, walnut, plywood, cedar, red wood, cypress, maple and African mahogany it felt especially good to be picking through the cherry lumber bins again for this one. Boards of 8/4, 5/4 and 4/4 dimensions (some rough, some dressed) would be used to make the ledger chest.

Cherry boards marked for cutting.
A defining element of tansu is the hardware used for opening doors and drawers, for bracing the edge and corner joints, and for carrying these mobile chests. The example on which this chest is based (piece #21, above) did not use any bracing hardware, but featured square (kakute) pulls for the drawers, locks on all of the cavities, and robust handles along the sides which enabled a heavily laden chest to be carried on the shoulders of two individuals by means of a pole threaded in between. This all combines for a distinctive look, but our chest would need to look different. Square-shaped tansu pulls and drawer/door locks of the type used in nineteenth century Japan are not easily sourced today in the US (if anywhere) and the pole handles would make this hallway cabinet look “over built”. Instead, I opted for iron tansu handles of the so-called melon (mokko) motif shown on piece #22, above. These drawer pulls and side handles, along with finger holds for the sliding doors, were procured from the Hida Tool & Hardware Co., a fine source for Japanese wares located in Berkeley, CA.

Tansu hardware
Dimensioning
Projects like this one begin with the frame, which is good as I still needed to study more about doors and drawers (see: episode 2). To begin, the sides, top and bottom members were all worked to a 2 in. x 1 3/4 in. dimension and then cut to length. These thick components lend strength to both carcass and personality. Mortice and tenon joints along with screws will be used to attach them together. While not always applying authentic methods (screws?), I use techniques commensurate with my skill level that will still produce a solid and attractive furniture item. These techniques should change over time as abilities improve, but I don’t consider using sound joinery options unavailable to the original craftsman to be wholly inappropriate.
Things proceeded smoothly in the machine room, ripping, jointing, thickness planing and then cross-cutting the parts in sequence. The top surface and upper sides were fashioned by edge joining narrower boards, all the while attending to grain pattern and flow. The lower sides, and eventually the doors, would be made by inserting a thin panel into a multi-railed frame. I’m not confident in the authentic method of construction here, and have yet to locate a definitive book on tansu construction (all sources found to date obsess on joint types), but I think I have a plan that will work. Instead of floating the panels between the rails, I believe the Japanese created a heavily slatted frame and then applied a thin wooden panel, sometimes referred to as a “mirror board”, to the backside. In addition, I would have these panels slot within the frame members, adding to carcass stability, although this may not be historically proper. This all required a set of ten rails plus two panels. The rails were fashioned in bulk by cross-cutting several boards to 10 1/2 in. and then creating 3/8 in. deep rabets along each end using a dado blade at the table saw. Finally, these were ripped to create 1 1/2 in. wide rails. The top and bottom rails needed some additional work but these details are tedious to describe and would likely be unbearable to read.
Proceeding to the panels, I needed to first prepare the surfaces of a 4/4 board and then re-saw at the bandsaw to effectively slice the board in two. Each half was further surfaced to 1/4 in. in depth, edge joined with each other to form wider panels, and then cut to the final width and height dimensions. In joining these panel boards I decided to “slip-match” rather than “book-match” the grain. Although it does not produce the true butterfly image of book-matching, slip-matching gives a very similar, mirrored look and, importantly, it keeps the grain flow consistent across the entire width of the panel. Since slip-matching is performed by sliding one freshly sawn board half out from beneath the other, the grain in both pieces remains oriented in the same direction. Book-matching serves to flip the grain flow between the “pages” (think about it) and this can cause noticeable differences in coloration due to chatoyance. At times, this difference is not noticeable or perhaps even desirable, but in this case I felt it would be distracting.

Slip-matched cherry panels
The four vertical frame “posts” were then prepared to receive these elements. This meant creating a 1/4 in. groove down the entire length for the panels and upper sides, which was done with a straight bit at the router table. The lower sections of these grooved posts were marked in alternating 1 1/2 and 2 inch increments and then 5/16 in. wide morticed sockets were formed across the 1 1/2 in. segments to receive the rails. A slight variation in these intervals was introduced near the top, in part to create visual interest, but also to make the math easier. Finally, additional grooves and mortices were created to house the back panel and rails.

Morticed frame, rails and panels
The upper sides, back rails, back boards and floor board would also need to be cut to size and rabetted/dadoed prior to assembly. All easily done, but the number of parts was rapidly mounting and there was still that matter of drawer construction to be solved. The drawers themselves would be made later. All that was required at this point of frame construction were proper openings and a means for drawer support that would further promote controlled movement. There are several strategies for drawer frame construction that satisfy the above. Modern drawers often use metal glides and, while their ease of assembly is compelling, I wanted to use a more traditional approach for this piece; one that employs only wooden surfaces. I would use a full platform to support the bottom drawer as this would also serve to cleanly house the doored compartment below. For the top drawers I opted for a version of the web frame construction strategy that required only wooden slats about the perimeter.
First, additional mortices in the face frame were required to permit assembly of these parts. These were bored along the two front posts with the mortiser and cleaned-out further with chisels. The corresponding tenons on the crossing pieces could then be cut at the table saw. Shaving carefully upwards with successive cuts/adjustments of the dado blade stack, a firm fit was eventually achieved on the test piece allowing tenons on the actual members to be cut with confidence. Time for a dry fit of the 33 carcass elements prepared thus far. It was gratifying to find that everything went together as intended Dry assembly at this stage also provided an opportunity to mark the areas for further modification that will receive the horizontal surfaces, drawer frame elements and door tracks. Making progress.

Carcass frame assembled, unglued
The bottom members were removed and a groove was dadoed at the router table to receive the 3/4 in. plywood floor. Similar operations were then conducted on the upper members that surround the cherry top surface, prepared earlier. After working the surface smooth with a card scraper the perimeter of the cherry top was rabetted at the table saw to create a 1/2 inch lip that would slip into the newly created dado grooves. Both frames would eventually be locked together by the use of pocket screws to the underside of the joints. Not exactly like the 170 yr-old exemplar, but a nice & clean look all the same.

Top and Bottom
By now, all of the frame members have been modified to an extent that they have become precious, and all further manipulations are conducted with utmost care to avoid catastrophe. These remaining modifications are necessary to accommodate the doors and drawers. The eventual sliding door panels will possess tongued rails that ride within grooves cut along the bottom and middle frame members. All that’s needed for now are the grooves. In the absence of the actual doors, there was nothing to dictate groove width and placement, the only requirement is for the upper groove to be twice as deep as the lower groove to enable door insertion. It was decided to rout two 1/4 in. wide grooves into the frame members spaced suitably apart to leave a 1/16 in. gap in between the door panels. This then fixes the panels to be 5/8 of an inch in thickness (jot that number down). The resultant 3/16 in. setback from the front of the chest nicely matches similar features about the frame. Construction-wise, these grooves are called “stopped dadoes” and, as such, they required precisely placed sockets to define the termini. The sockets were created at the mortiser and then the intervening dadoes cut at the router table. A final, shallow groove down the two front frame members was routed to receive the leading edge of the sliding door panels. A couple mock door pieces were made from pine to confirm viability of the whole design. Time for a second dry fit.
Dry fitted chest with top, bottom and mock doors in place
There are a few wooden elements required for operation of the drawers that could be measured and cut now to assure that they all fit properly when the time comes, even though only one, a central guide for the top drawers, would need to be installed during the glue-up. These small drawer elements are known in the trade as runners, doublers and kickers, and since none of them would ever be visible, they could be made from yellow poplar, an inexpensive hardwood often employed for behind-the-scene duty. The central guide is used to limit the sideways movement of the two top drawers and is attached to the front frame by a mortice/tenon joint into the short vertical member. It was easily fashioned in the machine room and then test fit prior to complete disassembly.
Assembly & Finish
All of the parts would require some manner of smoothing with the card scraper and sandpaper prior to re-assembly. The edges of many pieces were also rounded at the router table or otherwise “broken” by hand using 220 grit sandpaper. For the table top and sides it was decided to begin the finishing process prior to glue-up so as to accommodate any subsequent shrinkage of these elements that would then expose bare wood. Satin-sheened gel polyurethane was used, with care taken not to coat those portions about to receive glue. The bottom and top platforms could then be constructed. First, the bottom plywood panel was surrounded by its cherry frame pieces (upside down) and after careful squaring-up of all the intersections the whole was secured with four pocket screws. This then served as a template for construction of the top. Cherry frame pieces were clapped around the finished table top (upside down), stacked precisely atop the completed bottom portion and then clamped to prohibit movement as the four pocket screws were driven-in to complete the assembly.

Pre-finished table top mounted within the unfinished frame and clamped atop the bottom section during assembly, assuring perfect alignment of top/bottom mortice sockets and a squarely built carcass
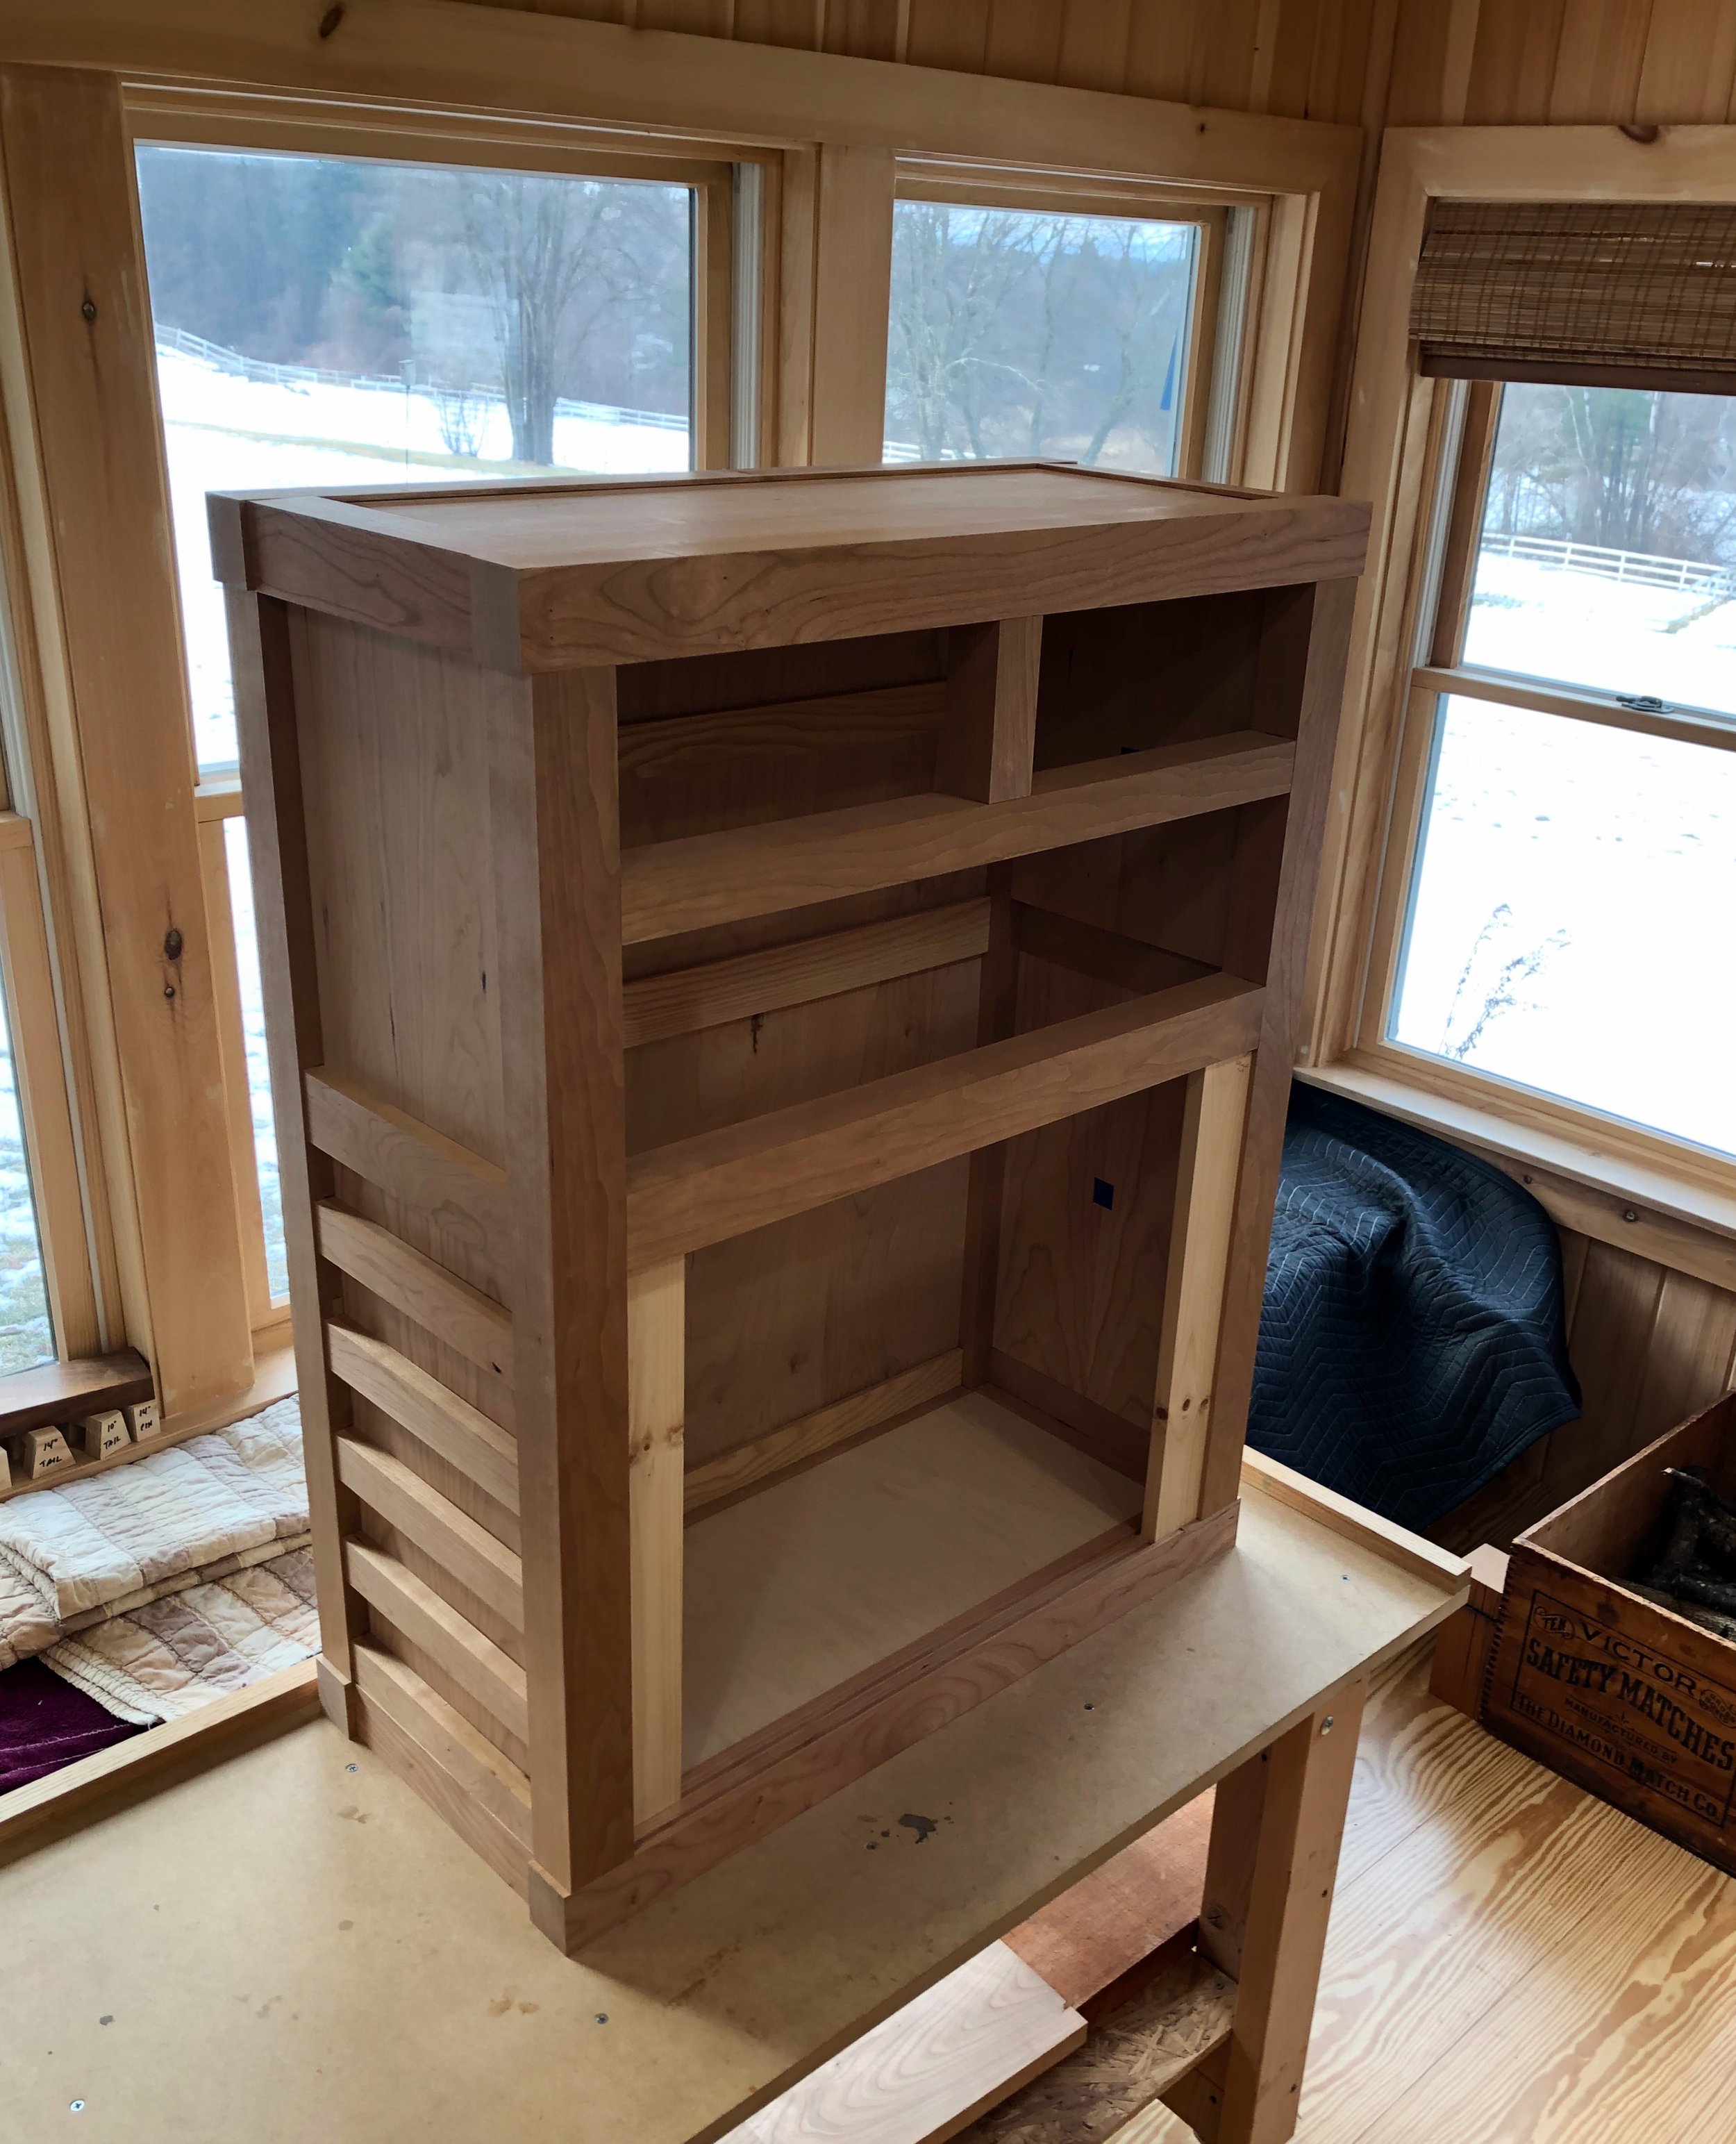
At last, the glue-up. The fully-formed top and bottom sections meant that this operation would involve heavy parts with many simultaneous tenon insertions, making the assistance of my wife, Joung’s, careful touch crucial for success. So far, so good …
Stay tuned for the Ledger Chest conclusion in episode 2.

Halfway home!